# Writing Yarn in VS Code

Now that you've got Visual Studio Code and Yarn Spinner for Visual Studio Code installed, it's time to learn how to use it to write Yarn Spinner Scripts.

## Writing Yarn Spinner Scripts with VS Code

Yarn Spinner for Visual Studio Code is designed to work with a **folder**, not single files.

You should always work on a project-by-project basis with folders containing your `.yarn` file or files in it, even if your narrative only has one `.yarn` file, put it in a folder of its own.

{% hint style="warning" %}
If you're working on Yarn Spinner Scripts that are part of a game—for example a Unity game—you're likely to have a folder for your narrative/dialogue within the project structure.

If you're using VS Code as your C# editing environment with Unity, you can reach your Yarn Spinner scripts by choosing the Assets menu -> Open C# Project from within Unity, and then navigating to the appropriate folder within VS Code to work with your Yarn Spinner Scripts.

If you're not using VS Code as your C# editing environment with Unity, you can still open the Narrative folder with VS Code to work with your Yarn Spinner Scripts.
{% endhint %}

### Opening a folder

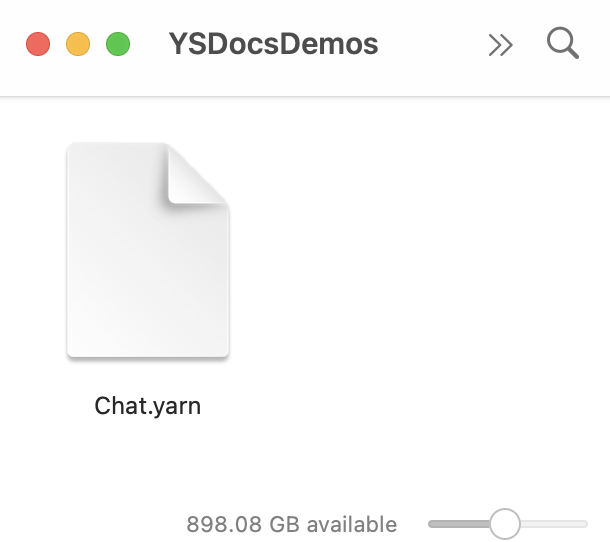
For this example, we'll assume you have a folder that you want to use to work on your story. The folder in our example is called `YSDocsDemo` . Inside this folder, we've made a single Yarn Spinner Script named `Chat.yarn`.

{% hint style="warning" %}
You can also open an empty folder, and make the Yarn Spinner Scripts within VS Code.
{% endhint %}

<figure><img src="/files/HCAZBD104aXyIHXbbe2j" alt="" width="305"><figcaption><p>A folder on disk containing a Yarn file.</p></figcaption></figure>

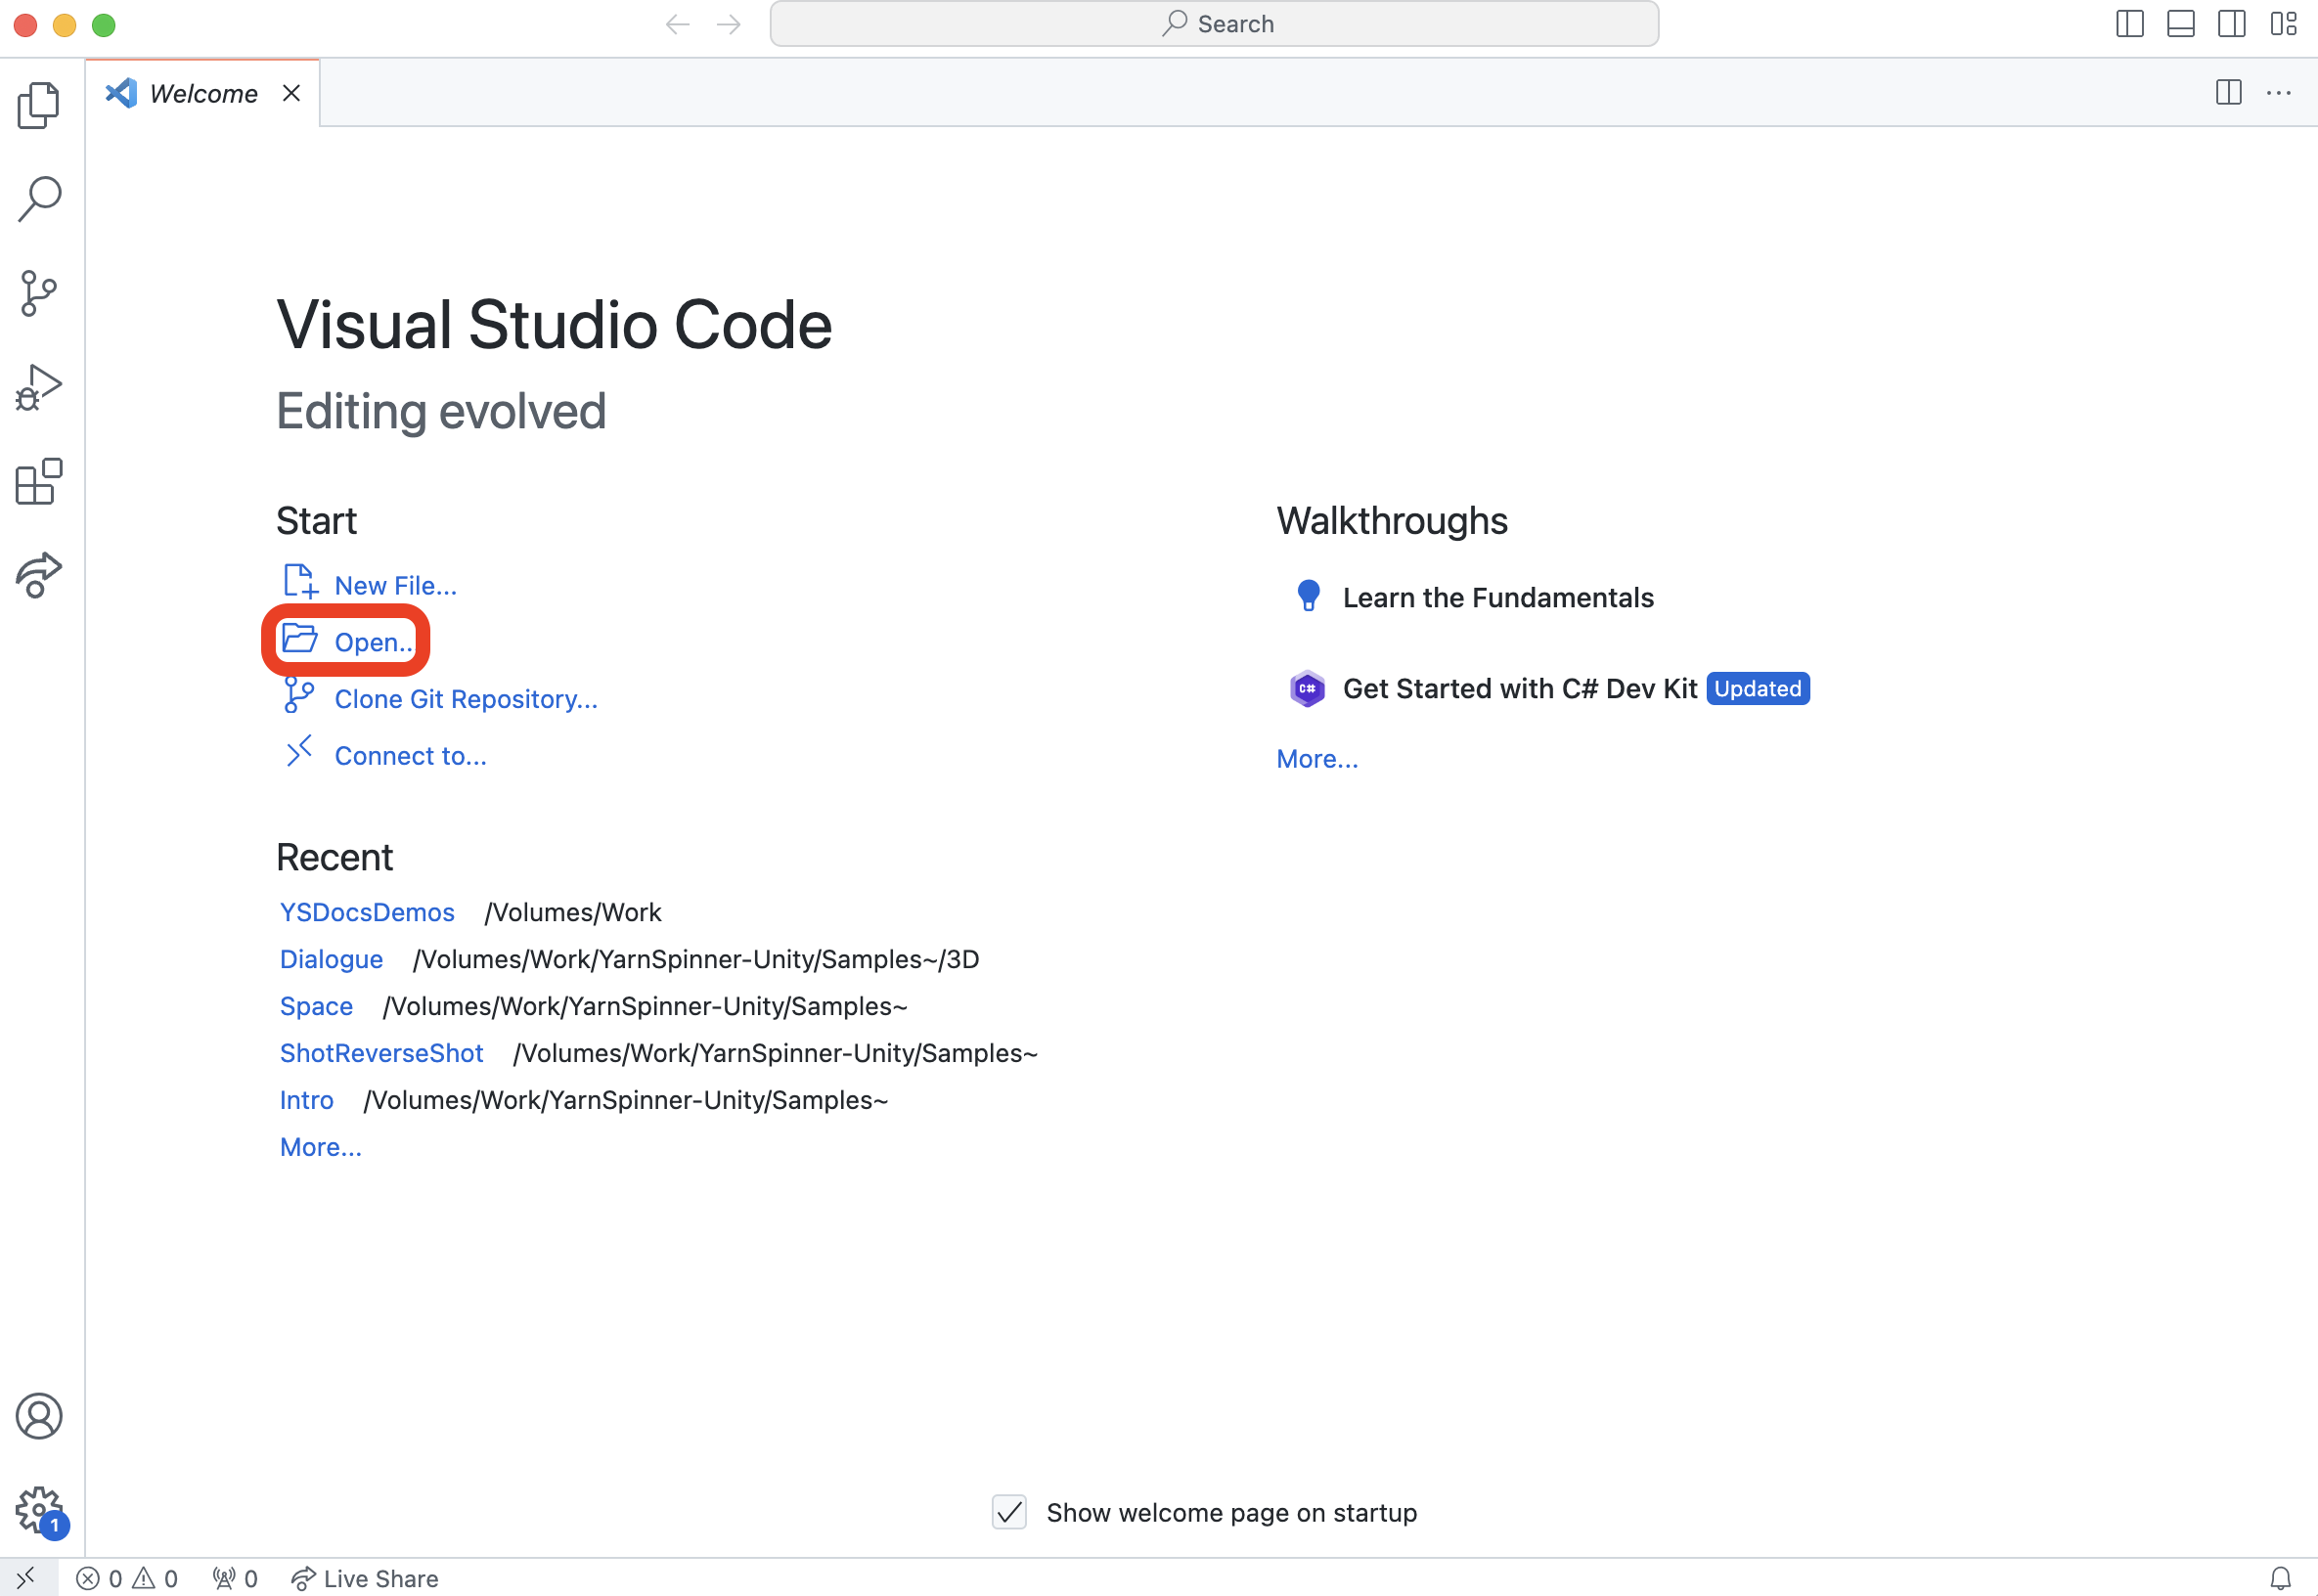
If we open VS Code, the default screen will have an Open button right in the middle.

<figure><img src="/files/LEqsjbMPMeaMdQw40jSh" alt=""><figcaption><p>The Open button on the Visual Studio Code start screen.</p></figcaption></figure>

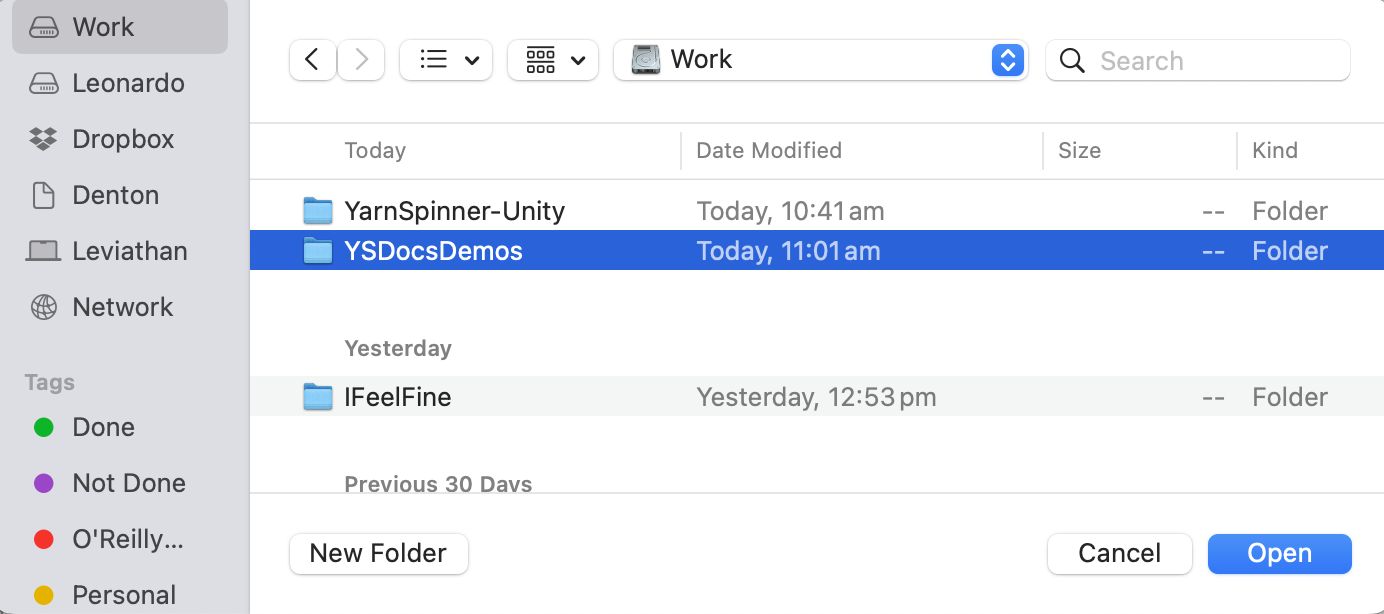
Click this button, or choose the File menu -> Open Folder..., and then open the folder containing your `.yarn` file:

<figure><img src="/files/8P6UI5HdlokQ51KnG94t" alt="" width="563"><figcaption><p>Opening a folder containing <code>.yarn</code> files.</p></figcaption></figure>

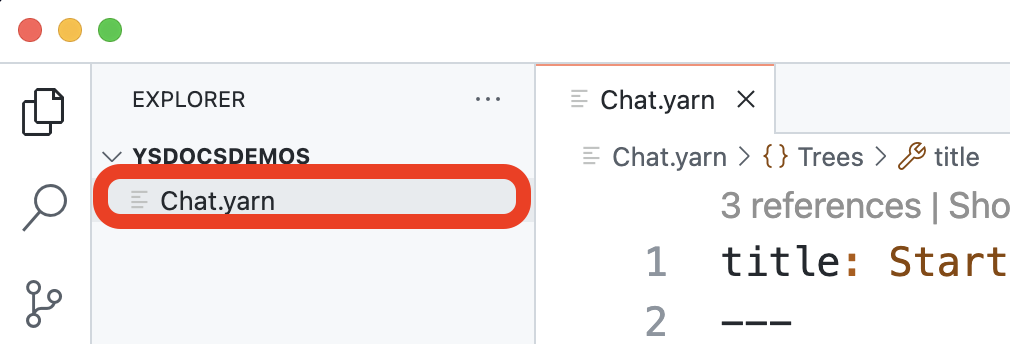
When the folder opens, you'll see the sidebar of VS Code change to reflect the contents of the folder. You can click on a `.yarn` file to open it in the text editor:

<figure><img src="/files/NayNTmRiXb5zAqWQs8Fl" alt="" width="563"><figcaption><p>Choosing a <code>.yarn</code> file to edit.</p></figcaption></figure>

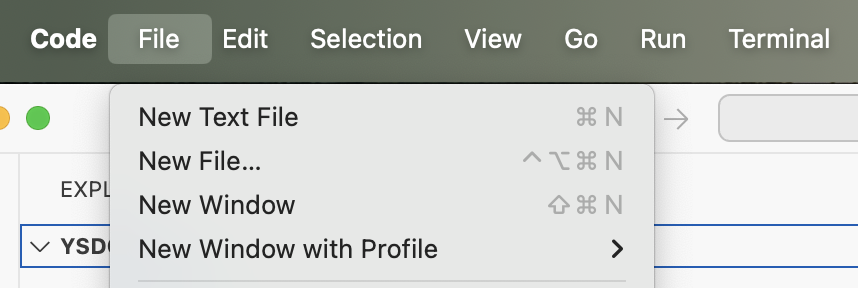
You can also use the File menu to make a new file inside the folder:

<figure><img src="/files/TW4pMYyFy69gJhyqfYnj" alt=""><figcaption><p>Choose New File... from the File menu.</p></figcaption></figure>

VS Code will then ask you to name your new file:

<figure><img src="/files/bQ7zS5fQiWrgP0fvSsNc" alt=""><figcaption><p>Name a file with a <code>.yarn</code> extension.</p></figcaption></figure>

## Working with Yarn in Visual Studio Code

With a `.yarn` file open in VS Code, you can verify that the Yarn Spinner for Visual Studio Code Extension is active by looking in the bottom right-hand corner of the screen, and locating the words "Yarn Spinner":

<figure><img src="/files/U9ddCFZs21Owbwr7cccg" alt=""><figcaption><p>The status bar of VS Code showing that the Yarn Spinner extension is active.</p></figcaption></figure>

{% hint style="info" %}
The bottom right-hand corner of Visual Studio Code window will only show "Yarn Spinner" if both the Yarn Spinner for Visual Studio Code extension is installed, and the currently active file is recognised as a `.yarn` file by its extension.
{% endhint %}

You can use the text editing view to work with `.yarn`, and to write your narratives. The Yarn Spinner for Visual Studio Code extension provides all sorts of features to make this process easier.

{% hint style="info" %}
This section of the documentation will talk about Yarn Spinner Script features, like `<<jump>>`, and others, that you won't have encountered yet. Review it, and then as you work through [Scripting Fundamentals](/3.1/write-yarn-scripts/scripting-fundamentals.md) and [Advanced Scripting](/3.1/write-yarn-scripts/advanced-scripting.md), revisit this page and see how the features you've learned about work with the Yarn Spinner Editor.
{% endhint %}

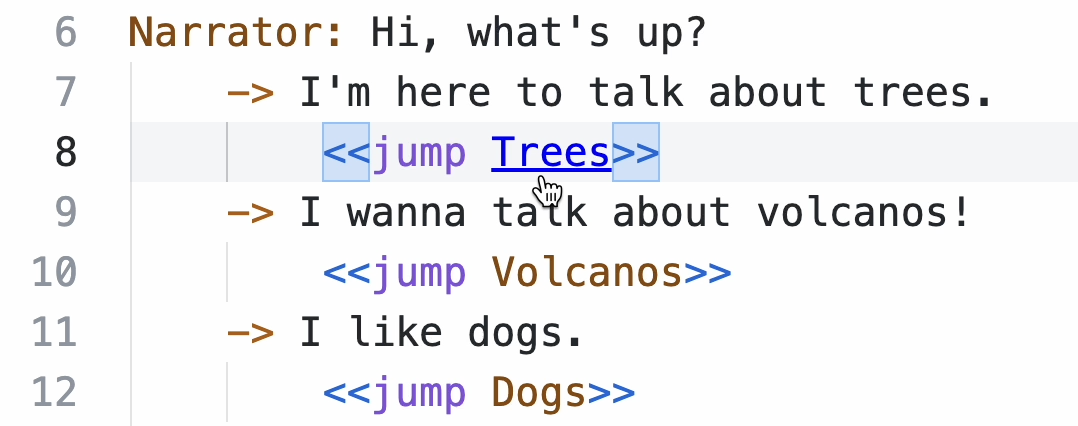
For example, if you hold the Command key (on macOS) or the Control key (on Windows or Linux) and hover over names of nodes in, for example, \``<<jump>>` statements, you'll be able click on them to move the editor view to the Yarn that represents that node:

<figure><img src="/files/uFld0vM31y46mWiWsLsH" alt=""><figcaption><p>Command/Control allows you to click a node name to jump to its definition.</p></figcaption></figure>

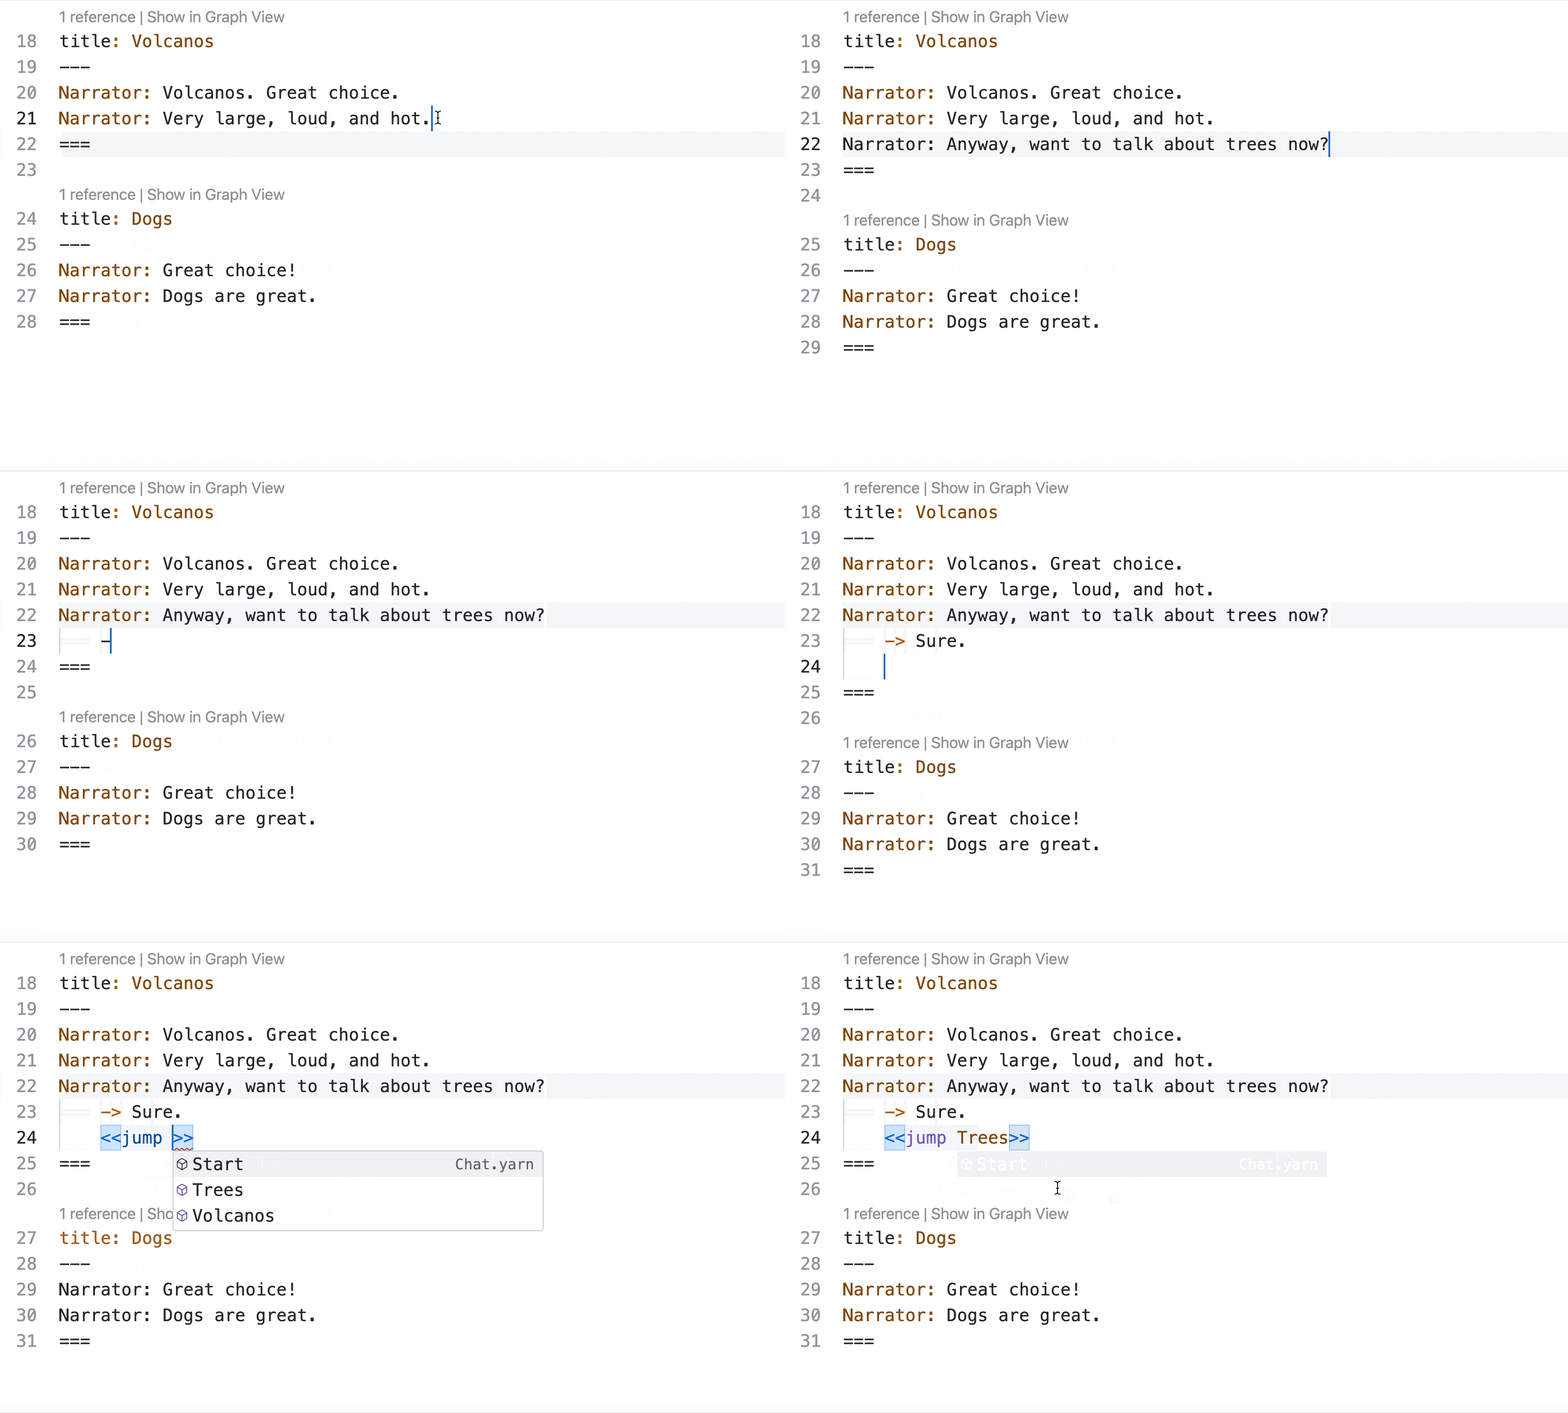
You'll also be offered autocomplete suggestions based on node names that exist in your project. For example, if you create a new `<<jump>>` statement, you'll be able to pick from your nodes:

<figure><img src="/files/l8apkZHHJwN2xF505i5F" alt=""><figcaption><p>Choosing a node to jump to with autocomplete.</p></figcaption></figure>

If your Yarn Spinner Scripts also use variables, which you'll learn about shortly, Yarn Spinner for VS Code will help out as well. For example, when you `<<declare>>` a new variable, you can add a comment with three `/` in front of it to provide a description of the variable:

<figure><img src="/files/CN390bG941ufseG3p6nO" alt=""><figcaption><p>Using the the special <code>///</code> comment syntax to describe a variable.</p></figcaption></figure>

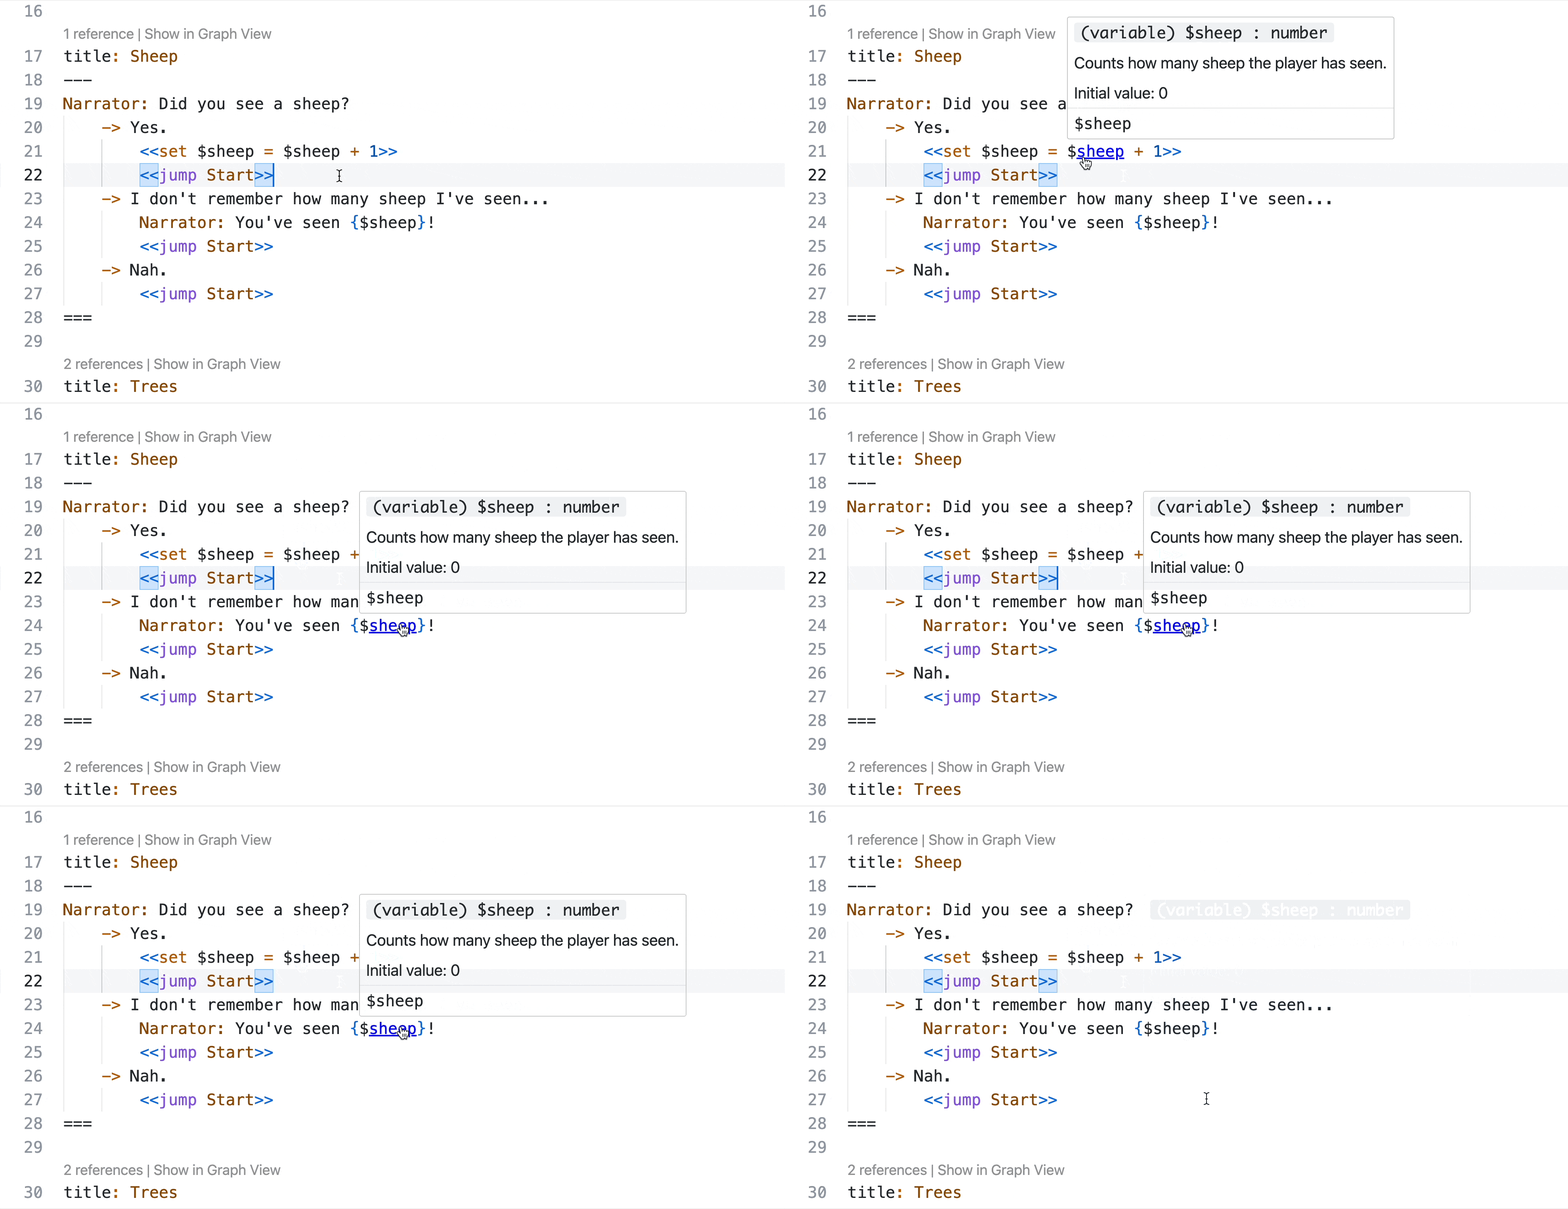
Then, when you use the variable, you can hover over it in VS Code for a reminder of its purpose (and its default value):

<figure><img src="/files/z1UU5x8FtPgAJXTWfoMt" alt=""><figcaption><p>Viewing a variable's description.</p></figcaption></figure>

Variable names will also autocomplete when you try and use them, and errors will be show if there are type isues. So, if you `<<declare>>` a variable to be a certain type, for example a `boolean`:

<figure><img src="/files/8UXX0x7lsaYsXTDEXOsi" alt=""><figcaption><p>Using `<code>&#x3C;&#x3C;declare>></code> to declare a boolean.</p></figcaption></figure>

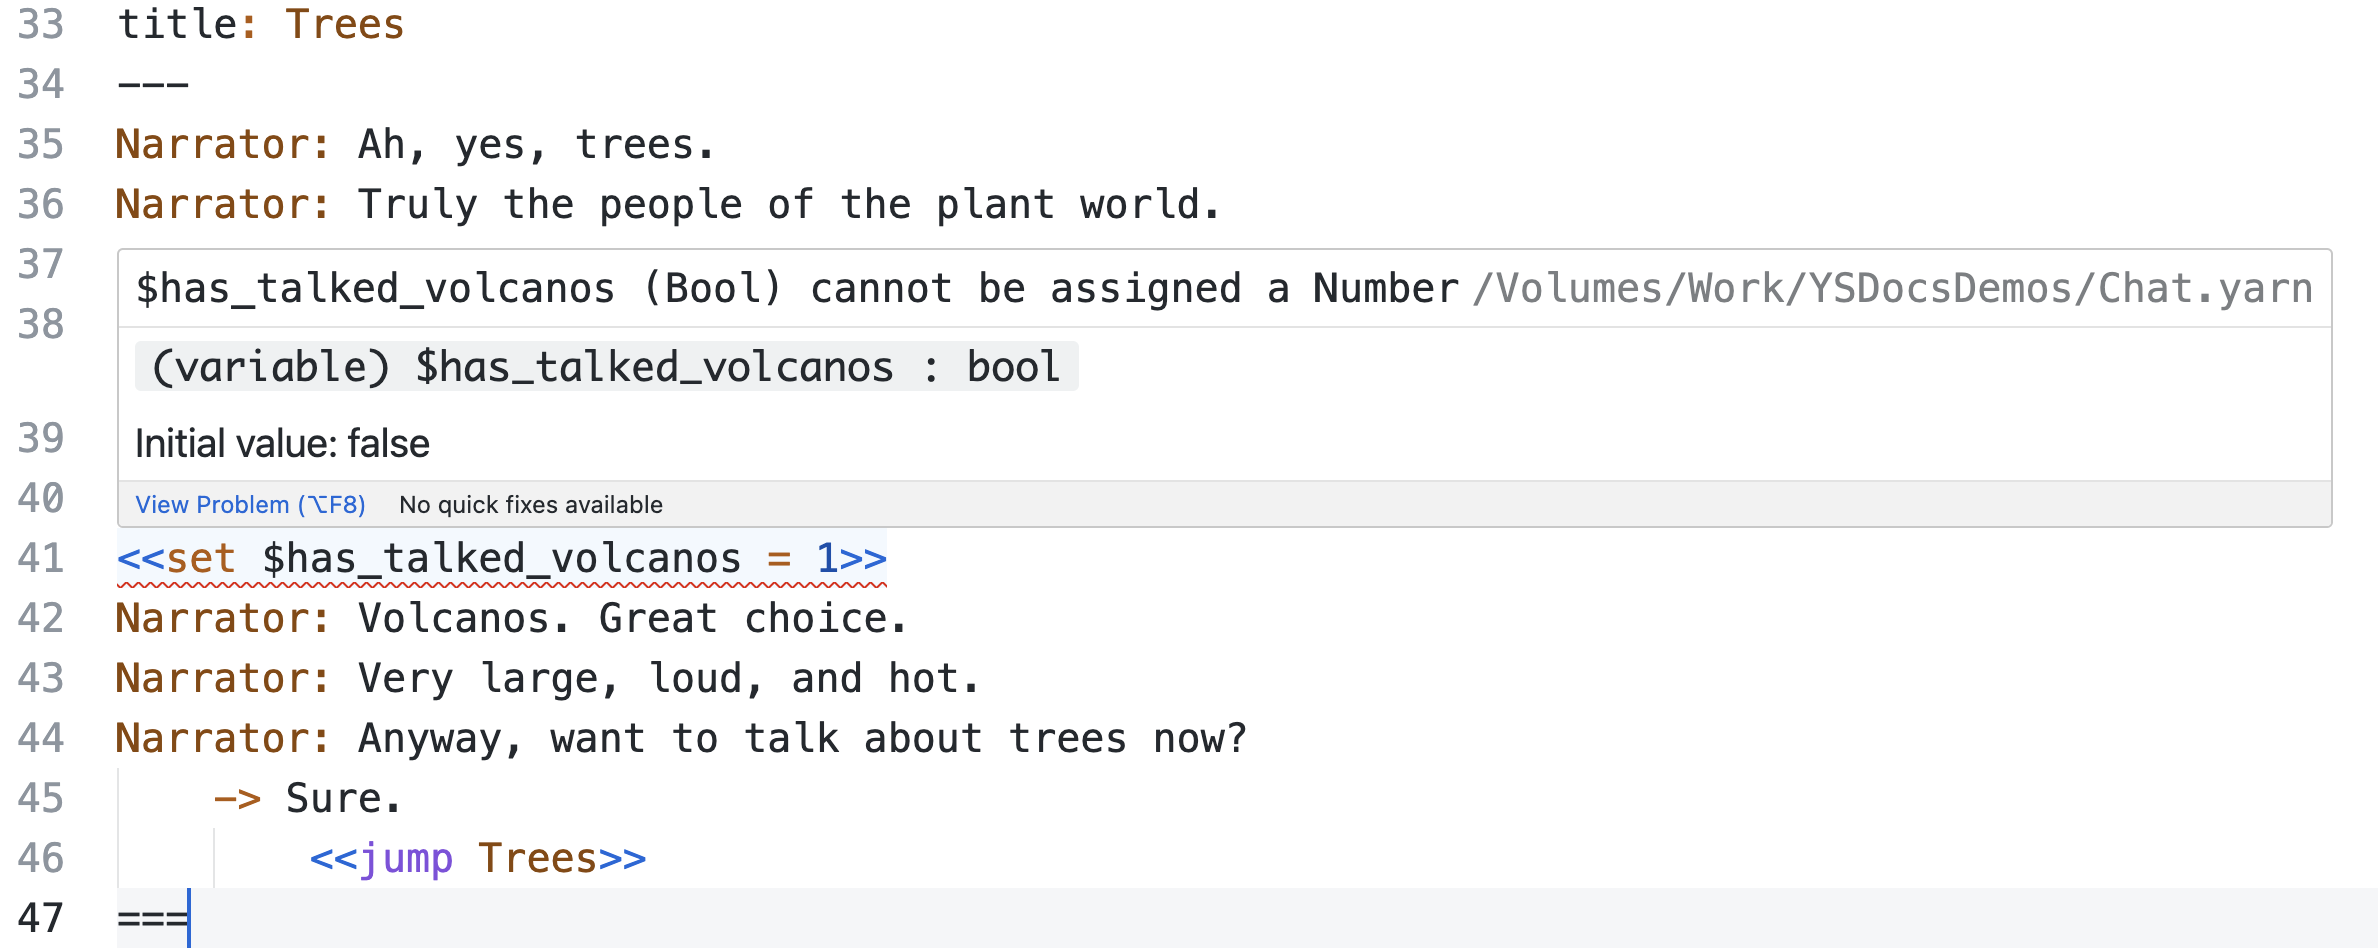
... and then attempt to use that variable in a way that would produce an error. For example, by attempting to assign a number to it, then Yarn Spinner for Visual Studio Code will show an error:

<figure><img src="/files/cy0IQS2F6XwT8vAmyvvs" alt=""><figcaption><p>An error arising from trying to use a <code>boolean</code> like an <code>integer</code>.</p></figcaption></figure>

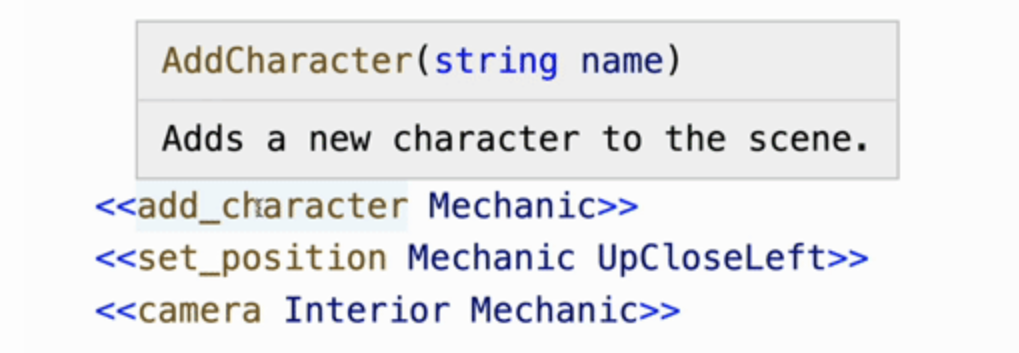
You'll also be able to see documentation comments from commands defined in your game's C# source code:

<figure><img src="/files/ocw1q2S0pmks0skqMzm9" alt="" width="563"><figcaption><p>Comments from C# commands in your Yarn scripts.</p></figcaption></figure>

{% hint style="warning" %} Nodes can be spread across as many `.yarn` files in a single folder as you like. {% endhint %}

## Working with nodes

While Yarn Spinner is a text based language, our Yarn Spinner for Visual Studio Code extension provides a handy Graph View.

You can open the Graph View for whichever `.yarn` file you're currently working with by clicking the Graph View button in the top right-hand corner:

<figure><img src="/files/ou7AcWE7n3pLkJBACxpc" alt=""><figcaption><p>The Graph View button.</p></figcaption></figure>

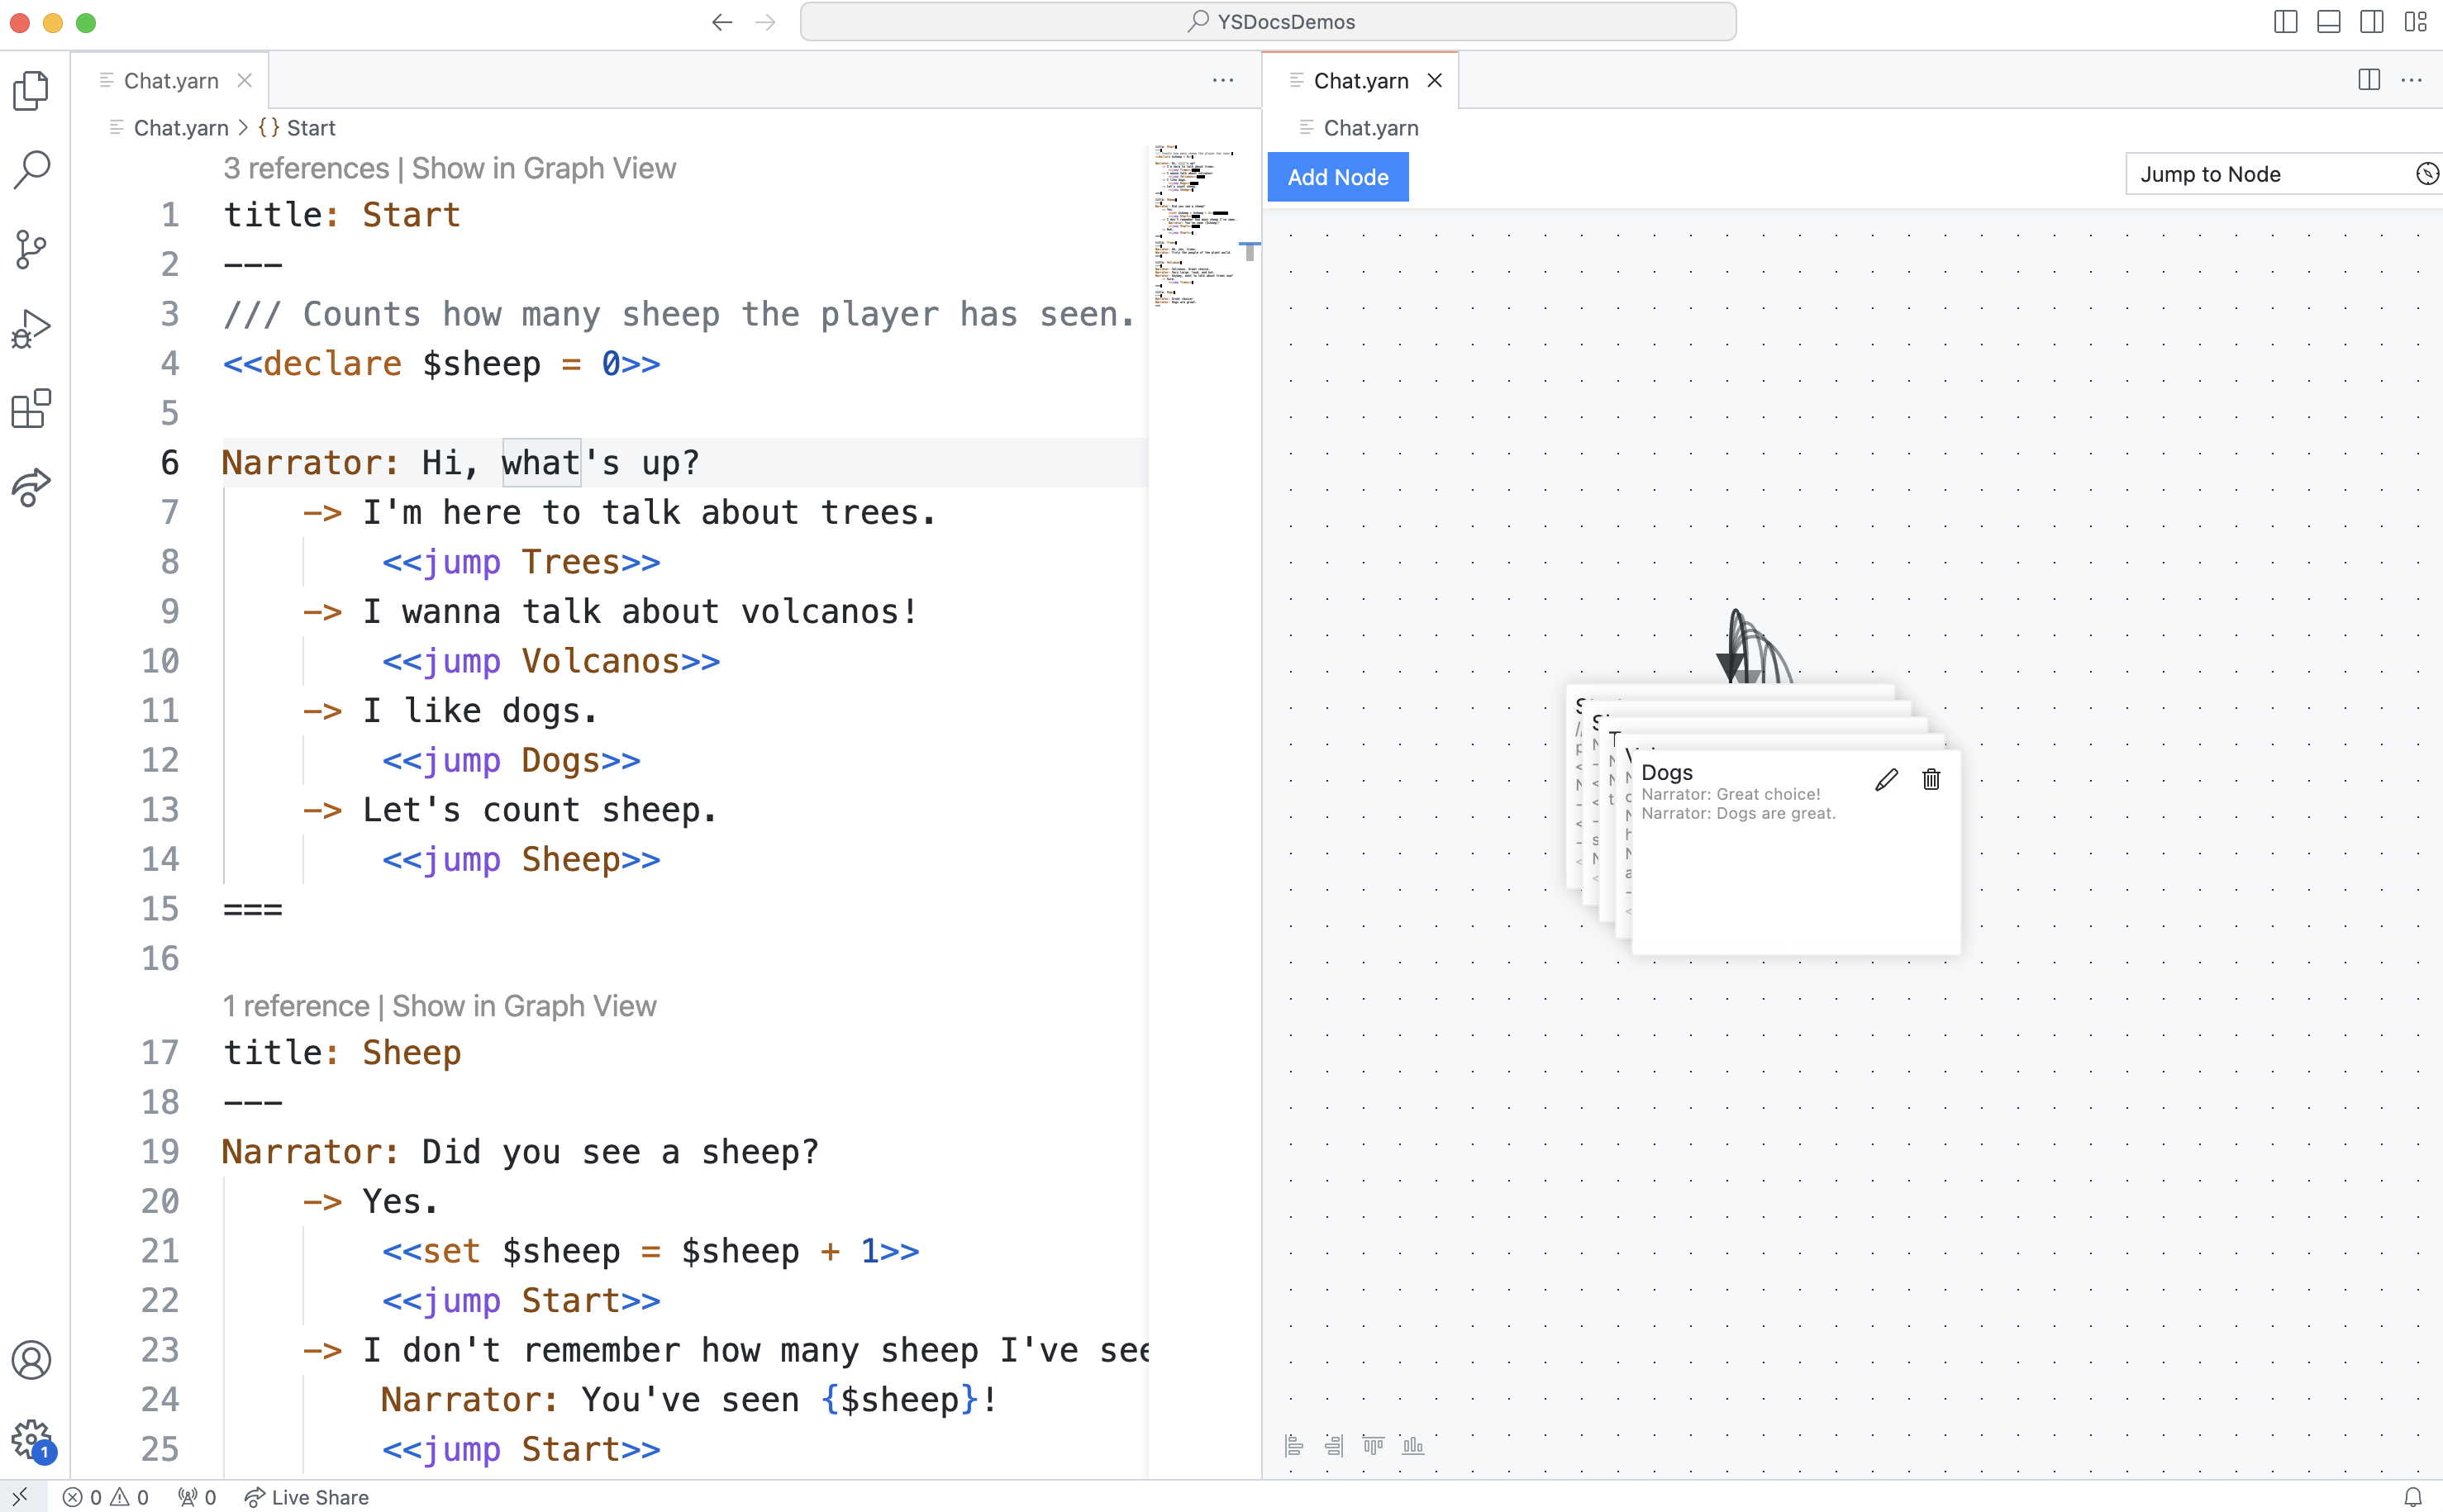
You might notice that, when you first look at the Graph View for a `.yarn` file, all the nodes appeared stacked on each other, like this:

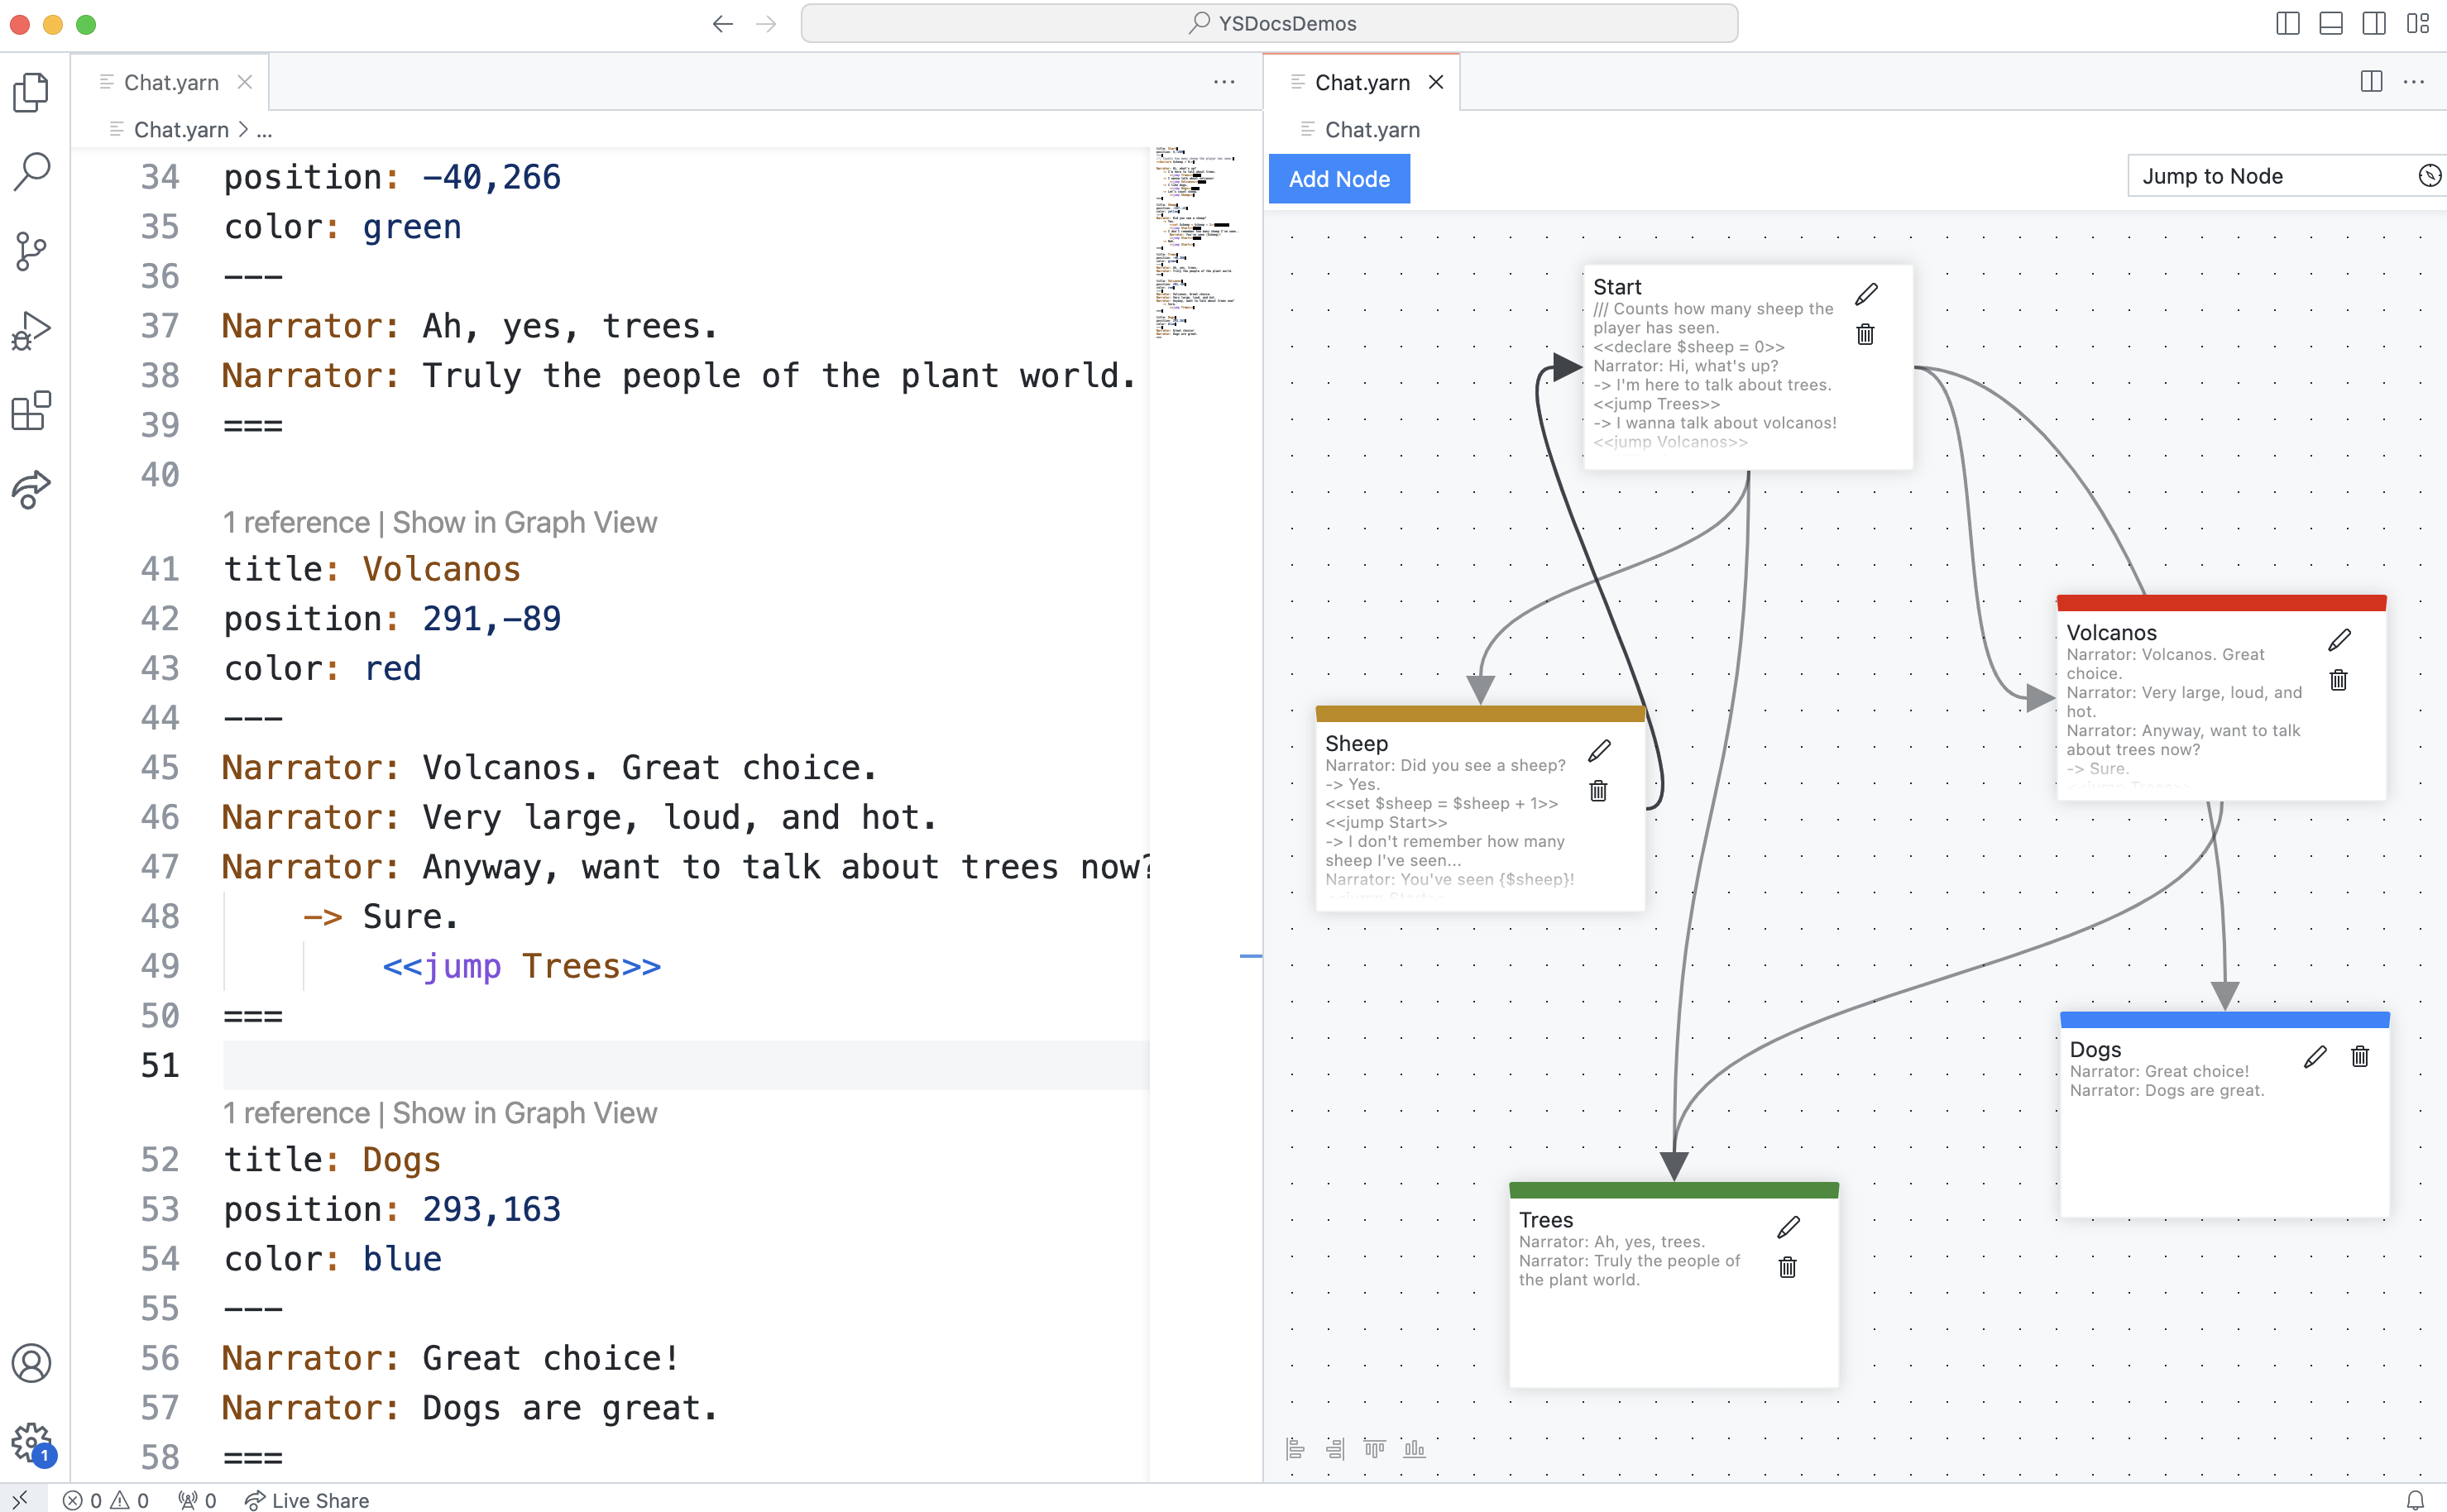
<figure><img src="/files/z3bmSFfQ8eMGJmJtq0Y1" alt=""><figcaption><p>Nodes stacked on each other in the graph view.</p></figcaption></figure>

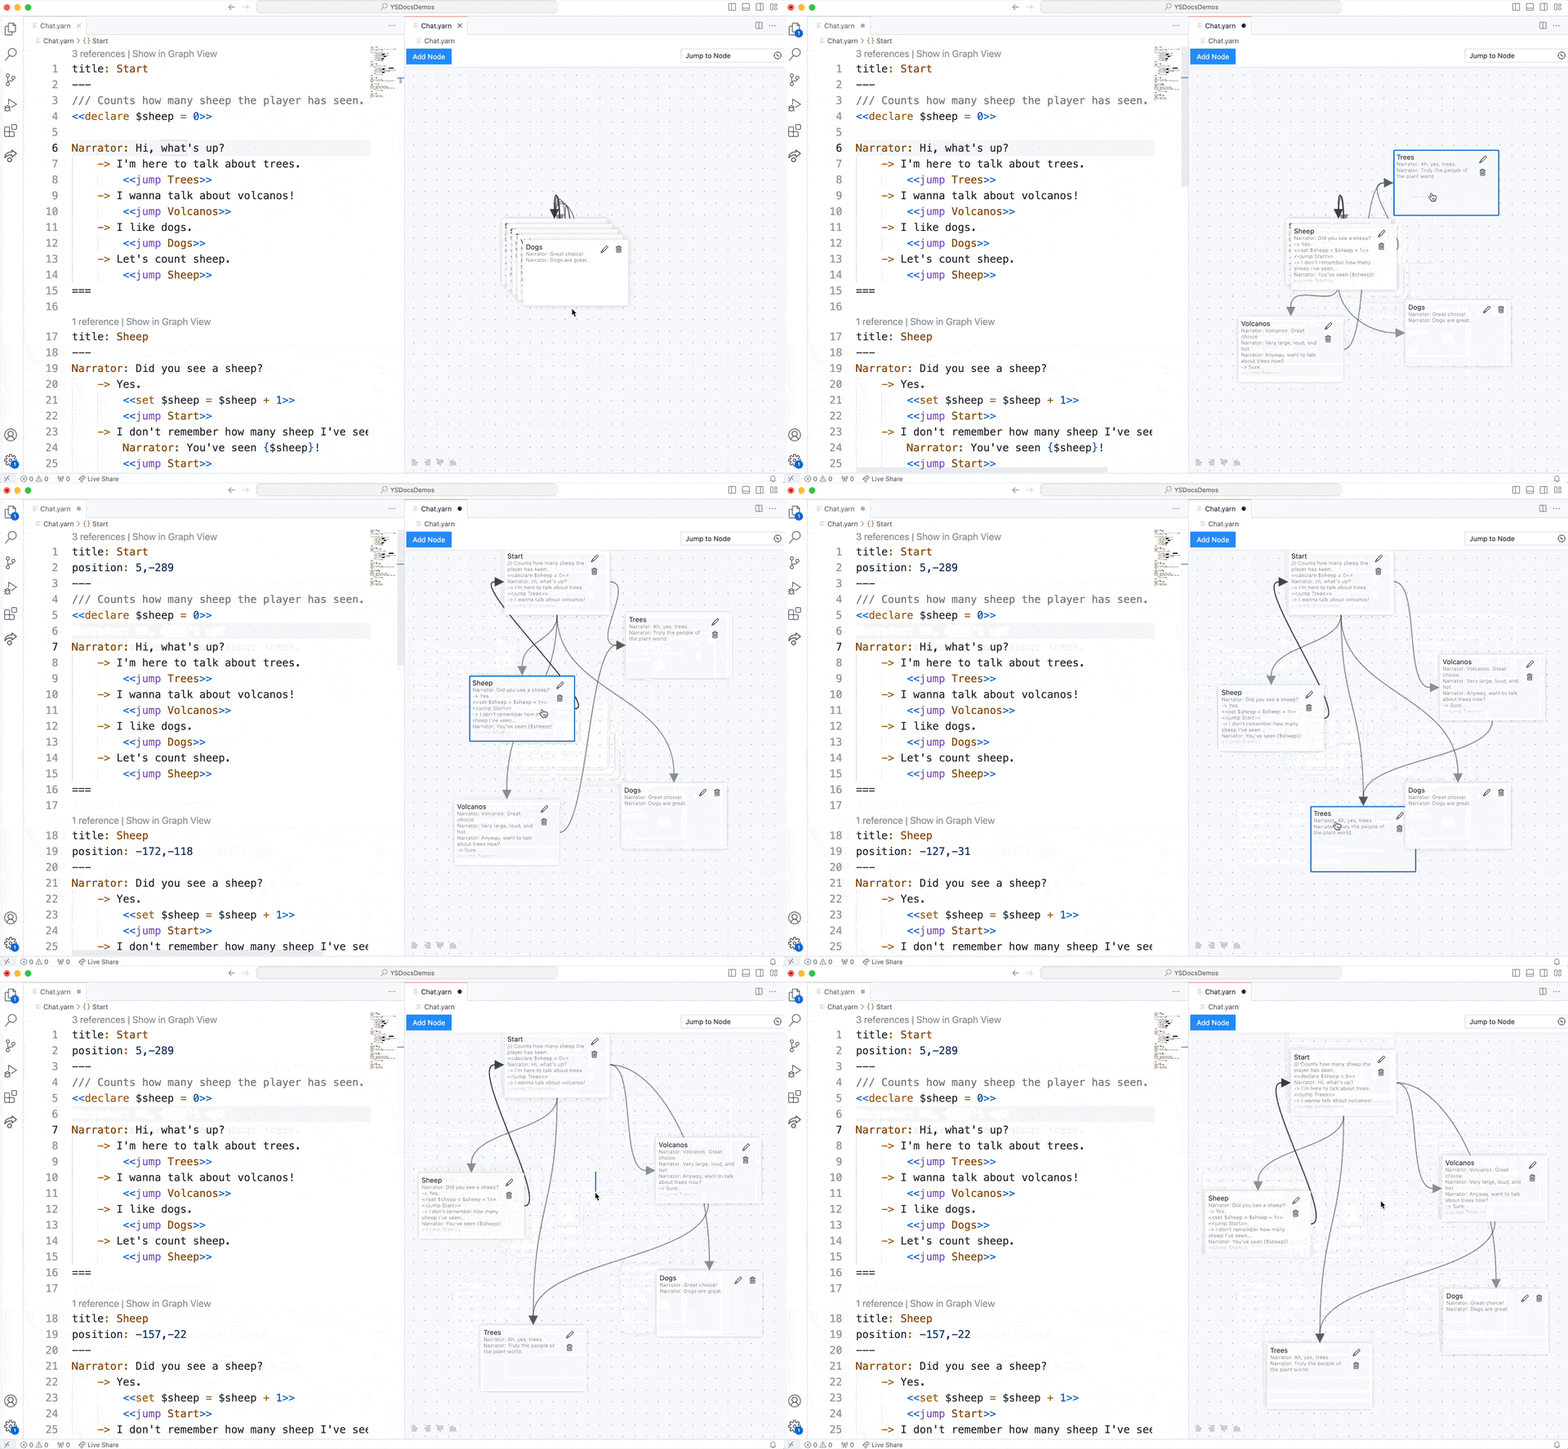
To make sense of things, and better understand the `<<jump>>` use between nodes, you can rearrange the nodes by clicking and dragging to wherever you want them:

<figure><img src="/files/tywSzagCy0Kc140tO0GO" alt=""><figcaption><p>Rearranging your nodes.</p></figcaption></figure>

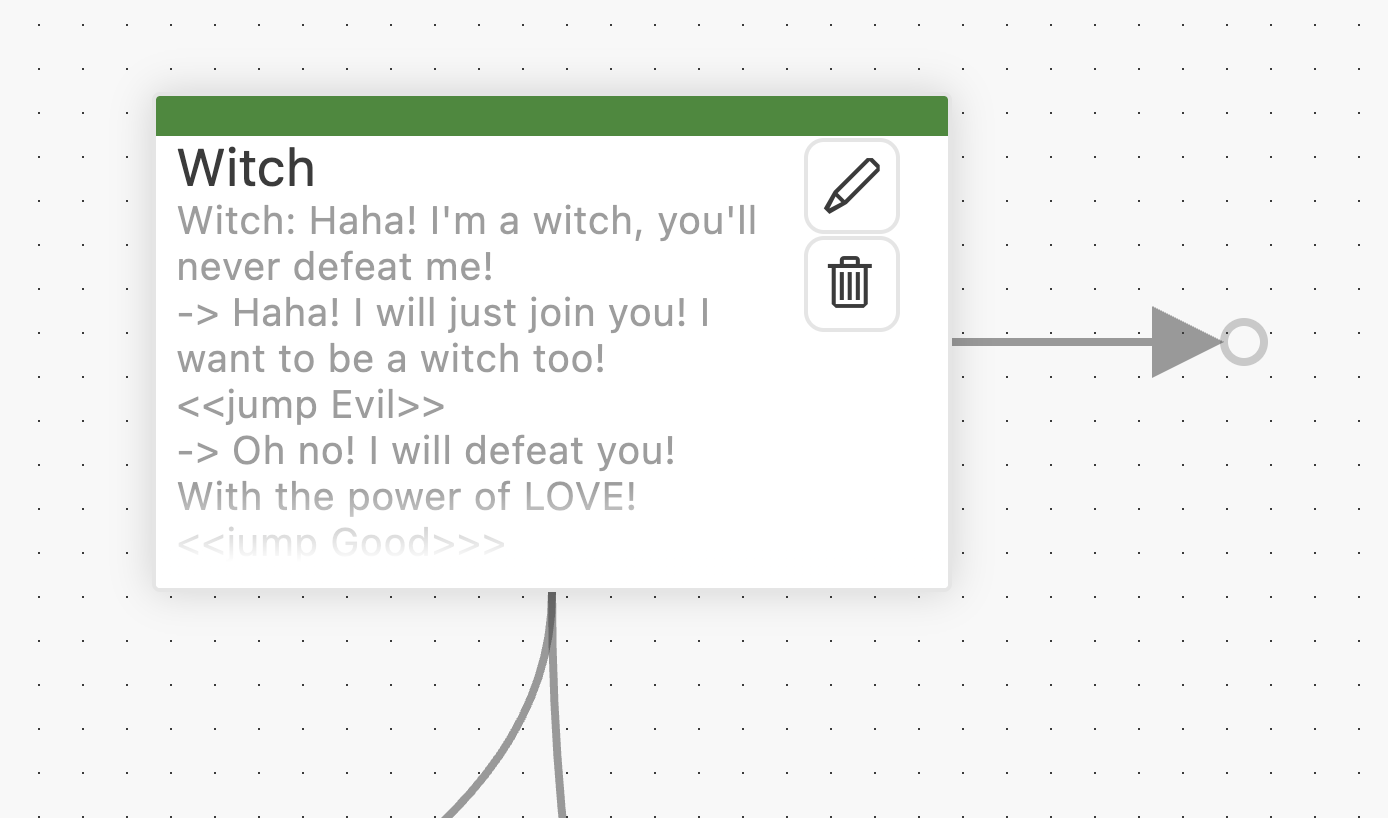
Any time the `<<jump>>` command is used, it will be visualised as a line with an arrow, leading to the note that's being jumped to. If you `<<jump>>` to a node in another `.yarn` file, it will be visualised as a line leading to a small circle:

<figure><img src="/files/lbRli8btW4IgGv1lHZ9m" alt=""><figcaption></figcaption></figure>

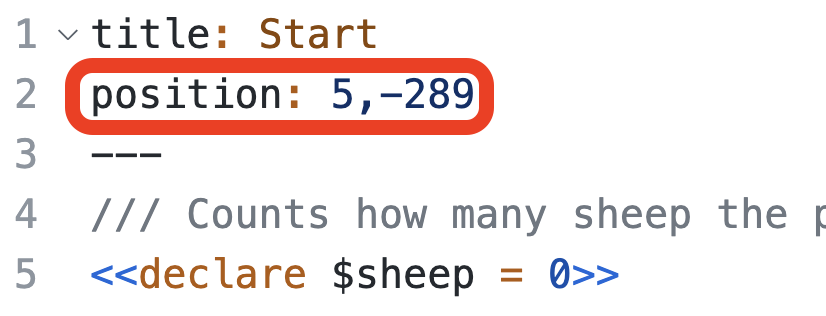
The position of the nodes will be stored in each node's header:

<figure><img src="/files/6S0VkbRgIuZcdyF6MmUC" alt="" width="563"><figcaption><p>The position of each node is stored in the header.</p></figcaption></figure>

You can use the Add Node button, found at the top of the Graph View, to add new nodes. New nodes will appear in the Graph View, and in the text editor:

<figure><img src="/files/D3JX97RTDtsmvvYC36tj" alt=""><figcaption><p>The Add Node button.</p></figcaption></figure>

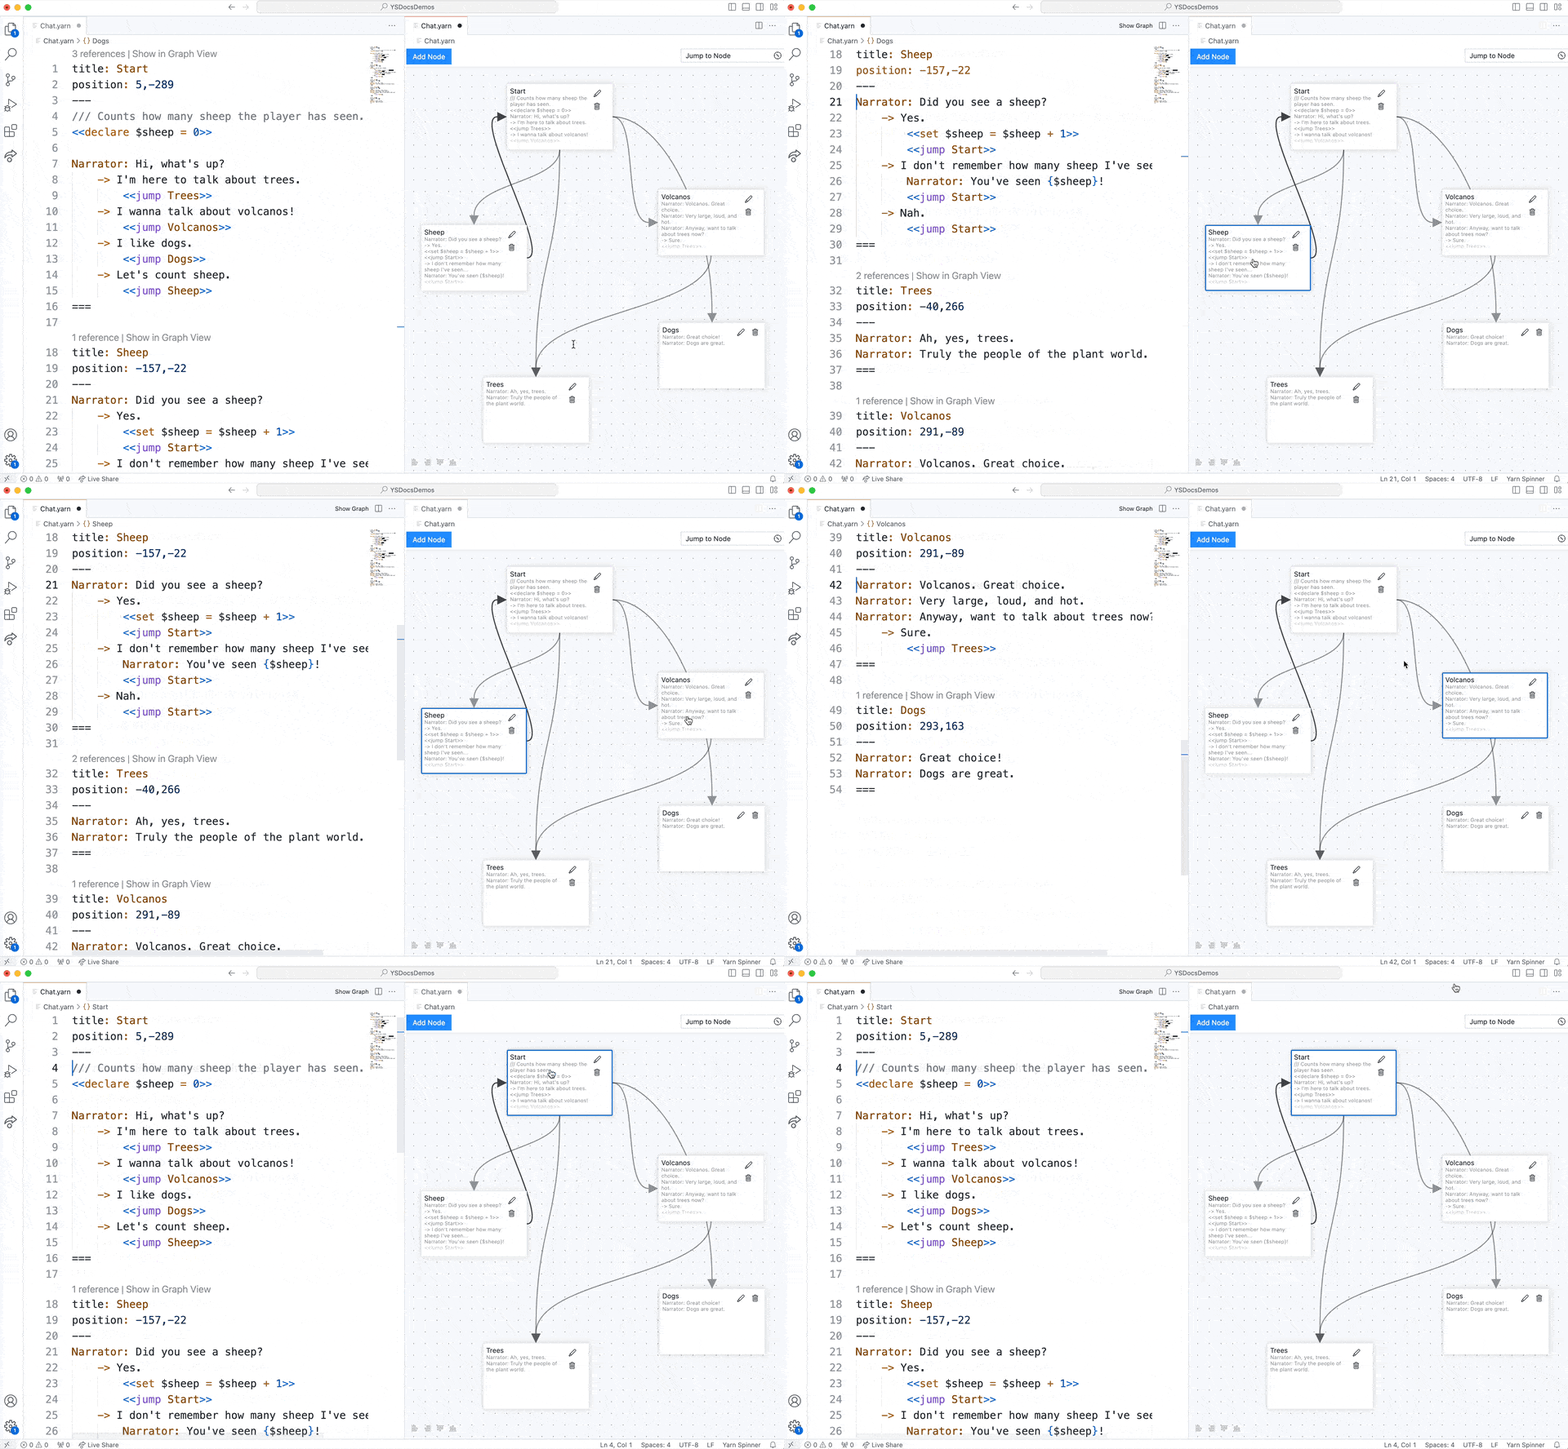
Double-clicking a node in the Graph View will jump to that node in the Text View:

<figure><img src="/files/XjarnMgfkPy5AE1ISXdp" alt=""><figcaption><p>Double-clicking a node in the Graph View to edit it in the Text View.</p></figcaption></figure>

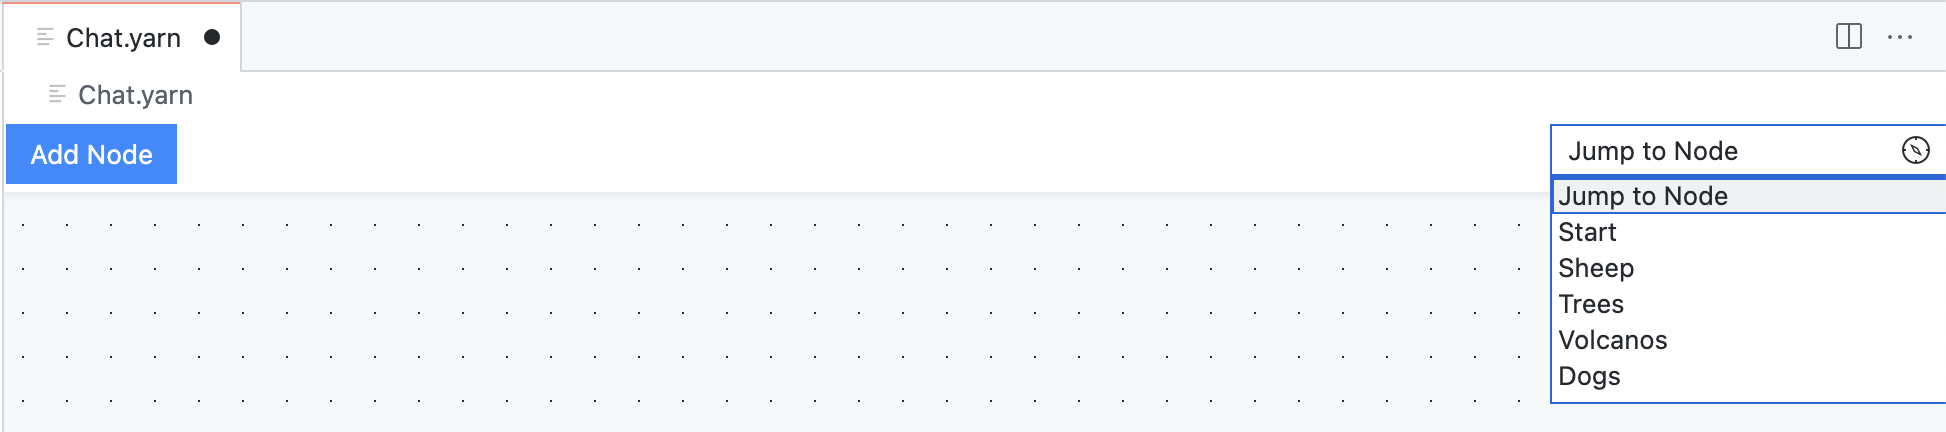
If you have a lot of nodes, you can use the Jump to Node menu, in the top right-hand corner of the Graph View, to jump the Graph View to a specific node:

<figure><img src="/files/dgAd9tkR9z7DWHzvmbsn" alt=""><figcaption><p>The Jump to Node menu.</p></figcaption></figure>

At any point you can also click Show in Graph View, found above each node in the Text View to jump the Graph View to it:

<figure><img src="/files/7rvnaQK6JeQWTa2oY3fq" alt="" width="555"><figcaption><p>Show in Graph View</p></figcaption></figure>

### Customising the Graph View

You can add some additional metadata to the headers of each node to customise your Graph View, for ease of understanding the relationships between areas of your script.

#### Colouring Nodes

For example, if you add the `color` field to the header, you can colour-code your nodes:

<figure><img src="/files/QQtCQ03dWl5fWqbLX29s" alt=""><figcaption><p>Colour-coded nodes.</p></figcaption></figure>

{% hint style="info" %} You can use `red`, `green`, `blue`, `orange`, `yellow`, or `purple`. The colours that you see may be different, depending on your VS Code theme. {% endhint %}

The \`

color`field works like any other header element, and goes below the`title`and above the`---\`:

```
title: NodeName
color: purple
---

===
```

#### Grouping Nodes

You can also group your nodes by adding the `group` field to your node headers. For example, if you add `group: Main_Options` to the header of the `Volcanos`, `Dogs`, and `Trees` nodes, you'd end up with this:

<div data-full-width="true"><figure><img src="/files/Ifus0sAgQewBRUDi6zqn" alt=""><figcaption><p>Grouping nodes in the Graph View.</p></figcaption></figure></div>

#### Sticky Notes

You can also use the Add Sticky Note button, found at the top of the Graph View, to add Sticky Notes to your Yarn Spinner Scripts:

<figure><img src="/files/D3JX97RTDtsmvvYC36tj" alt=""><figcaption></figcaption></figure>

Sticky Notes are just like normal nodes, but styled to stand out, so you can use them to leave notes for yourself, or your team, to add context to your narratives:

<figure><img src="/files/fOcvSXvE8HgPJax1KDLL" alt=""><figcaption></figcaption></figure>

Because Sticky Nodes are just normal nodes with an extra header field (they become a Sticky Note when you add `style: note` to their header), you can use the `color:` field to set their colour. For example, the notes in the above screenshot are created with the following Yarn Spinner Script:

{% code overflow="wrap" %}

```json
title: Note_Evil
style: note
position: 521,336
---
TODO: Add more evil options in here.
===

title: Note_Love
style: note
color: red
position: -128,171
---
I don't like the fact that the witch is totally unaware of what love is. Can we give them some more lines here?
===
```

{% endcode %}

## Using the Command Palette

The VS Code Command Palette has a number of useful Yarn Spinner features as well. Summon the Command Palette by pressing Shift + Command + P (Mac) or Ctrl + Shift + P (Windows/Linux), or choosing the View menu -> Command Palette..., and type "Yarn Spinner" to filter the available commands to those provided by the Yarn Spinner for Visual Studio Code Extension:

<figure><img src="/files/dZDgR8trWr7q6qS2CxKx" alt="" width="563"><figcaption><p>The Command Palette</p></figcaption></figure>

From here you can Preview Dialogue, which will allow you to play through your narrative, right inside Visual Studio Code. To learn more about this, read [Previewing Your Dialogue](/3.1/write-yarn-scripts/yarn-spinner-editor/previewing-your-dialogue.md).

The Export Dialogue as HTML... option will export a self-contained playable version of your narrative as an HTML file, which is otherwise the same as the experience your get when previewing.

The Export Dialogue as Graph... option will allow you to export a `.dot` file of your graph. To learn about `.dot` files, check out the GraphViz documentation: <https://graphviz.org/doc/info/lang.html>

And finally, the Export Dialogue as Recording Spreadsheet... option will allow you to export a spreadsheet, which can be useful for voice actors recording dialogue.

{% hint style="info" %}
You can also use the Command Palette to turn off all the Microsoft-provided "AI" "features by typing `Chat: Hide Copilot` and hitting Return/Enter.
{% endhint %}


---

# Agent Instructions: Querying This Documentation

If you need additional information that is not directly available in this page, you can query the documentation dynamically by asking a question.

Perform an HTTP GET request on the current page URL with the `ask` query parameter:

```
GET https://docs.yarnspinner.dev/3.1/write-yarn-scripts/yarn-spinner-editor/writing-yarn-in-vs-code.md?ask=<question>
```

The question should be specific, self-contained, and written in natural language.
The response will contain a direct answer to the question and relevant excerpts and sources from the documentation.

Use this mechanism when the answer is not explicitly present in the current page, you need clarification or additional context, or you want to retrieve related documentation sections.