Loading...
Loading...
Loading...
Loading...
Loading...
Loading...
Loading...
Loading...
Loading...
Loading...
Loading...
Loading...
Loading...
Loading...
Loading...
Loading...
Loading...
Loading...
Loading...
Loading...
Loading...
Loading...
Loading...
Loading...
Loading...
Loading...
Loading...
Loading...
Loading...
Loading...
Loading...
Loading...
Learn about the Unity components that you use when working with Yarn Spinner for Unity.
Yarn Spinner for Unity is made up of a number of components. The most important of these are the Dialogue Runner, which loads and runs your scripts, and the Dialogue Views that show content to your player.
In this section, you'll learn about how to work with each of these.
Quickly get started with a simple scene.
Want to use Yarn Spinner in a new scene right away? Follow these steps.
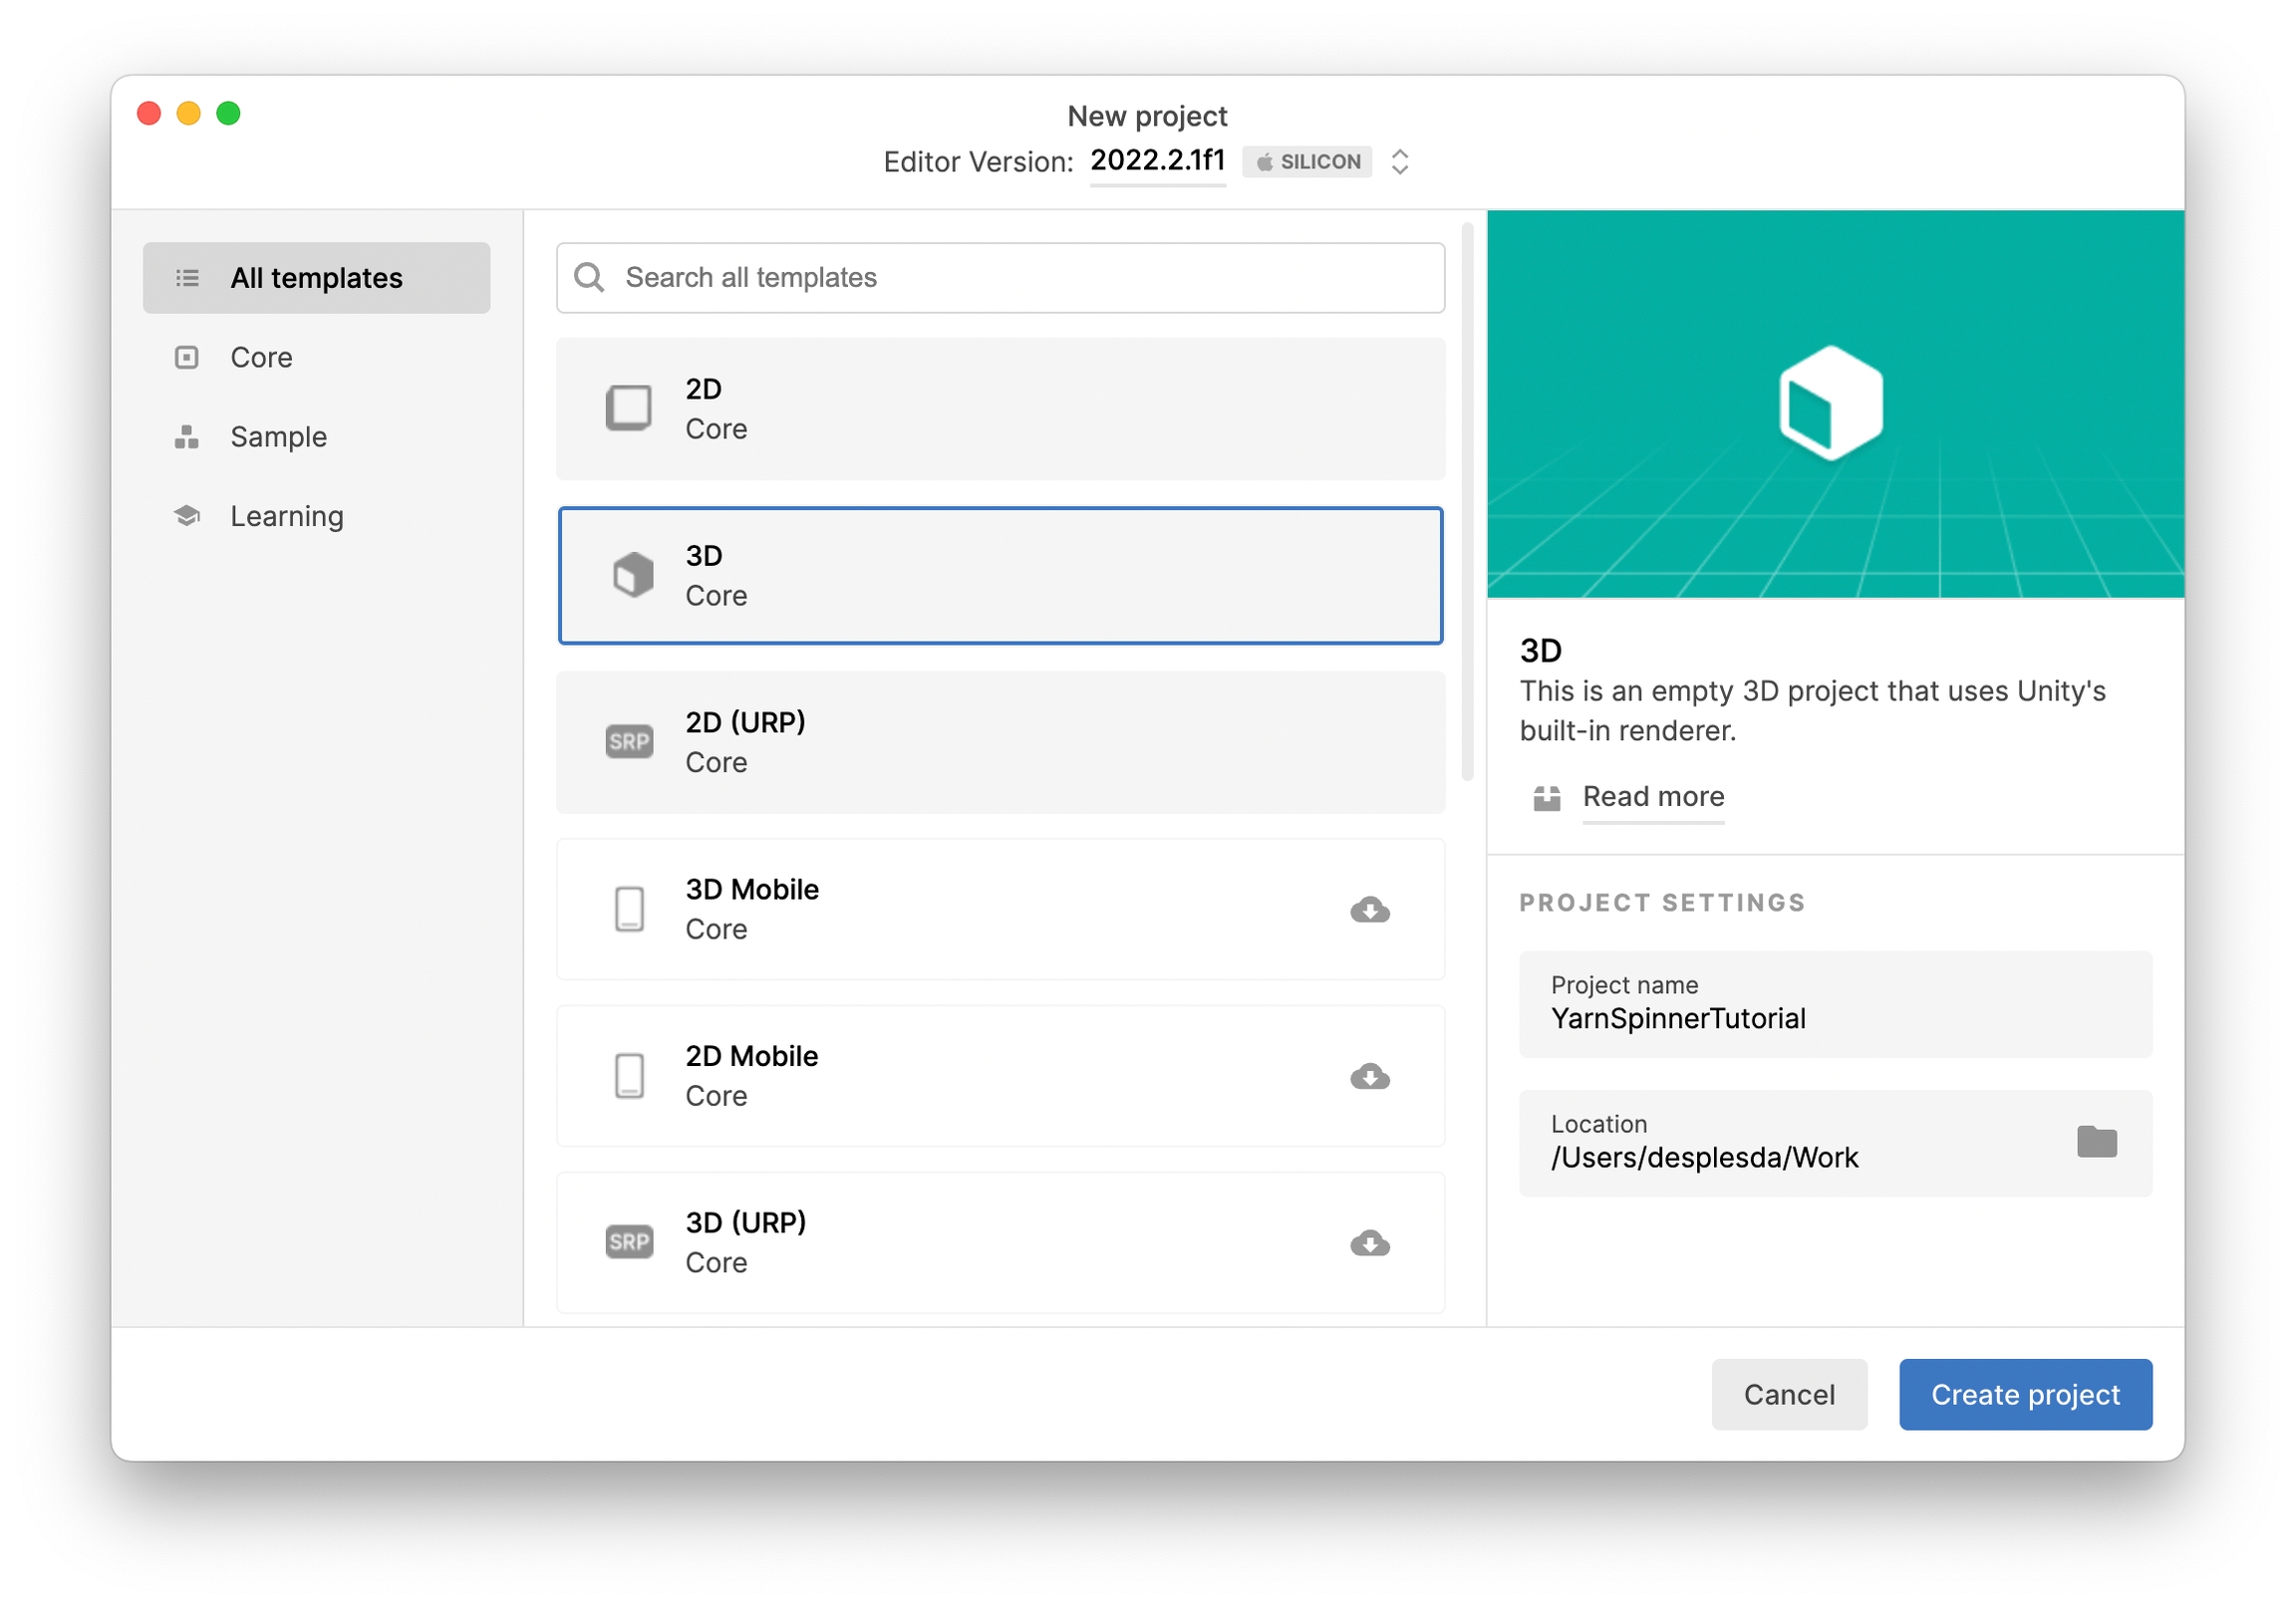
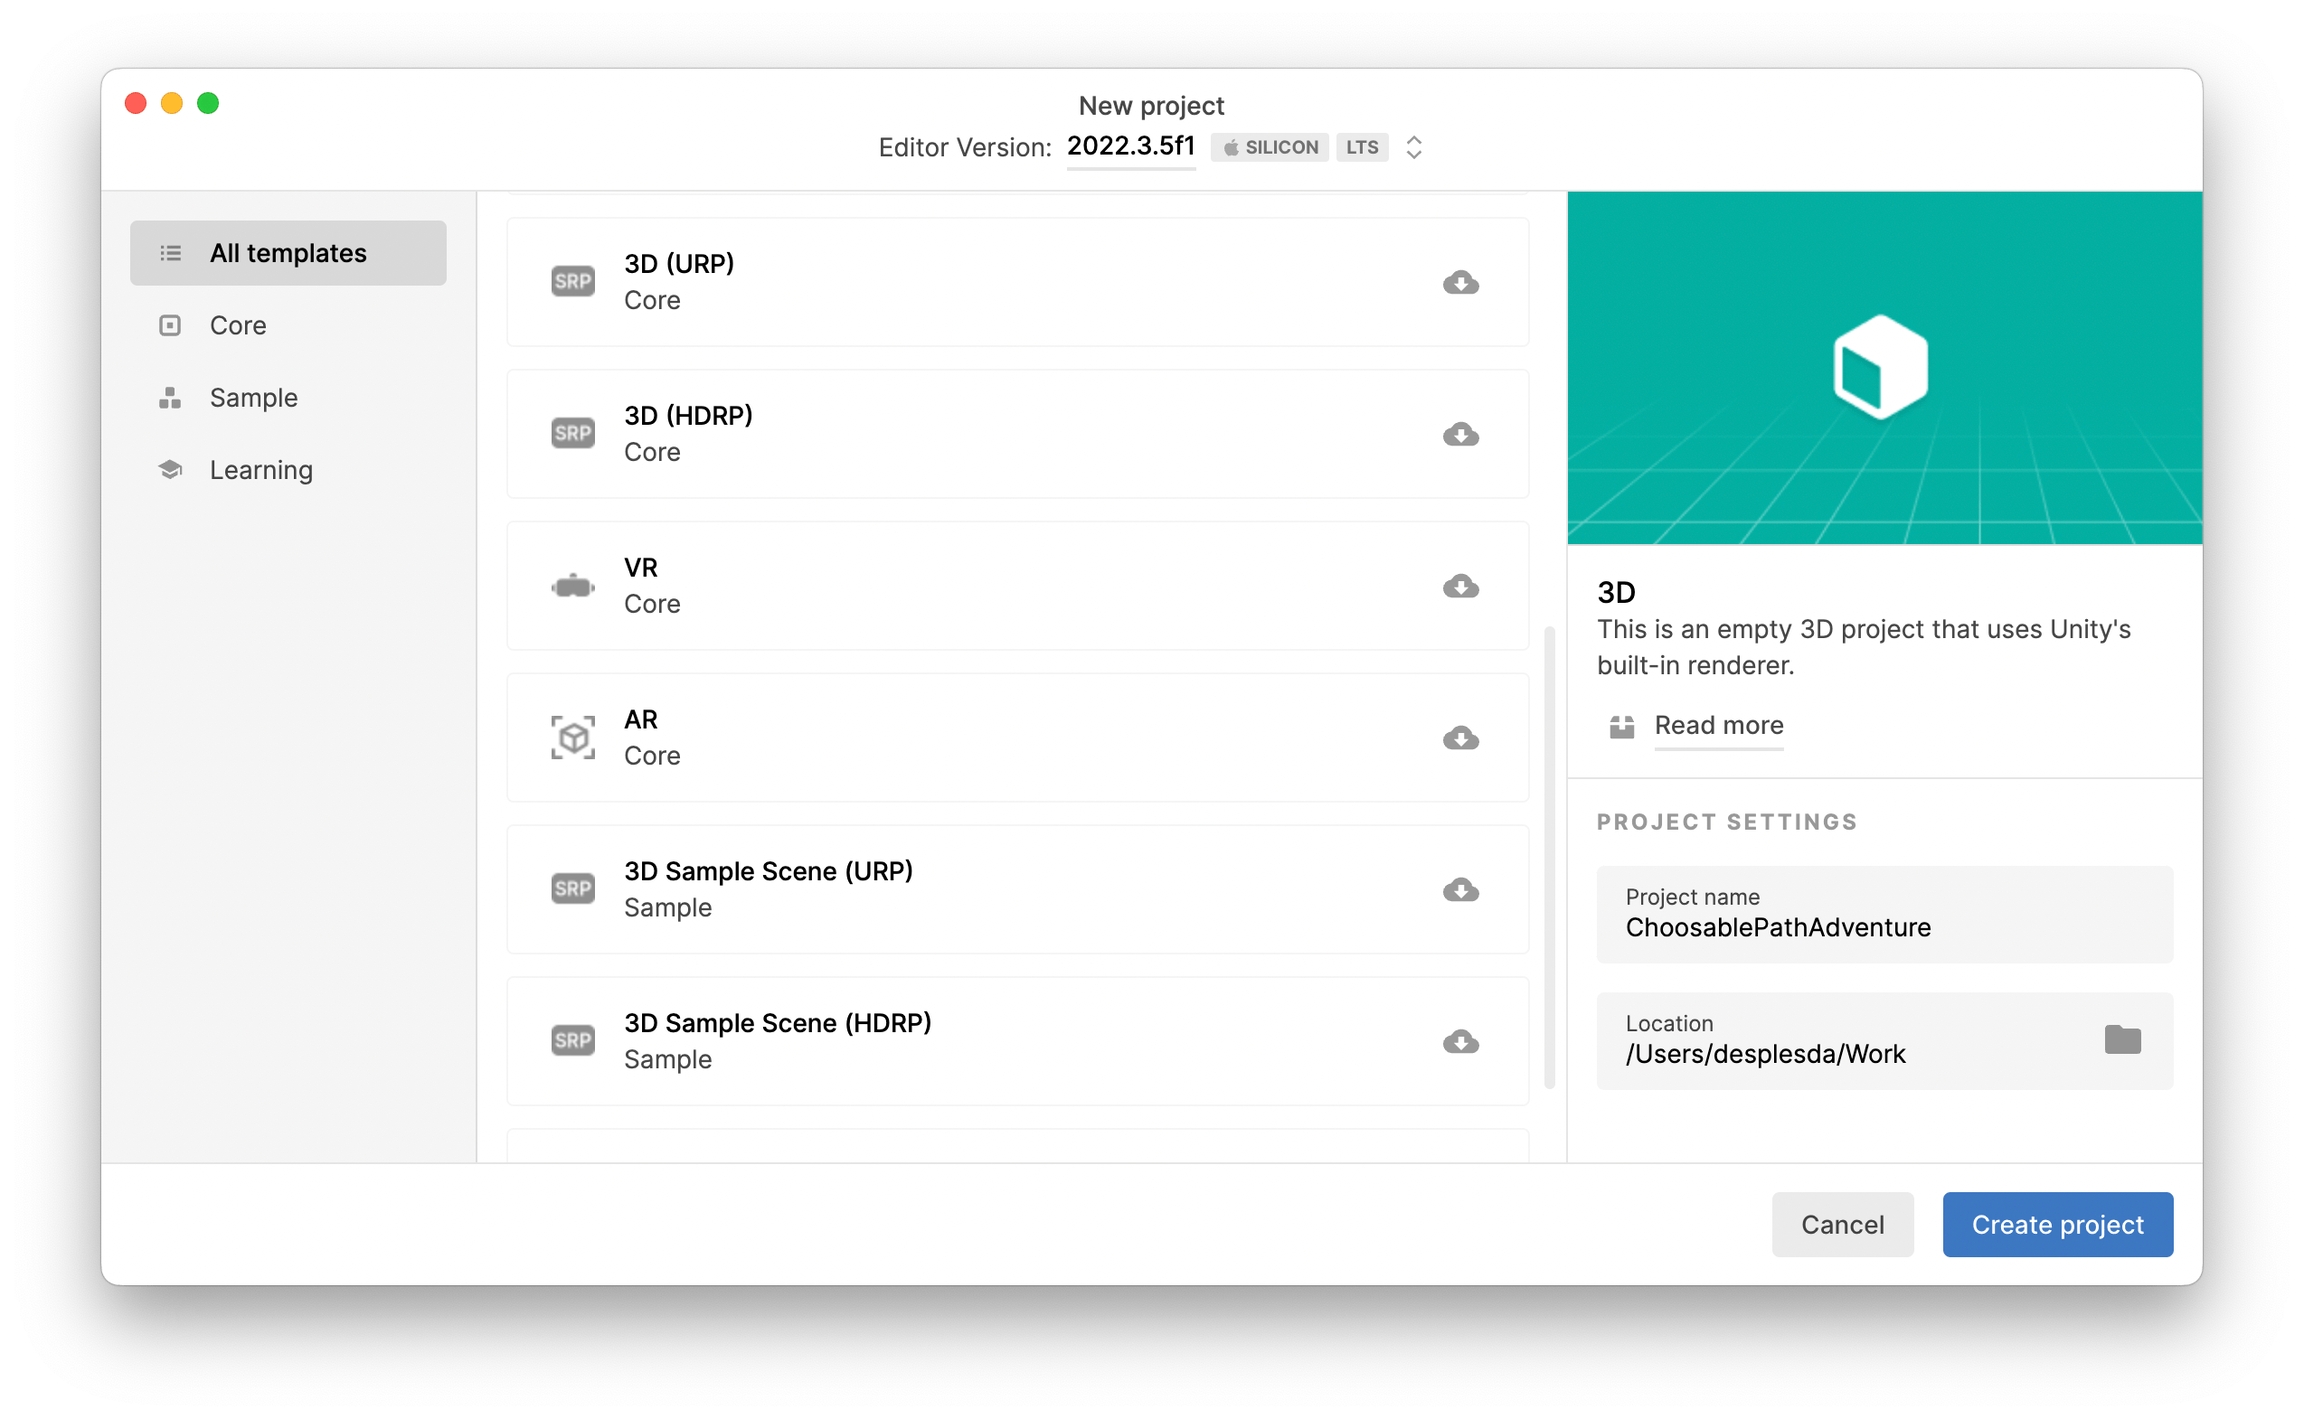
Create a new empty Unity project, by following the instructions in the Unity manual.
Install Yarn Spinner into the project, by following the instructions in Installation for Unity.
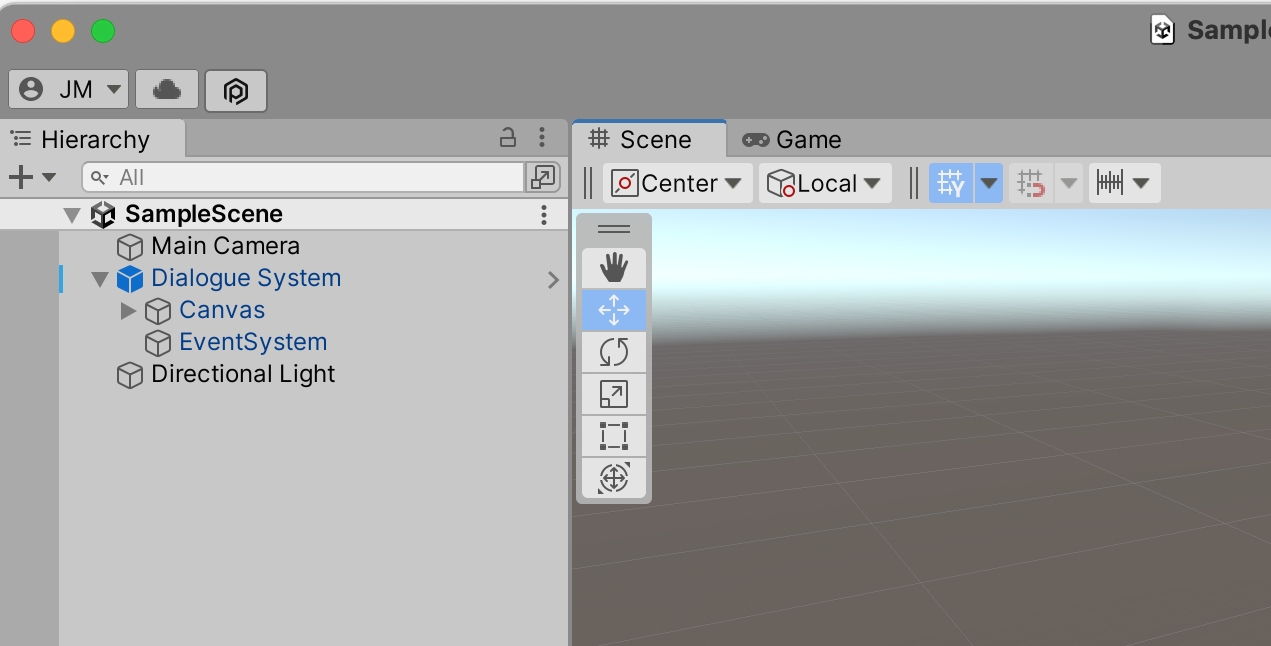
Add a Dialogue System to the scene:, by opening the GameObject menu and choosing Yarn Spinner -> Dialogue System.
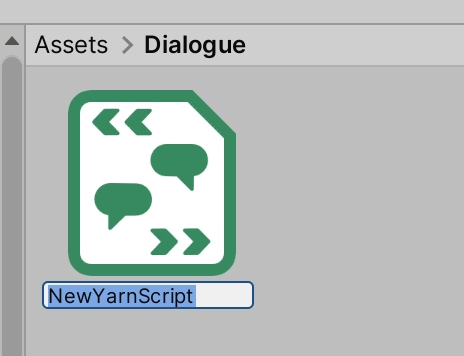
Create a new Yarn script, by opening the Assets menu and choosing Create -> Yarn Spinner -> Yarn Script. Name the new file HelloYarn.
Open the new Yarn script by double-clicking it.
Select all of the text in the file, and delete it.
Copy the text below, and paste it into the file.
You can learn about our recommended editor, Visual Studio Code with the official Yarn Spinner Extension at: Fundamentals.
Save the file and return to Unity.
Create a new Yarn Project that uses this script, by selecting the HelloYarn file, and clicking the Create New Yarn Project button in the Inspector. This will create a new Yarn Project called Project. Projects are collections of Yarn scripts that get compiled together, and can be used with a Dialogue Runner.
Make the Dialogue Runner use the Project by dragging the Project you just made into the Dialogue Runner's Yarn Project field.
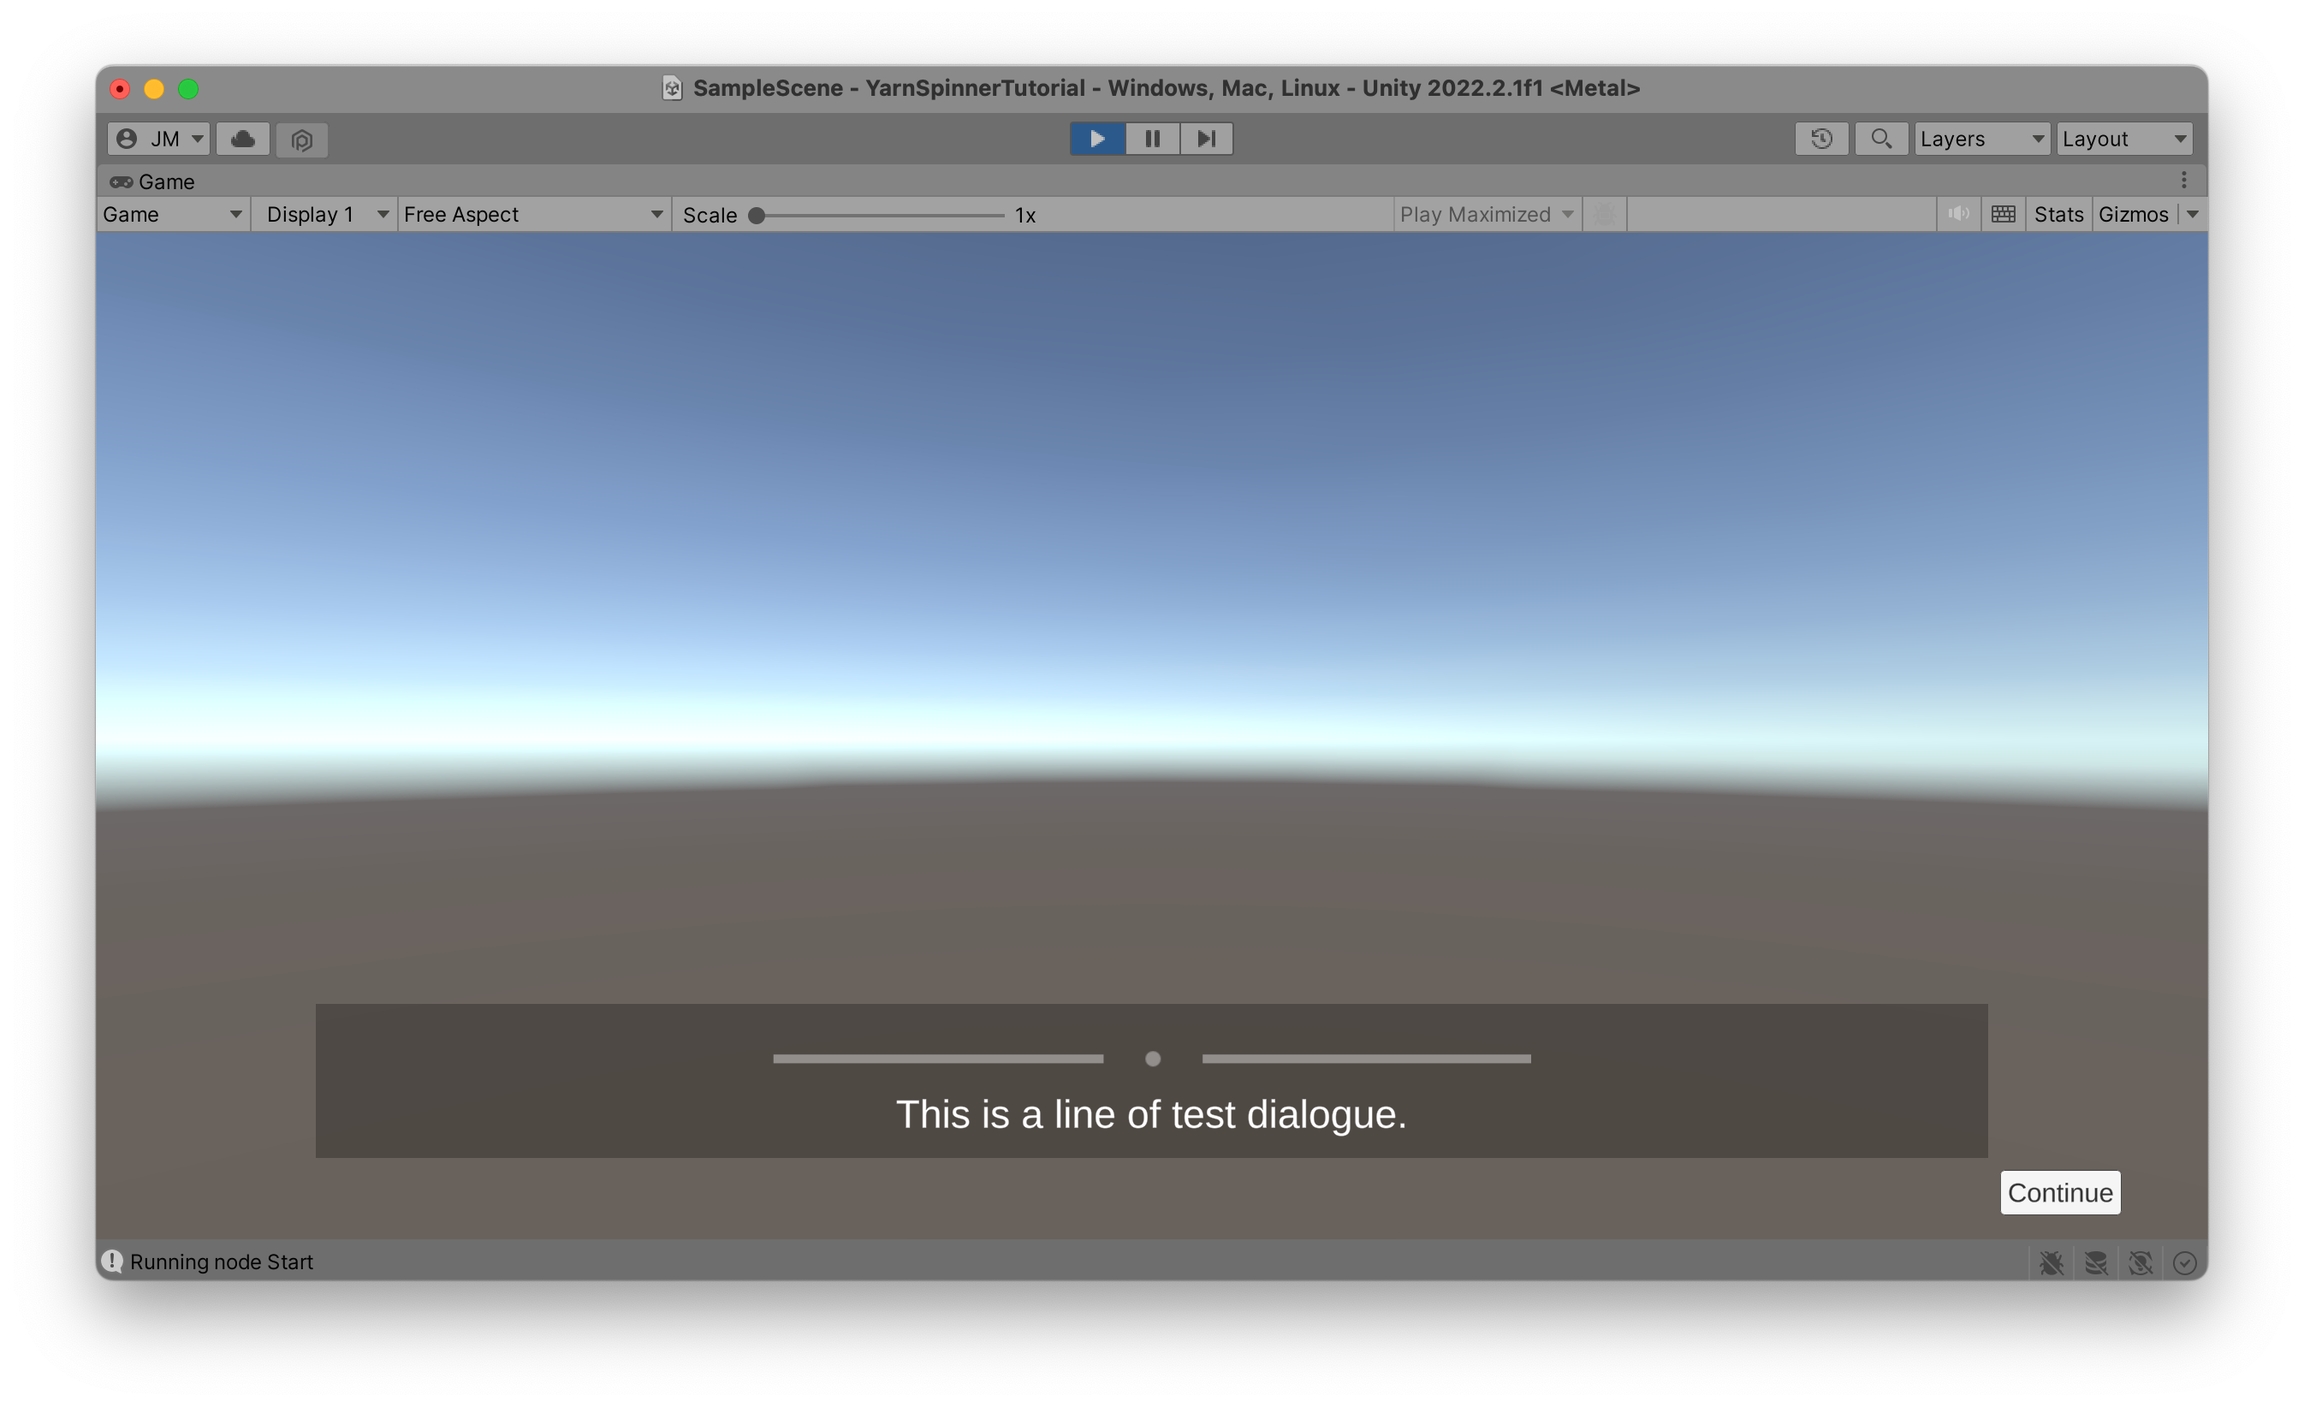
Play the game by clicking the Play button at the top of the window. Your dialogue will appear!
Learn about Dialogue Views, which present dialogue content to the user.
A Dialogue View is a kind of component that receives content from a Dialogue Runner, and presents it to the player. Dialogue Views are how the player sees your game's lines of dialogue, and how they select choices in the dialogue.
A Dialogue Runner can have multiple Dialogue Views. For example, you might have one Dialogue View that's designed to display lines of dialogue, and another that's in charge of displaying options to the player.
If you want a custom dialogue view that can display Night in the Woods-style speech bubbles, or a Mass Effect style dialogue wheel, then check out our premium . They're a great way to support the project, and get some fancy dialogue views into your game. ❤️
Because every game's needs are different, a Dialogue View is designed to be extremely customisable, and you can create your own custom dialogue views to suit the needs of your game.
However, because there are common patterns of how games work with dialogue, Yarn Spinner for Unity comes with some pre-built Dialogue Views that handle common use cases:
Line View is a Dialogue View that displays a single line of dialogue in a text box that's inside a canvas, and shows a button that the user can click to proceed.
Option List View is a Dialogue View that displays a collection of options in a list.
Learn how to create Dialogue Views that are designed for the specific needs of your game.
While the Line View and Options List View are useful for lots of situations, your game might need to display lines and options in specific ways. In these situations, you can write your own custom Dialogue View, and handle the presentation of lines and options in ways that are entirely in your control.
To create a Dialogue View, you subclass the DialogueViewBase class, and add it as a component to a game object in your scene. You can then add this game object to the Dialogue Views list on your scene's Dialogue Runner.
If you just want to skip straight to the sample code, take a look at the SimpleSpeechBubbleLineView sample code in the Yarn Spinner examples repository.
On its own, an empty subclass of DialogueViewBase will not do anything useful. To make it display lines and options, you'll need to implement certain methods.
To understand how to create a custom Dialogue View, it's useful to understand how the Dialogue Runner works with content.
Yarn Spinner scripts deal in three different kinds of content: lines, options, and commands. Of these, only the first two - lines and options - are content that need to be shown directly to the player.
When the Dialogue Runner encounters lines or options, it first needs to determine the specific content the user needs to see. Once it has this, it sends the content to each of its Dialogue Views.
Your scene can have multiple Dialogue Views, and they can all do different things. It can be useful to create, for example, a Dialogue View that handles lines, and a separate Dialogue View that handles options.
Lines and options are represented in compiled Yarn scripts as line IDs. A line ID is a unique identifier for the text of a line or an option. When Yarn Spinner needs to show a line or option to the user, it asks its Line Provider to provide it with a LocalizedLine object. This object contains the text of the line or option, in the user's current locale.
As discussed in Line Providers, you can have different kinds of Line Providers; for example, the Text Line Provider creates LocalizedLine objects that just contain text, while Audio Line Provider creates objects that also contain an AudioClip.
When displaying a collection of options, each individual option has its own LocalizedLine.
Once a LocalizedLine has been created, the Dialogue Runner has everything that it needs to show content to the user. The next steps vary depending on whether it's showing a line or an option.
When Yarn Spinner encounters a line of dialogue, it calls the RunLine method on each Dialogue View. This method takes two parameters: the first is the LocalizedLine that the Line Provider created, and the second is a delegate that the Dialogue View should call when the line has finished being presented.
In Dialogue Views, a line is presented when the user has received the entire line, and is ready to move on to the next line. The practical outcome of what this means depends on the Dialogue View itself; for example, a Dialogue View that plays voice-over audio might finish presenting when all of the audio has played, while a Dialogue View that gradually reveals the text of a line might finish presenting when all of the text is visible.
The Dialogue Runner will wait until all Dialogue Views report that they've finished presenting the line. Once this happens, it moves on to the next part of the dialogue.
If you're making a game where you want the dialogue to pause until the user gives a signal to proceed, your Dialogue View can pause the dialogue by not calling the completion handler until it receives the signal. Because the Dialogue Runner will wait until all Dialogue Views report that they're done, the dialogue will wait until your view tells it to continue.
At any point during a line's presentation, a Dialogue View can interrupt the line. It does this by calling the requestInterrupt method, which is a delegate that's set by its controlling Dialogue Runner. When this method is called, all Dialogue Views that have not yet finished their presentation receive a call to their InterruptLine method.
InterruptLine is very similar to RunLine, in that it receives a line to present and a completion handler to call when the presentation is complete. However, while RunLine is expected to present the line at its own pace, InterruptLine is a signal to finish the presentation as quickly as possible.
As before, the actual details of this depend on the Line View. To continue the examples from before, a Dialogue View that plays voice-over audio might fade out the audio over a short period of time, or even cut off playback immediately; a Dialogue View that's gradually revealing text might reveal the remaining text all at once, or rapidly reveal the remaining text.
When a Dialogue View receives a call to InterruptLine, it should not call the completion handler that it received from the call to RunLine. Calls to interrupt a line supersede calls to run a line.
Any Dialogue View may request that a line be interrupted. If multiple Dialogue Views request it, only the first request does anything.
When the last Dialogue View reports that its presentation is complete, either because RunLine finished its presentation, or because InterruptLine was called and it quickly finished its presentation, it needs to tell the dialogue views to get rid of the line, and potentially prepare for more content.
The Dialogue Runner does this by calling DismissLine on all Dialogue Views. As with RunLine and InterruptLine before it, DismissLine receives a completion handler to call when it has finished dismissing the line.
As before, the details of how a line is dismissed vary with what the Dialogue View actually does. A Dialogue View that plays voice-over audio may not need to do anything to dismiss a line, because the playback has already finished; a Dialogue View that shows line text on screen might need to hide the text, possibly with an animation.
When the last Dialogue View reports that it has finished dismissing its line, the Dialogue Runner continues running the script.
Options are slightly different to lines, in that they rely on receiving some kind of user input before the dialogue can continue: the Dialogue Runner needs to know which option was selected.
To handle options, Dialogue Views implement the RunOptions method. This method receives an array of DialogueOption objects, each of which represents an option that can be shown to the user, as well as a completion handler.
When this method is called, the Dialogue View uses the information contained within the DialogueOption objects to present the choices to the player, and then awaits user input. Once it knows which option was selected, it calls the completion handler, passing in the DialogueOptionID of the selected option.
When the Dialogue Runner delivers options to its Dialogue Views, it expects exactly one of them to call the completion handler that RunOptions receives.
If none of them call it, then the Dialogue Runner will never receive the option that was selected (and will wait for it forever.)
If more than one of them call it, the Dialogue Runner will throw an error.
(In most situations, you will generally only have one Dialogue View in your scene that handles options. If you have more than one, then you will need to control which one of them will call their completion handler.)
Dialogue Runners can use multiple Dialogue Views. This is actually recommended, because it makes it easier to separate the code for handling lines, from that of running options.
All of the methods in DialogueViewBase are optional. If you don't implement a method, then the default implementation of that method is used instead; the default implementation either does nothing, or as close to nothing as it can while still working. For example, the default implementation of RunLine immediately signals that presentation is complete.
To create a Dialogue View that shows lines, implement RunLine, InterruptLine and DismissLine.
To create a Dialogue View that shows options, implement RunOptions.
To create a Dialogue View that supports both, implement all four.
During gameplay, your user may wish signal that they want to advance the dialogue: that is, they want to proceed to the next line, or they want the current line to be presented more quickly.
To handle this case, subclasses of DialogueViewBase may implement the method UserRequestedViewAdvancement, which can be called by other parts of the game.
In most cases, it is generally appropriate for implementations of UserRequestedViewAdvancement to call the requestInterrupt method, which tells the Dialogue Runner to interrupt the line (across all views) and to proceed to the next one. However, a Dialogue View may choose to perform other actions that deliver the line more quickly.
For example, in several text-based RPG games, dialogue is delivered as a text box, one letter at a time; when it's all delivered, the user can press the A button (to choose an arbitrary example) to proceed.
If, however, you press the A button while the text is still appearing, all of the text appears all at once (as though we'd jumped ahead).
Alternatively, if you pressed the B button while the text was still appearing, the line would be skipped, the dialogue would move to the next line.
UserRequestedViewAdvancement can be called by any part of your code. Additionally, you may wish to use DialogueAdvanceInput, which is a class that listens for user input, and when it receives it, calls UserRequestedViewAdvancement on a view you specify.
To access the tags on a line, you use the Metadata property on the LocalizedLine objects you receive. It's up to your code to decide what to do with the tags themselves.
Yarn Spinner will automatically add certain tags to lines. For example, the #lastline tag is automatically added to any line that's immediately followed by options, which allows your dialogue view to change its behaviour when options are about to appear.
To demonstrate how a custom Dialogue View is put together, we've created an example Dialogue View, which demonstrates the above features and is heavily commented. For more information, see the code on GitHub.
Learn about Options List View, a Dialogue View that displays a list dialogue options.
Options List View is a Dialogue View that presents a list of options in a list.
When this view receives options from the Dialogue Runner, it creates an instance of the Option View prefab you specify in the Option View Prefab property, and adds it as a child of the options list view.
Options List View only displays options, and doesn't display lines. You can use an additional Dialogue View to handle these, like a Line View or a custom Dialogue View of your own.
Canvas Group
The Canvas Group that the Options List View will control. The Canvas Group will be made active when the Options List View is displaying options, and inactive when not displaying options.
Option View Prefab
A prefab containing an Option View. The Options List View will create an instance of this prefab for each option that needs to be displayed.
Last Line Text
A TextMeshPro Text object that will display the text of the last line that appeared before options appeared. If this is not set, or no line has run before options are shown, then this property will not be used.
Fade Time
The time, in seconds, that the Options List View will take to fade in. If this is zero, the Options List View will appear immediately.
Show Unavailable Options
If this is turned on, then any options whose line condition has failed will still appear to the user, but they won't be selectable. If this is off, then these options will not appear at all.
Learn about Line View, a Dialogue View that displays a single line of dialogue on a Canvas.
Line View is a Dialogue View that displays a single line of dialogue inside a Unity UI canvas. When the Dialogue Runner encounters a line in your Yarn Script, the Line View will display it, wait for the user to indicate they're done reading it, and then dismiss it.
Line View only displays lines, and doesn't display options. You can use an additional Dialogue View to handle these, like an Options List View or a custom Dialogue View of your own.
If a line contains a character's name at the start, Line View can be configured to show the name in a separate text view to the line text itself. If the Character Name Text property is connected to a TextMeshPro Text object, then the character's name will appear in this object.
If you don't attach a Text object to the Character Name Text property, you can choose to either show the character name as part of the line (that is, in the Line Text view), or don't show it all.
Line View can be configured to use visual effects when presenting lines.
You can choose to have the Line View fade in when a line appears, and fade out when the line is dismissed.
You can choose to have the text of the line appear, one letter at a time, with a "typewriter" effect.
The Dialogue Runner will automatically proceed to the next piece of content once all dialogue views have reported that they've finished with a line.
If the 'Auto Advance' option on a Line View is turned on, then the Line View will signal that it's done with a line as soon as all visual effects have finished.
If 'Auto Advance' is turned off, then the Line View will not signal that it's done when the effects have finished, and the line's delivery will stop. To make the Line View finish up, you can call the UserRequestedViewAdvancement method, which tells the Line View that the user wants to proceed. The built-in Dialogue System prefab comes set up with a 'Continue' button that calls this method. You can also call this method from code, or use the Dialogue Advance Input component to trigger it based on user input.
Canvas Group
The Canvas Group that the Line View will control. The Canvas Group will be made active when the Line View is displaying a line, and inactive when not displaying a line.
Auto Advance
If this is turned on, the Line View will finish presenting the line, and then wait. This is useful for games where the user has control over the timing of lines of dialogue. If this is turned off, the Line View will signal to the Dialogue Runner that it's done showing the line once all animations are complete.
Hold Time
If Auto Advance is turned on, the Line View will wait this many seconds after all animations are complete before signalling that it's done showing the line. This option is only available when Auto Advance is turned on.
Line Text
A TextMeshPro Text object that the text of the line will be displayed in.
Use Fade Effect
If this is turned on, the Line View will fade the opacity of the Canvas Group from 0% to 100% opacity when lines appear, and fade back to 0% when lines are dismissed.
Fade In Time
The duration of the Fade effect when fading a new line in, in seconds. If this is zero, the line will appear immediately.
Fade Out Time
The duration of the Fade effect when fading a line out, in seconds. If this is zero, the line will disappear immediately.
Use Typewriter Effect
If this is turned on, the text of the line will appear one character at a time. This will take place after the Fade effect, if enabled.
On Character Typed
A Unity Event that's called every time the Typewriter effect displays new text.
Typewriter Effect Speed
The number of characters per second to display when performing a Typewrite effect. Larger values means that text will appear faster.
Character Name Text
A TextMeshPro Text object that will display the name of the character currently speaking the line.
Show Character Name In Line View
If this is turned on, lines that contain a character's name will display the name in the Line Text section. If it is turned off, character names will not be shown at all. This option is only available when Character Name Text is empty.
Continue Button
A game object that will be made active when the line has finished appearing. This is intended to be used for controlling the appearance of a button that the user can interact with to continue to the next line.
There are two important kinds of files you'll use when working with Yarn Spinner for Unity:
Yarn Projects are files that link your Yarn Scripts together, and are used by the Dialogue Runner.
Yarn Scripts are files that contain your written dialogue.
Learn about Yarn scripts, which are the assets that contain the dialogue you write.
A Yarn script is a text file containing your dialogue.
Yarn scripts need to be part of a Yarn Project in order to be used in your game.
To create a new Yarn script in Unity, follow these steps:
Open the Assets menu, and choose Yarn Spinner -> Yarn Script.
Unity will create a new file. Type in a name for the file, and press return.
The new file that you've just created will contain a single node, which has the same name as the file.
Creating a Yarn Script in Unity is exactly the same as creating a .yarn file externally (i.e. in macOS Finder or Windows Explorer), and dragging it into the Assets folder of your Unity project, or directly into the Project pane (where the new Yarn Script we created through the process above appeared) in Unity.
To edit a Yarn script, double-click it in Unity. The file will open in your editor. When you save your changes and return to Unity, it will be re-compiled.
You can learn about our recommended editor, Visual Studio Code with the official Yarn Spinner Extension at: Fundamentals.
Learn about Yarn Projects, which group your scripts together for use in a Dialogue Runner.
A Yarn Project is a file that links multiple Yarn scripts together. Yarn projects are how Dialogue Runners work with your content.
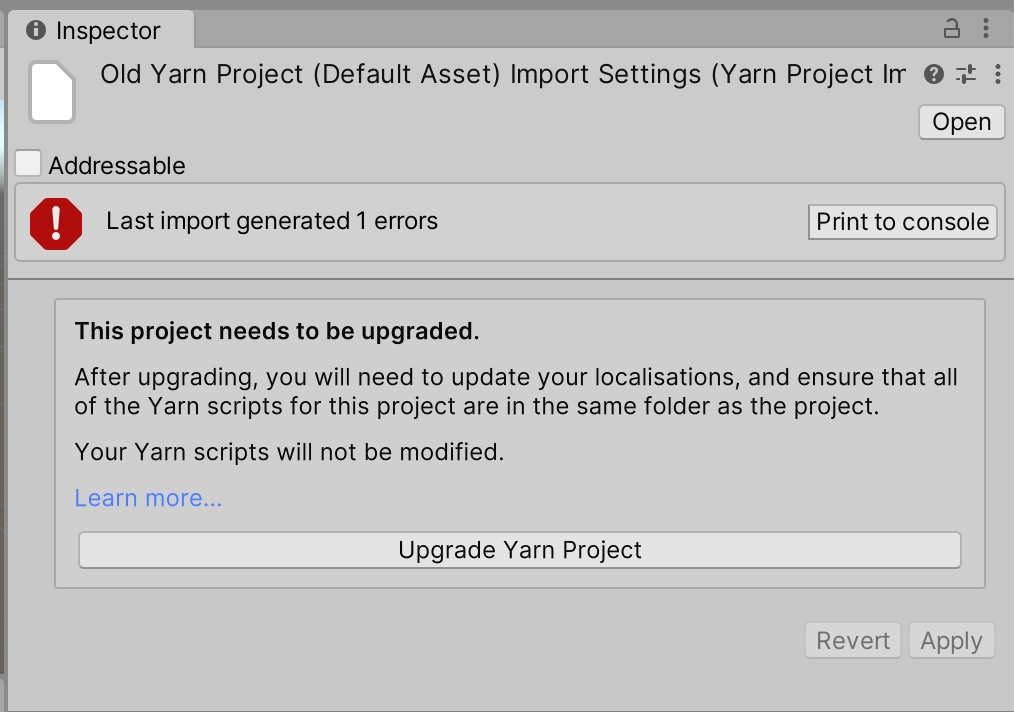
If you are upgrading your version of Yarn Spinner from version 2.2 or earlier, you will need to upgrade your Yarn Project. See Upgrading Yarn Projects to learn how to do this.
To create a new Yarn Project, follow these steps:
Open the Assets menu, and choose Yarn Spinner -> Yarn Project.
Unity will create a new file. Type in a name for the file, and press return.
On their own, a Yarn Project doesn't do anything. In order to be useful, you need to add Yarn scripts to it.
Yarn Projects include all Yarn Scripts that the project finds in the Source Files directory. By default, that means all Yarn Scripts in the same directory as the Yarn Project, and all of that directory's children.
When you add a Yarn Script to the same folder as a Yarn Project, it will automatically be included in the Yarn Project. When you make changes to the script, the Yarn Project will automatically be re-imported.
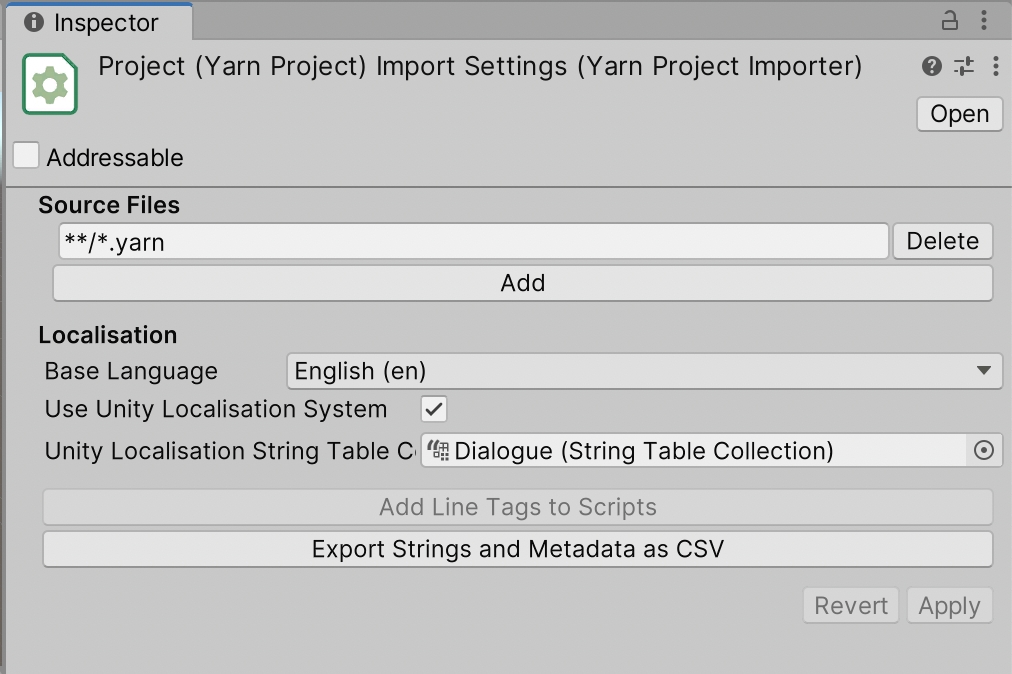
You can change the locations that a Yarn Project looks for Yarn Scripts by modifying the Source Files setting. Each entry in the Source Files setting is a search pattern.
*
any filename
"*.yarn" will find "One.yarn" and "Two.yarn".
**/*
any path, including subdirectories
"**/*.yarn" will find "One.yarn" and "Subfolder/Two.yarn".
..
the parent folder
"../*.yarn" will find "One.yarn" in the parent folder.
You can add as many entries to the Source Files field as you like. If a file is matched by multiple patterns, it will only be included once.
A Yarn script can be included in more than one Yarn Project.
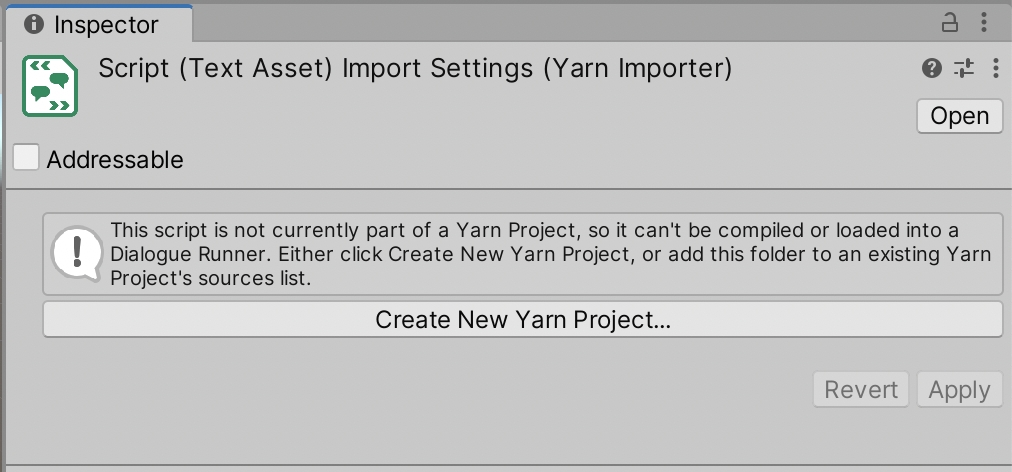
You can create a new Yarn Project from a script. To do this, follow these steps:
Select the Yarn script in the Project pane.
In the Inspector, click the Create New Yarn Project button.
Clicking this button does two things:
A new Yarn Project will be created next to the Yarn script.
The new Yarn Project will include the Yarn script you created it from in its list of source scripts.
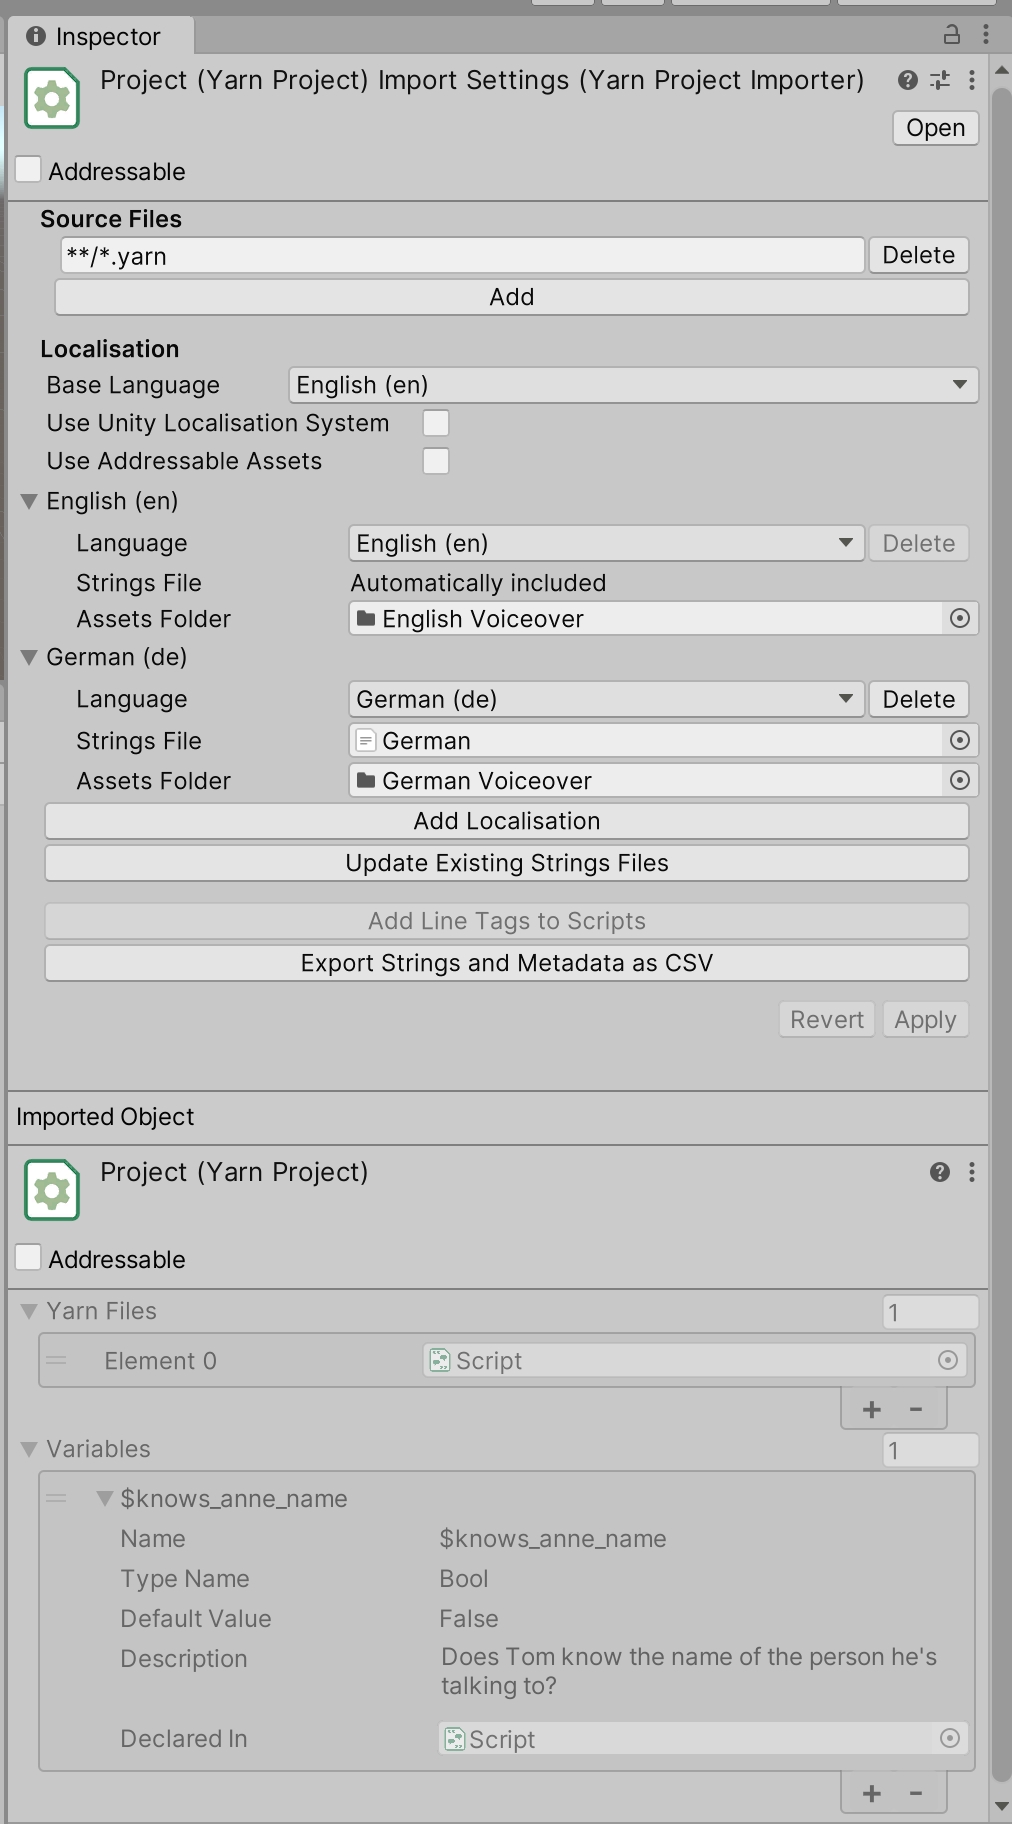
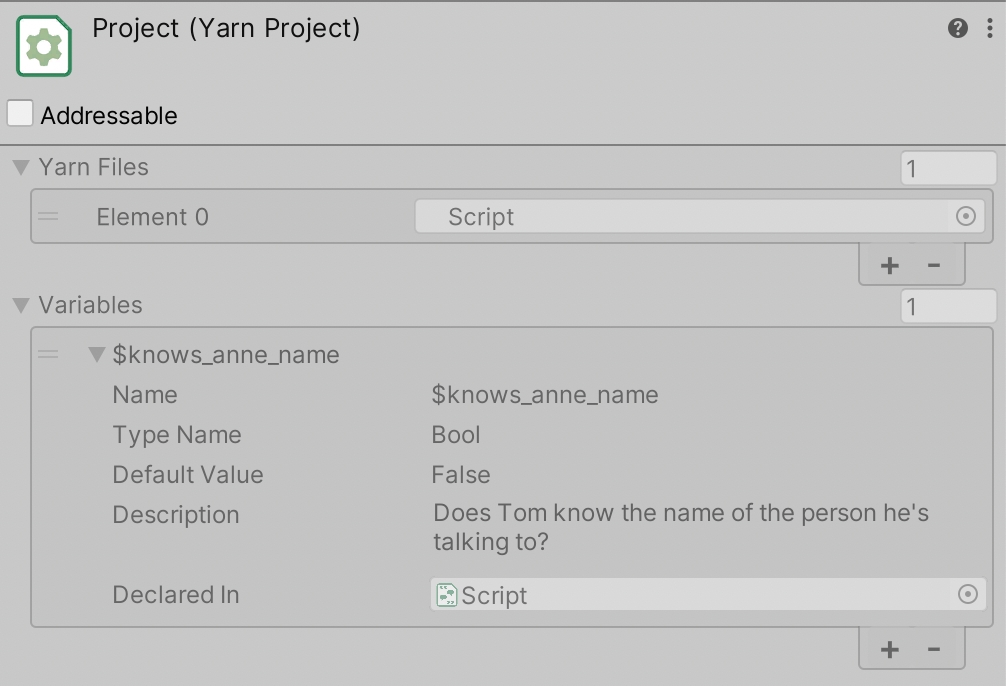
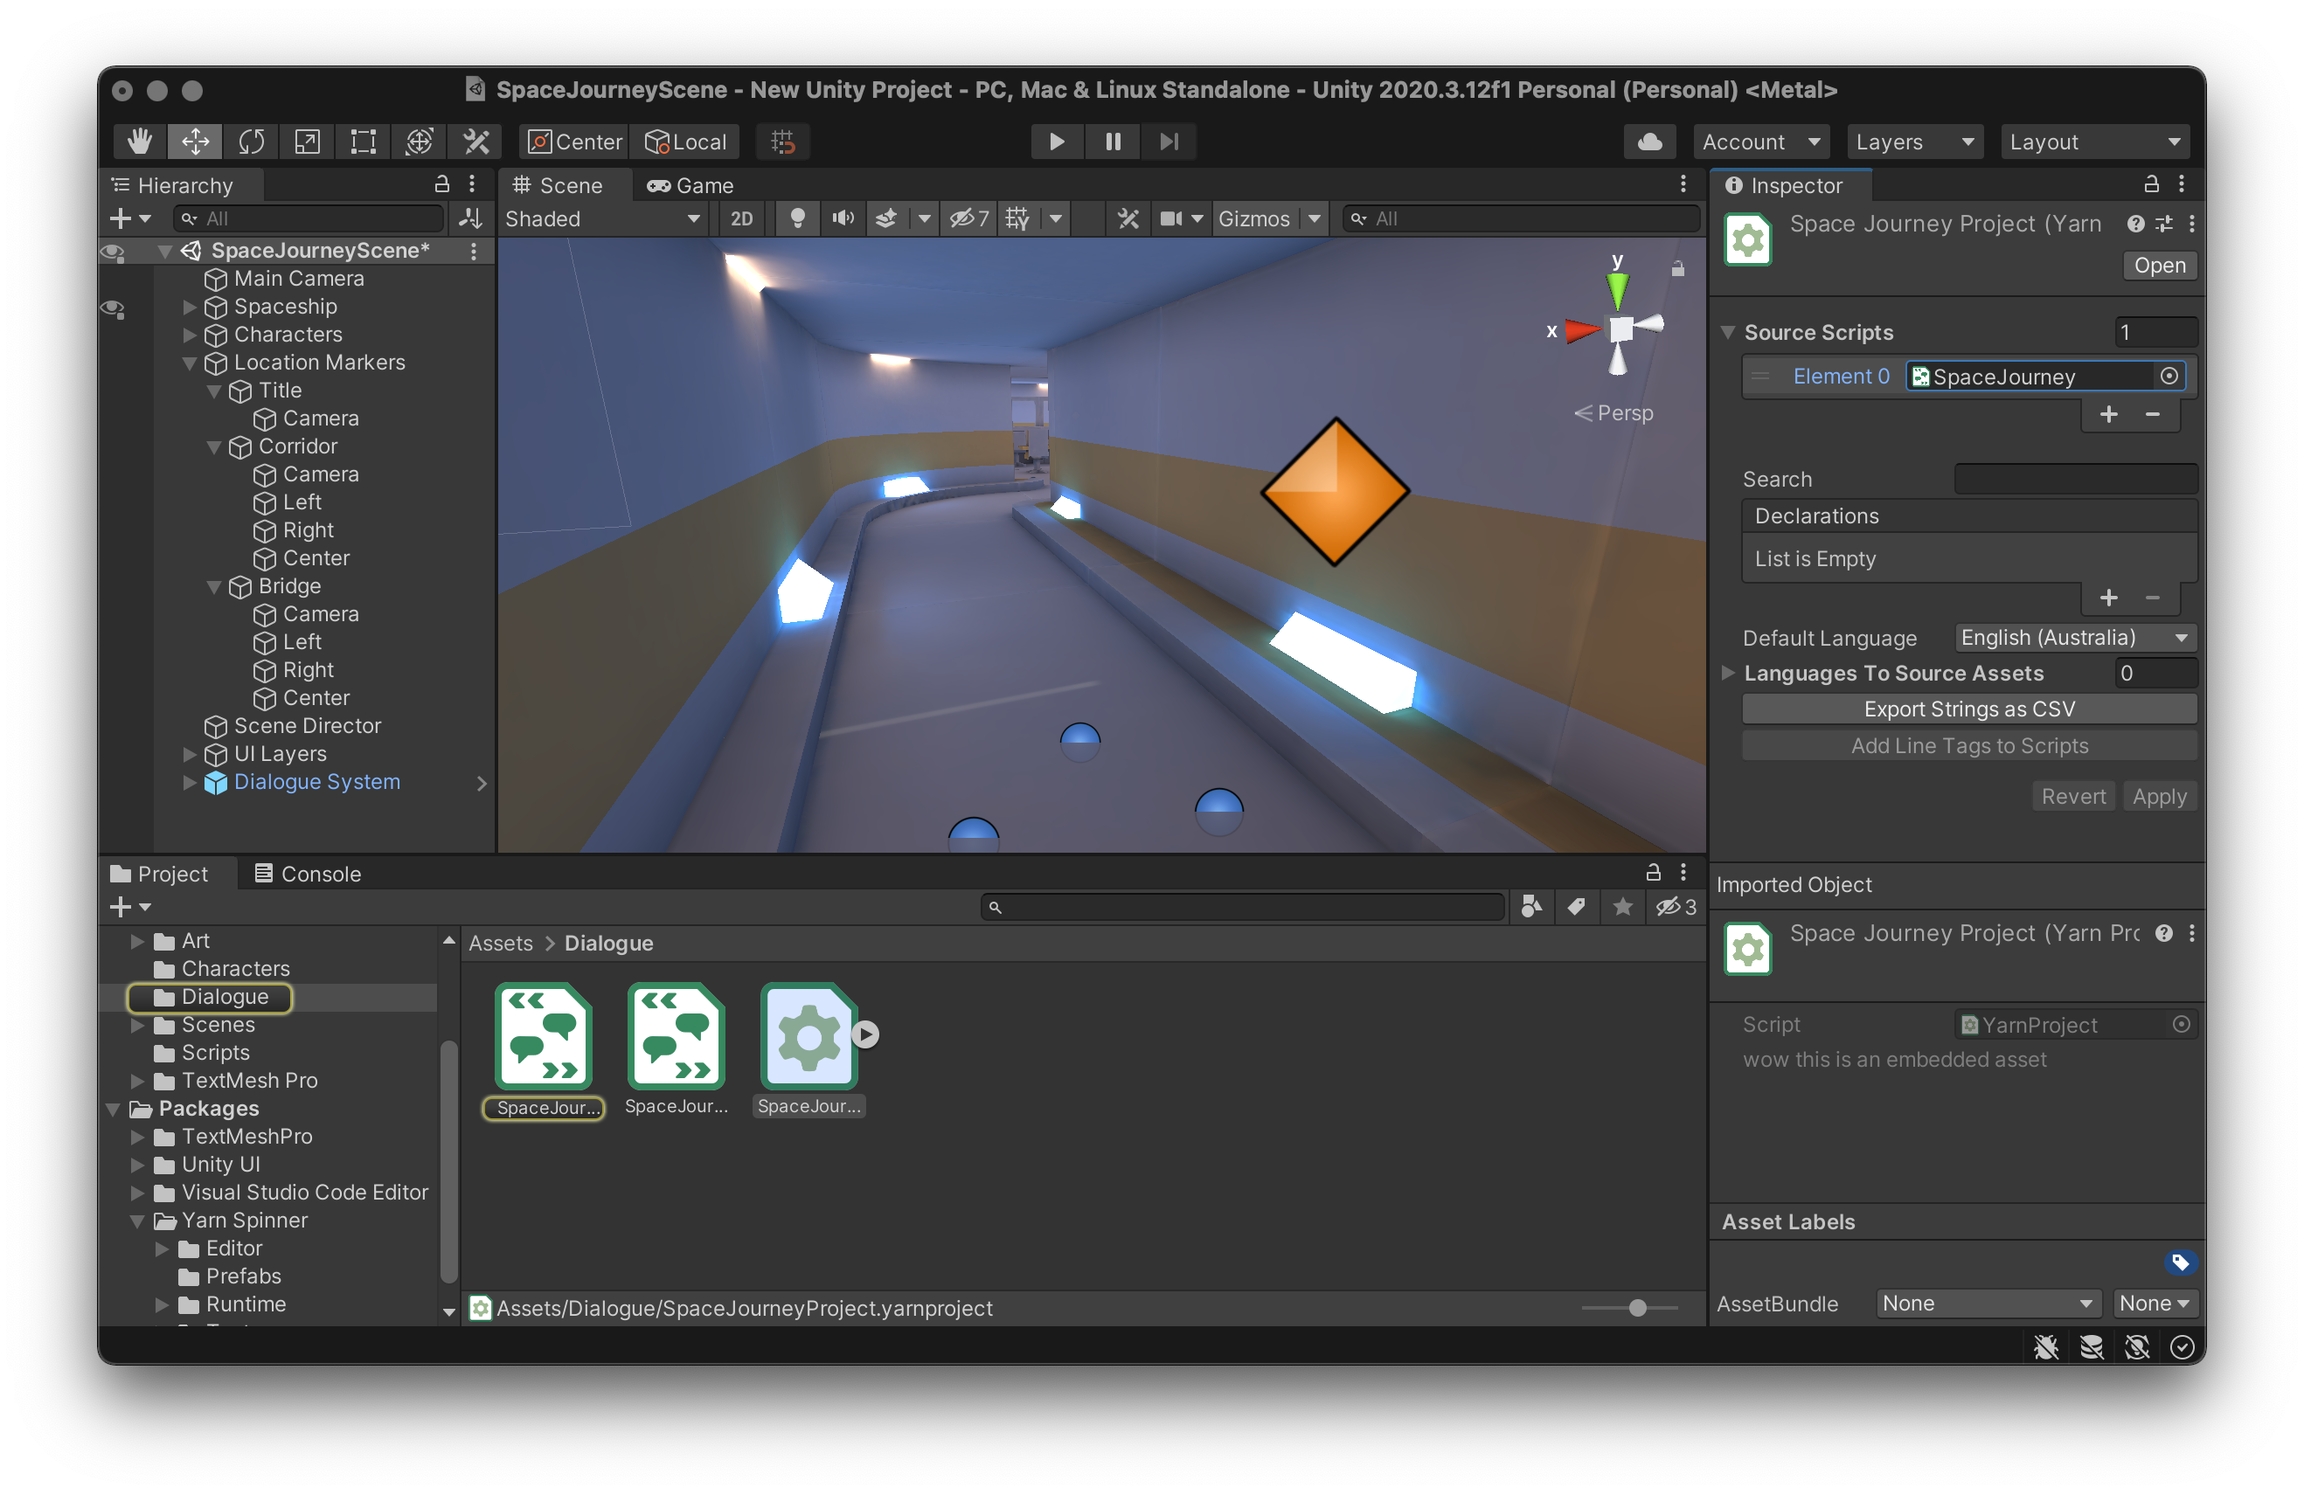
A Yarn Project's inspector shows information about every variable that are used in the Yarn scripts. This section of the Inspector shows the name, type, description, and default value of each variable.
The Inspector will show information about every variable in the project. If you use a declare statement to declare a variable, you can control the initial value of a variable, as well as its description. If you don't declare a variable, Yarn Spinner will attempt to figure the variable's type out based on how it's used, and won't be able to provide a description.
When you write a Yarn script, you write it in a specific human language. This is referred to as the 'base' language of the script. It's called the base language because it's the one you start with, and the one you translate into other languages.
Unless you change it to something else, Yarn Spinner will set the base language to your computer's current locale.
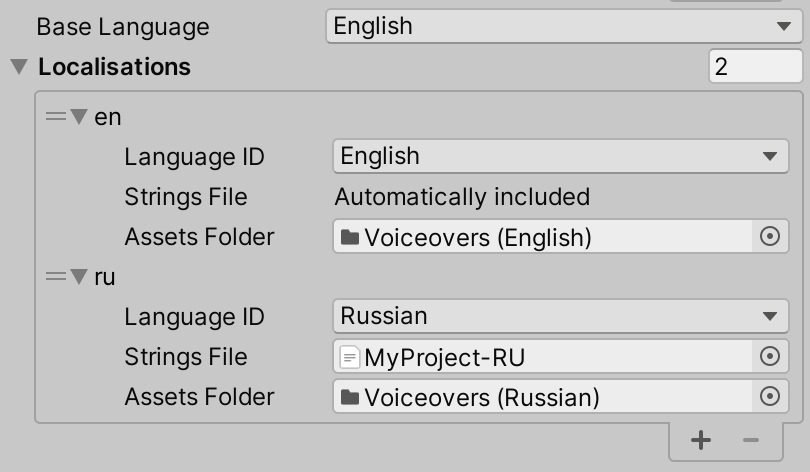
You can set the base language of a Yarn Project in the Inspector by changing the Base Language setting.
If you want to translate your scripts into another language, or if you want to associate each line with assets (like voice over audio clips), you create a new Localisation. To learn about this process, see Adding Localizations and Assets to Projects.
Yarn Projects are used by Dialogue Runners. When a Dialogue Runner is told to start running dialogue, it reads it from the Yarn Project it's been provided.
If you try to start a Dialogue Runner and it doesn't have a Yarn Project, or the Yarn Project doesn't have any Yarn scripts, or if any of the Yarn scripts contain an error, the Dialogue Runner won't be able to run.
Source Scripts
The list of places that this Yarn Project looks for Yarn Scripts.
Base Language
The language that the Yarn Scripts are written in.
Localisations
A mapping of languages to string tables and associated assets.
Use Addressable Assets
This checkbox will only appear if the Addressable Assets package is installed in your project, and if the project is not using the Unity Localisation System.
Use Unity Localisation System
If this is turned on, the Yarn Project will use the Unity Localisation System to store line data in.
This checkbox will only appear if the Localisation package is installed in your project.
Unity Localisation String Table
The String Table Collection that the Yarn Project uses. When the project is imported or reimported, this String Table will be filled with line content that comes from the project's Yarn Scripts.
This field will only appear if project is using the Unity Localisation system.
Export Strings as CSV
Update Existing Strings Files
When you click this button, all .csv strings files that are configured in the Languages to Source Assets list will be updated with any lines that have been added, modified or deleted since the strings file was created.
Add Line Tags to Scripts
If you are upgrading your version of Yarn Spinner from version 2.2 or earlier, you will need to upgrade your Yarn Project. To do this, select the Yarn Project, and click Upgrade Yarn Project.
After upgrading your Yarn Project, you will need to set up any localisations you had previously configured on your project. Follow the instructions in Built-In Localisation System or Unity Localisation, depending on what your game is using.
You will also need to either move all of your Yarn Scripts into the same folder as the Yarn Project, or update the Yarn Project's Source Files setting to tell the Yarn Project where to find your scripts.
Watch a video where Yarn Spinner developer Jon Manning walks you through upgrading a Yarn Project:
Learn about the Dialogue Runner, which runs the contents of your Yarn Scripts and delivers lines, options and commands to your game.
The Dialogue Runner is the bridge between the dialogue that you've written in your Yarn scripts and the other components of your game. It's a component that's responsible for loading, running and managing the contents of a Yarn Project, and for delivering the content of your Yarn scripts to the other parts of your game, such as your user interface.
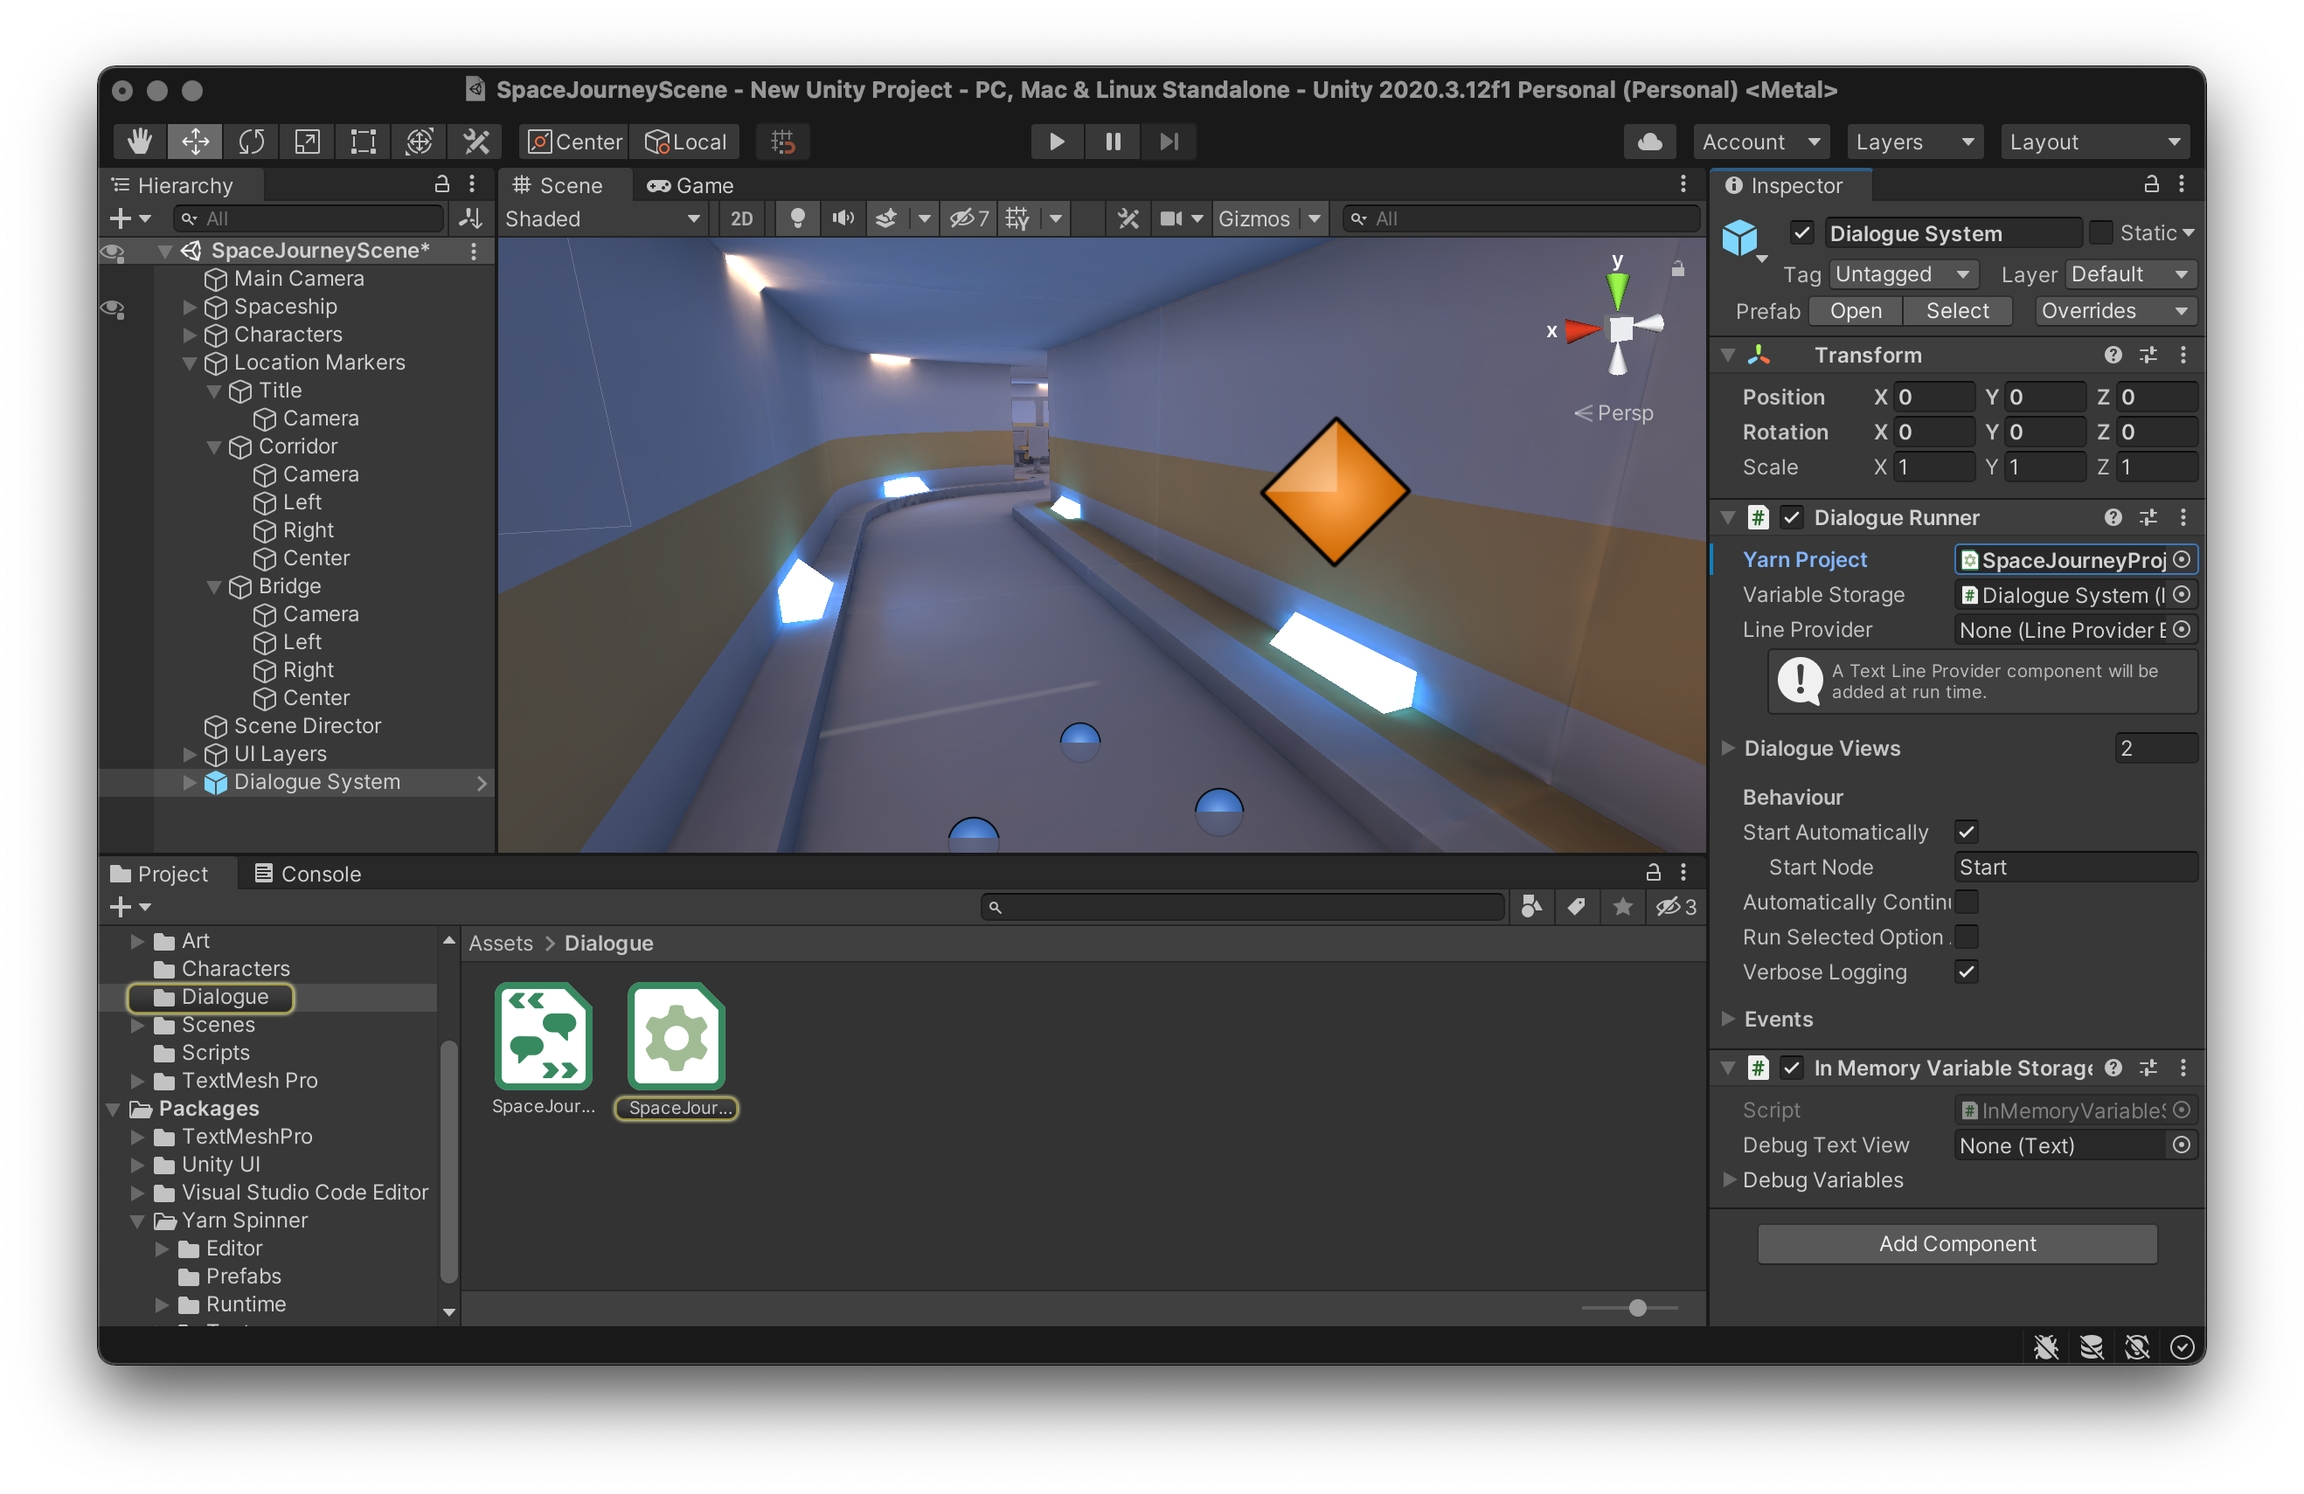
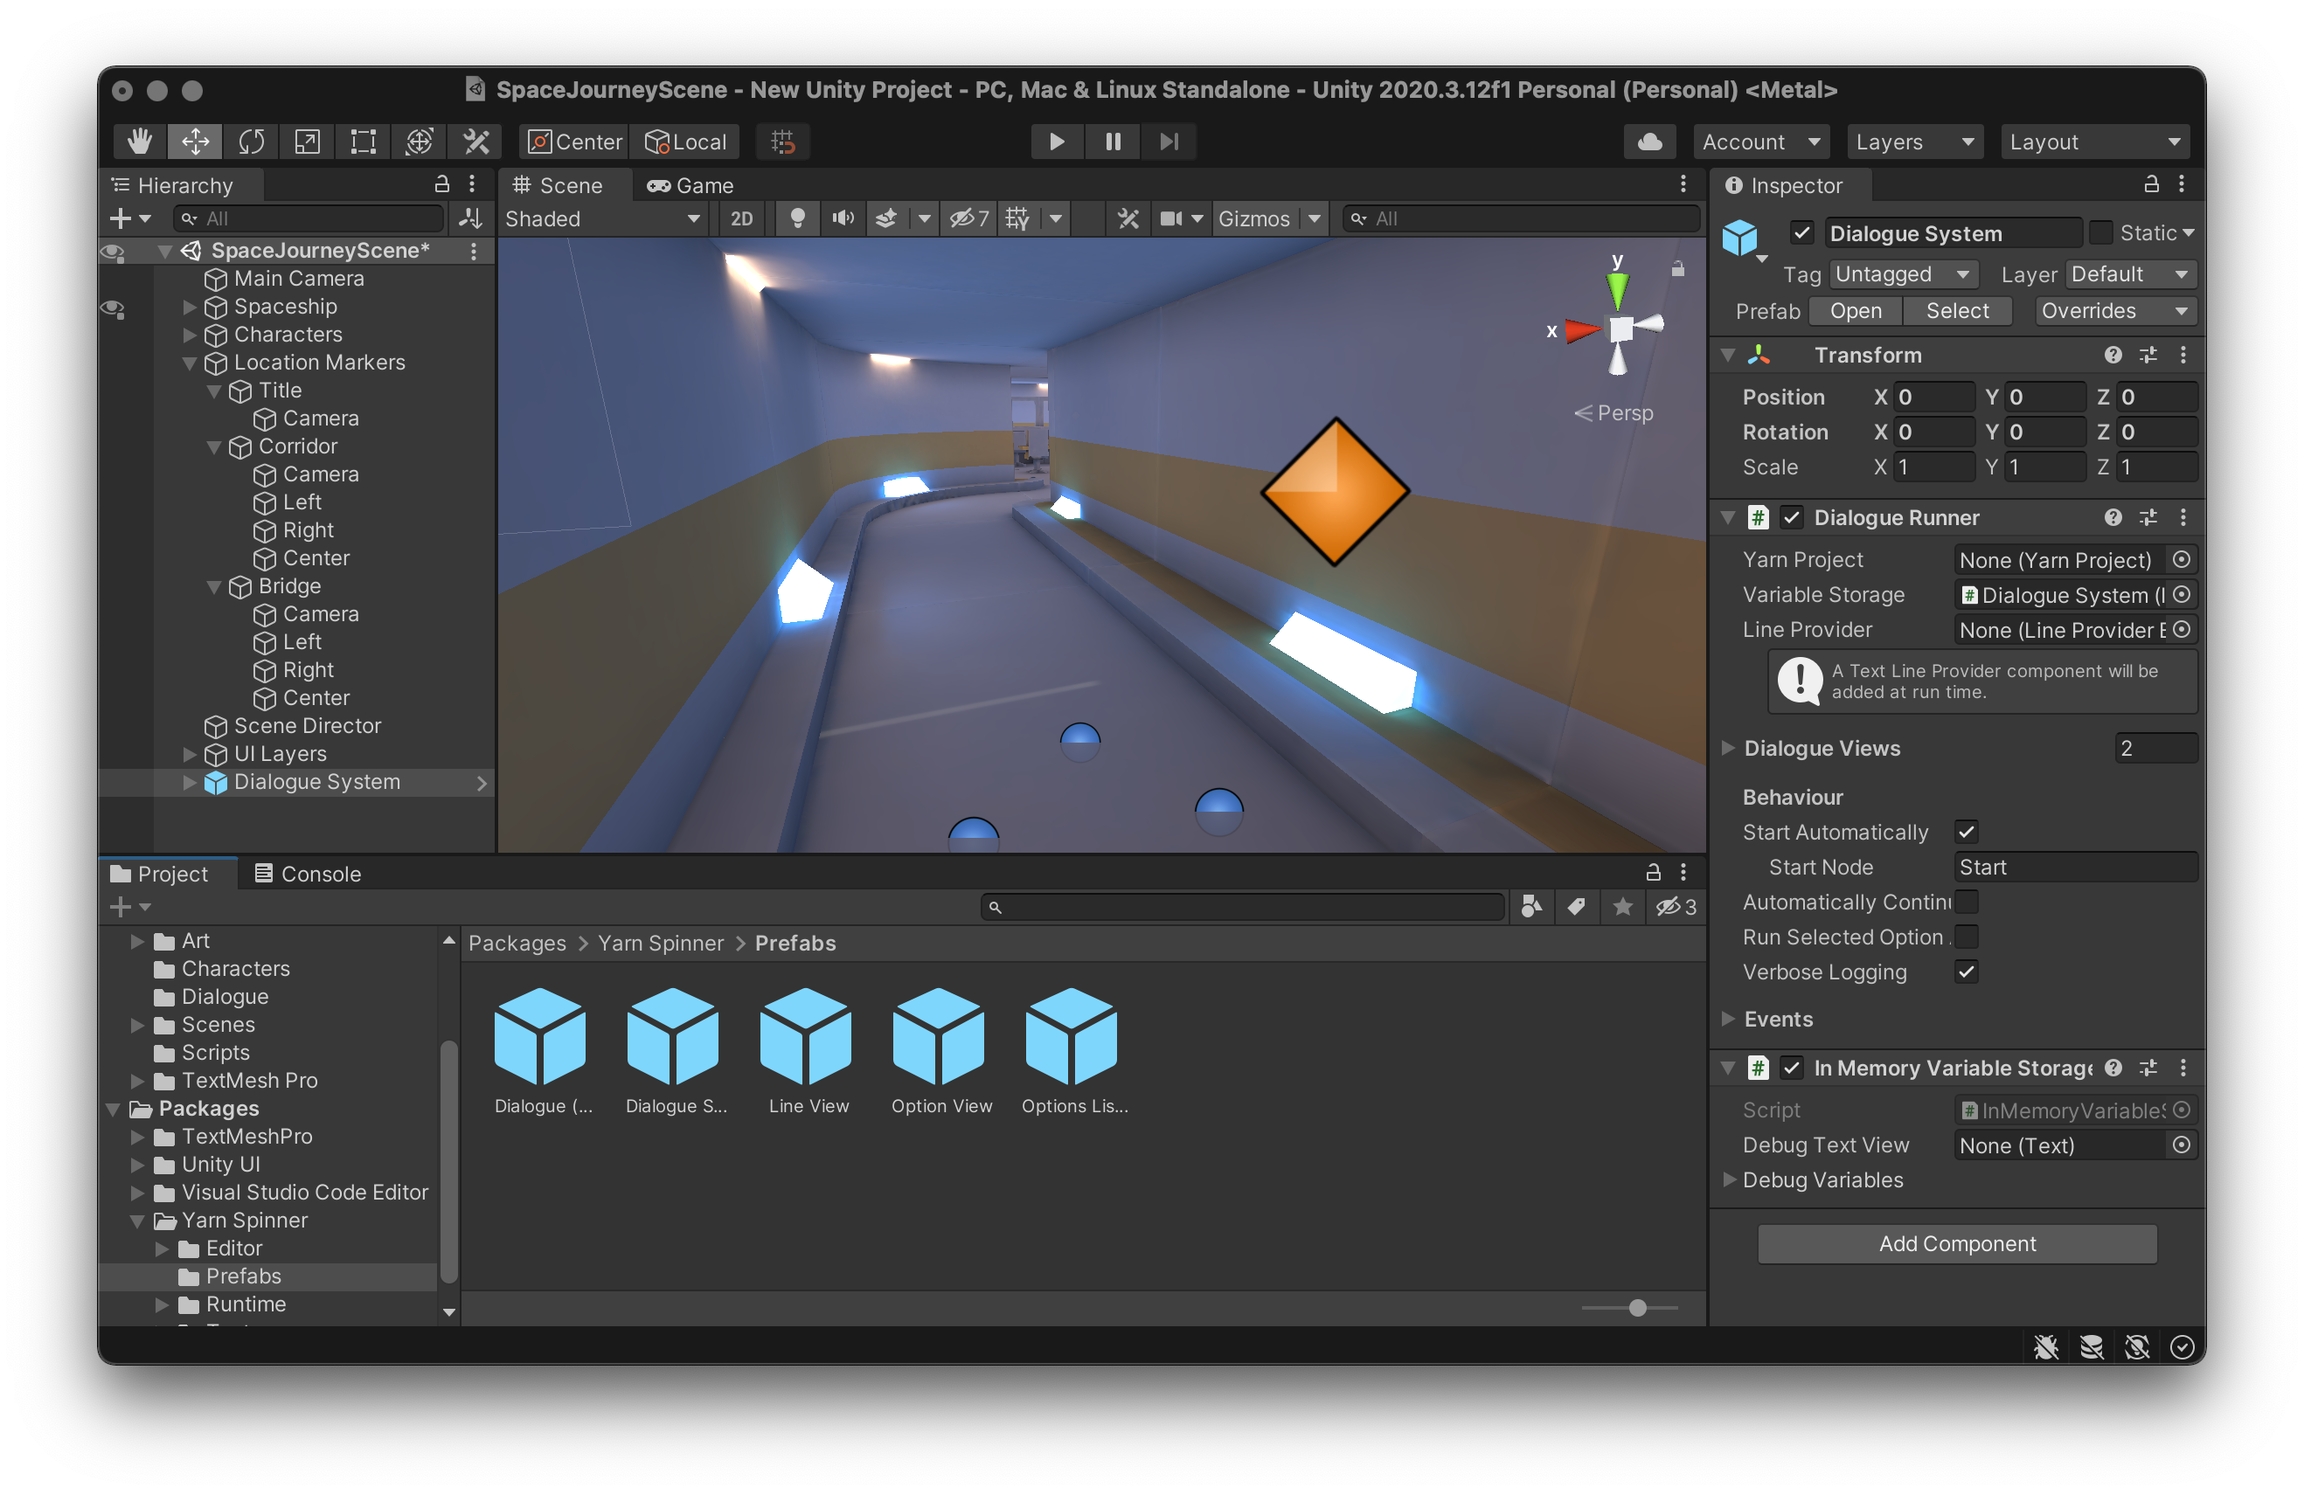
Setting up a Dialogue Runner is the first step in adding dialogue to your game. To use a Dialogue Runner, you add it to a game object in your scene, connect it to Dialogue Views, and provide it with a Yarn Project to run.
When you want to start running the dialogue in your game, you call the Dialogue Runner's StartDialogue method. When you do this, the Dialogue Runner will begin delivering lines, options and commands to its Dialogue Views.
The Dialogue Runner is designed to work with other components of Yarn Spinner for Unity:
The contents of your dialogue are delivered to your Dialogue Views.
The values of variables are stored and retrieved using the Dialogue Runner's Variable Storage.
The content that users should see - that is, the text in their current language, voice over clips, and other assets - are retrieved using the Dialogue Runner's Line Provider.
The bare-bones minimum that a Dialogue Runner needs in order to work is a Yarn Project and at least one Dialogue View. If you don't set up a Variable Storage or a Line Provider, the Dialogue Runner will use temporary placeholders.
If your game is using the Unity Localization system, your Dialogue Runner must use a Unity Localised Line Provider.
Yarn Project
Variable Storage
Line Provider
Dialogue Views
Start Automatically
Start Node
If Start Automatically is turned on, the Dialogue Runner will start running this node when the scene starts. (If your Yarn Project does not contain a node with this name, an error will be reported.)
Run Selected Options as Lines
If this is turned on, when the user chooses an option, the Dialogue Runner will run the selected option as if it were a Line.
Verbose Logging
If this is turned on, the Dialogue Runner will log information about the state of each line to the Console as it's run.
On Node Start
A Unity Event that's fired when the Dialogue Runner begins running a new node. This may be fired multiple times during a dialogue run.
On Node Complete
A Unity Event that's fired when the Dialogue Runner reaches the end of a node. This may be fired multiple times during a dialogue run.
On Dialogue Complete
A Unity Event that's fired when the Dialogue Runner stops running dialogue.
On Command
This page shows you how to install Yarn Spinner for Unity, the Unity integration for running Yarn and Yarn Spinner scripts in your Unity-based games.
You can download and install Yarn Spinner for Unity in a variety different ways. The best ways to download and install Yarn Spinner for Unity, and the ones that support us to continue developing it the most are via Itch.io and the Unity Asset Store.
Yarn Spinner is an open source project. You can directly support the Yarn Spinner Team by purchasing Yarn Spinner from Itch or the Unity Asset Store, but it will always have a free option as well. To support the continued development of Yarn Spinner, purchase Yarn Spinner for Unity from one of the storefronts. This is the best way to directly support the Yarn Spinner team.
Variable Storage components are responsible for storing and retrieving the values of variables in your Yarn scripts. When a Yarn script needs to get the value of a variable, it asks the Variable Storage for it; when a Yarn script sets the value of a variable, the Variable Storage is given the value.
Each game has different requirements for how variables are stored, which means that Yarn Spinner doesn't make any assumptions how the information is actually stored on disk. Instead, you can create your own custom Variable Storage script that implements the methods that Yarn Spinner needs.
The In-Memory Variable Storage stores everything in memory; when the game ends, all variables that have been stored are erased.
If you don't connect a Variable Storage to your Dialogue Runner, it will create an In-Memory Variable Storage when the game starts, and use that.
The In-Memory Variable Storage component is a Variable Storage component that stores all variables in memory. These variables are erased when the game stops.
The In-Memory Variable Storage component is intended to be a useful tool for getting started, and to be replaced with a custom variable storage that meets your game's needs.
However, if your game has no need to save and restore game state, then this class can be used in your final game, too.
This list will only appear if the project is not using the Unity Localisation system. See for more information.
If this is turned on, the Yarn Project will be set up to tell other parts of the game that localised assets like audio files should be fetched using the system.
When you click this button, all of the lines in the Yarn Scripts that this project uses will be written to a .csv file, which can be translated to other languages. See for more information.
This checkbox will only appear if the project is not usin the Unity Localisation system. See for more information.
When you click this button, any line of dialogue in the Source Scripts list that doesn't have a #line: tag will have one added. See for more information.
The that this Dialogue Runner is running.
The to store and retrieve variable data from. If you do not set this, the Dialogue Runner will create an for you at runtime.
The to use to get user-facing content for each line. If you do not set this, the Dialogue Runner will create a for you at runtime.
The to send lines, options and commands to.
If this is turned on, the Dialogue Runner will start running the node named Start Node when the scene starts. If this is not turned on, you will need to call to start running.
A Unity Event that's fired when a Command is encountered. This will only be called if no other part of the system has already handled the command, such as command handlers registered via or .
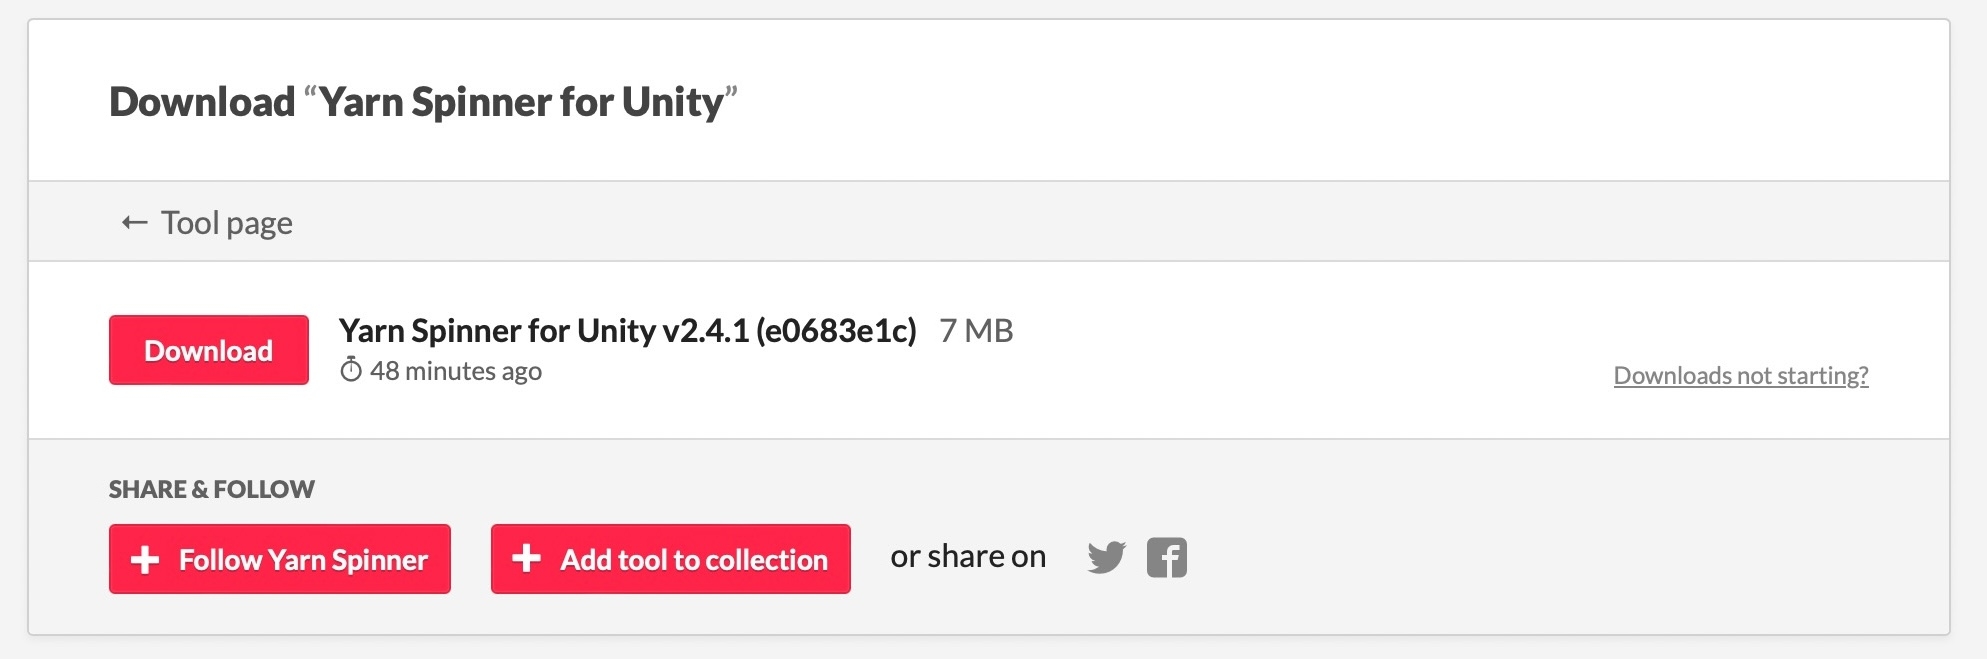
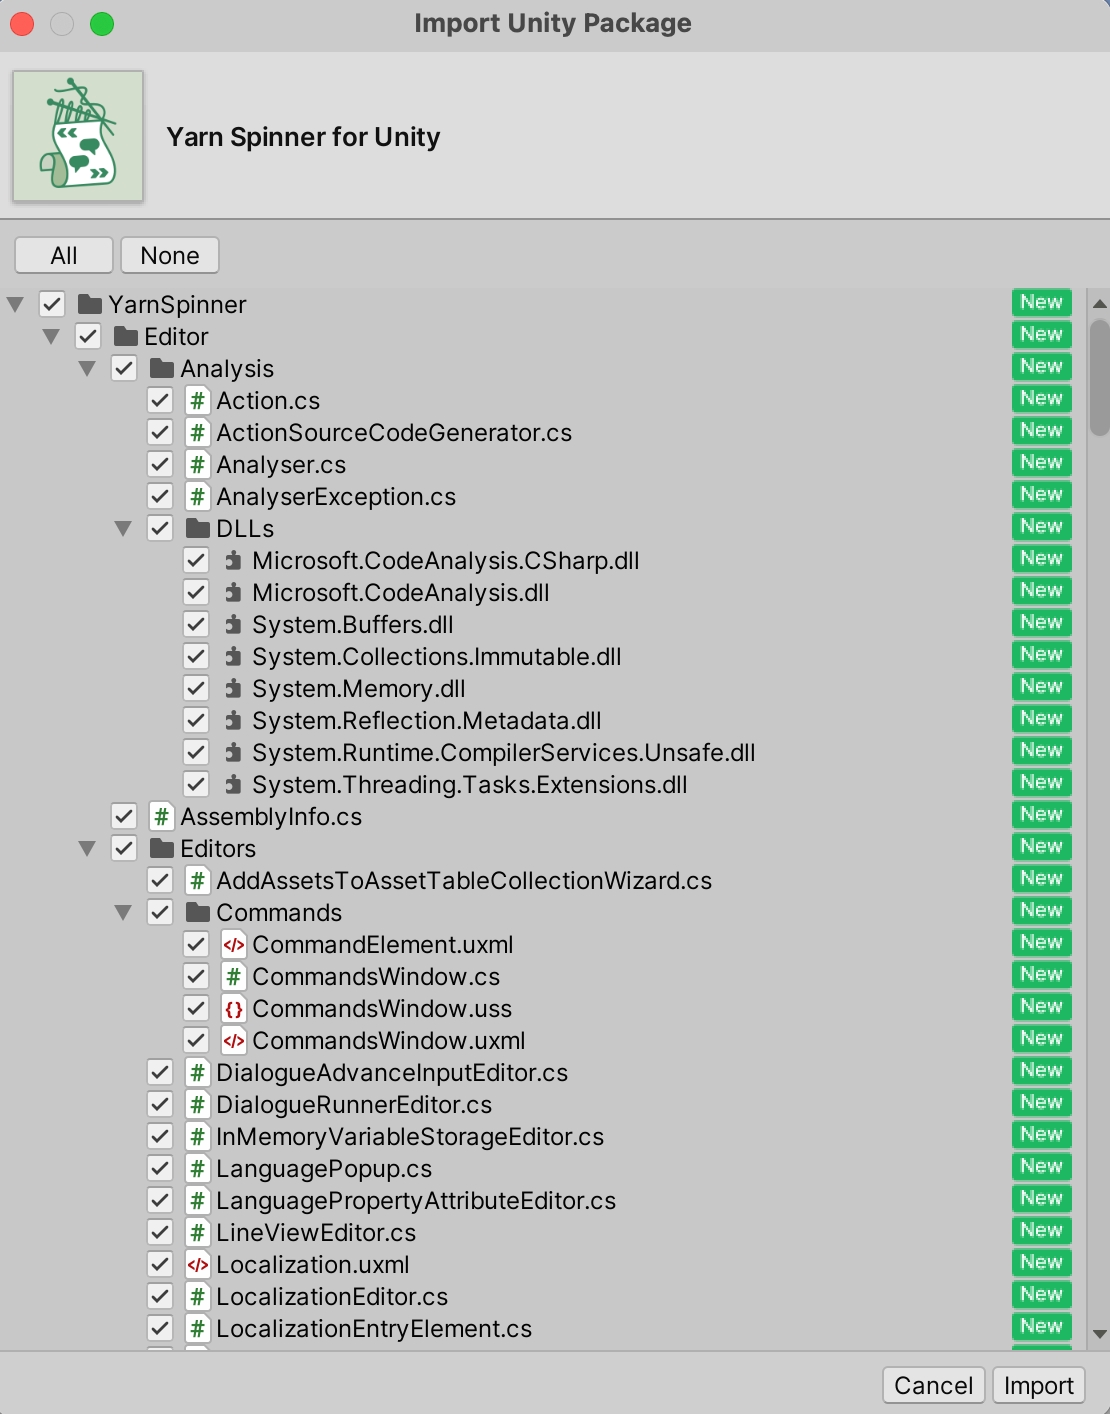
First, visit the Yarn Spinner Itch.io Store, and click the Buy Now button, and complete the checkout process.
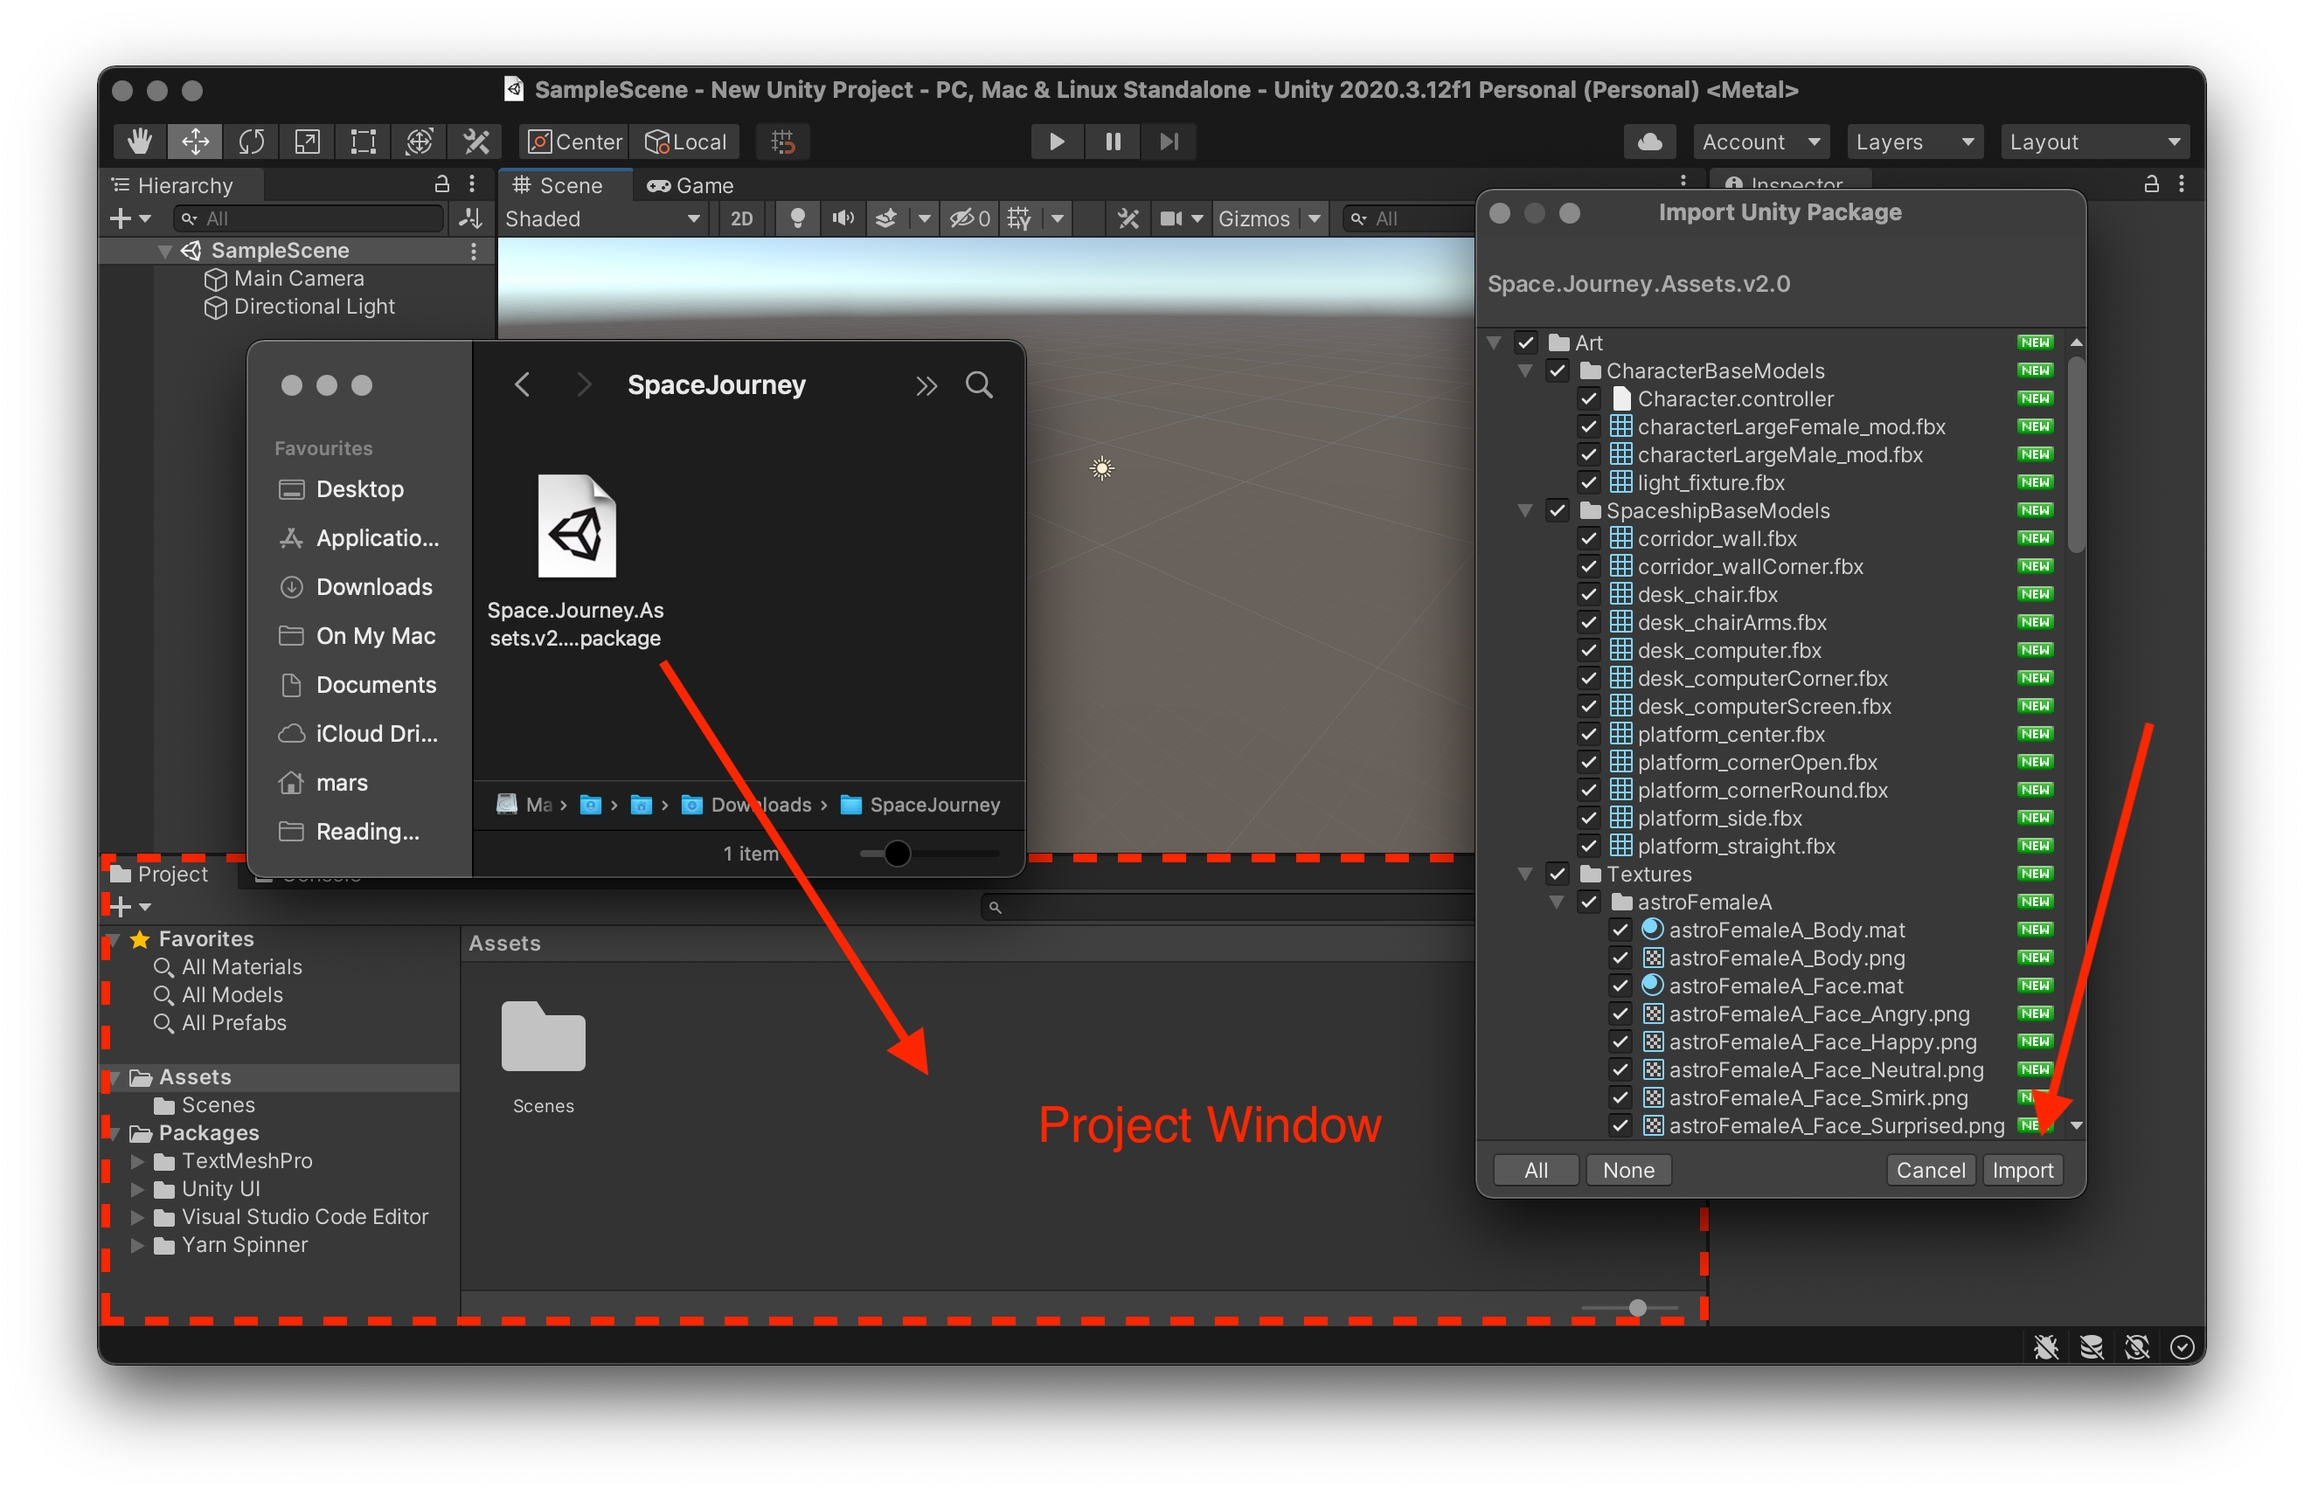
Once you've purchased Yarn Spinner, you'll find a Download button at the top of the page:
The download button will take you the following page, where you can download the Yarn Spinner for Unity .unitypackage:
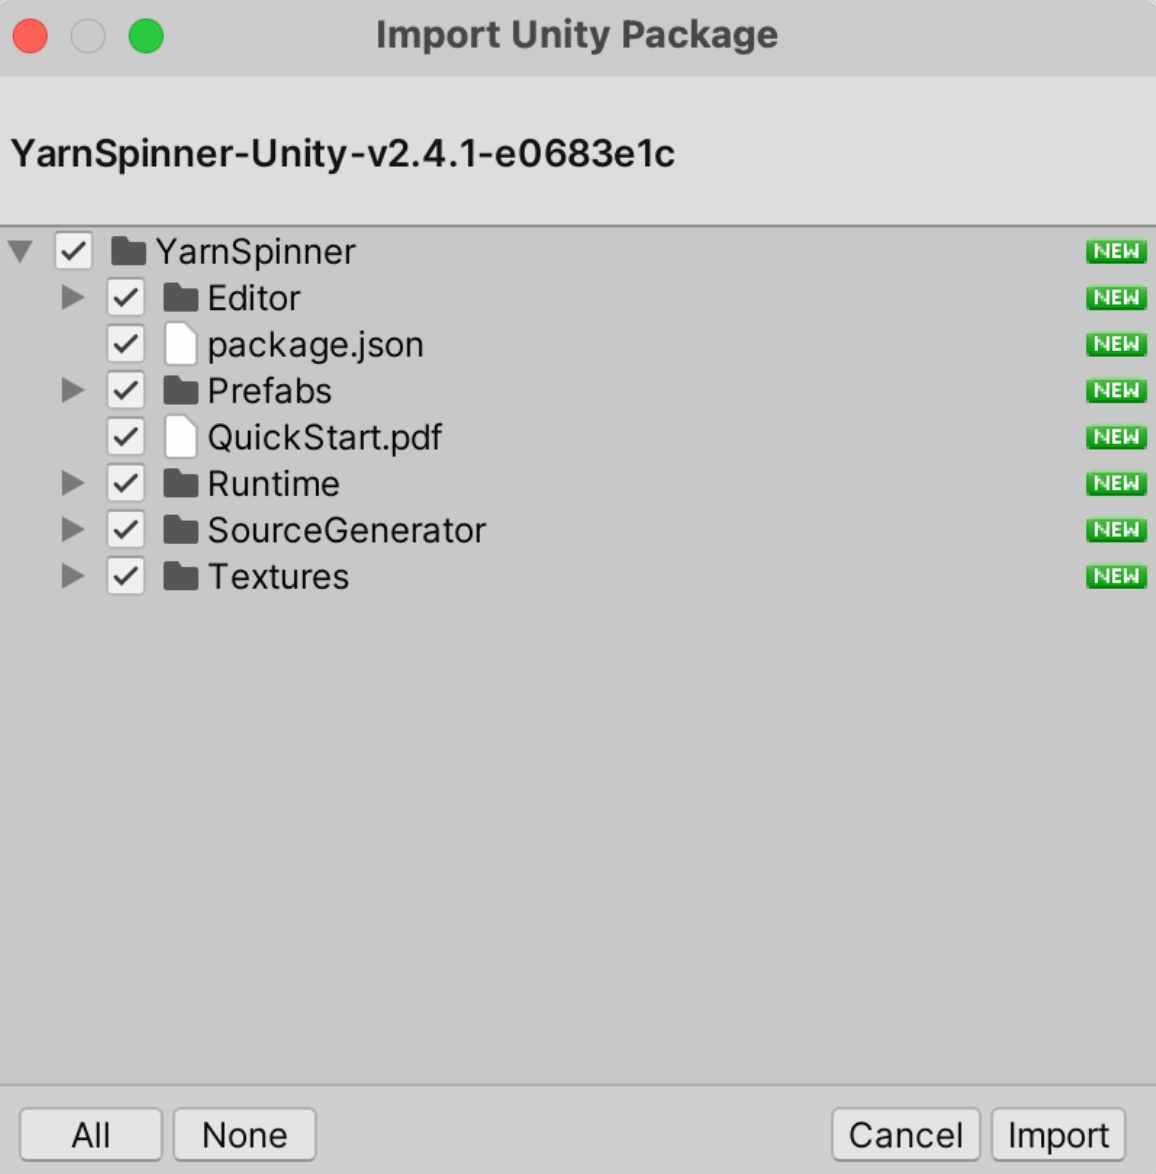
Once you've downloaded the .unitypackage, with the Unity project you want to use it in open and ready to go, double click it. Unity will then allow you to import the package into your project:
First, visit the Unity Asset Store page for Yarn Spinner for Unity, and add it to your cart, and complete your purchase while logged into the same Unity account you use to activate Unity.
Once you've purchased Yarn Spinner for Unity, you'll find the Add to Cart button replaced by an Open in Unity button. Click this button to launch Unity, and the Package Manager will locate your purchased package:
Once the Package Manager has located the package, you can use the Download button to fetch it:
Once Yarn Spinner for Unity has downloaded, you can use the Import button to start the process of adding it to your project:
This will trigger the Import Unity Package workflow, where you can use the Import button to add the Yarn Spinner for Unity package to your project:
And with that, you're ready to use Yarn Spinner! You might also want to download and import the Yarn Spinner for Unity Samples as a .unitypackage, from here.
You can review Unity's documentation for using the Asset Store for further guidance on working with purchased packages.
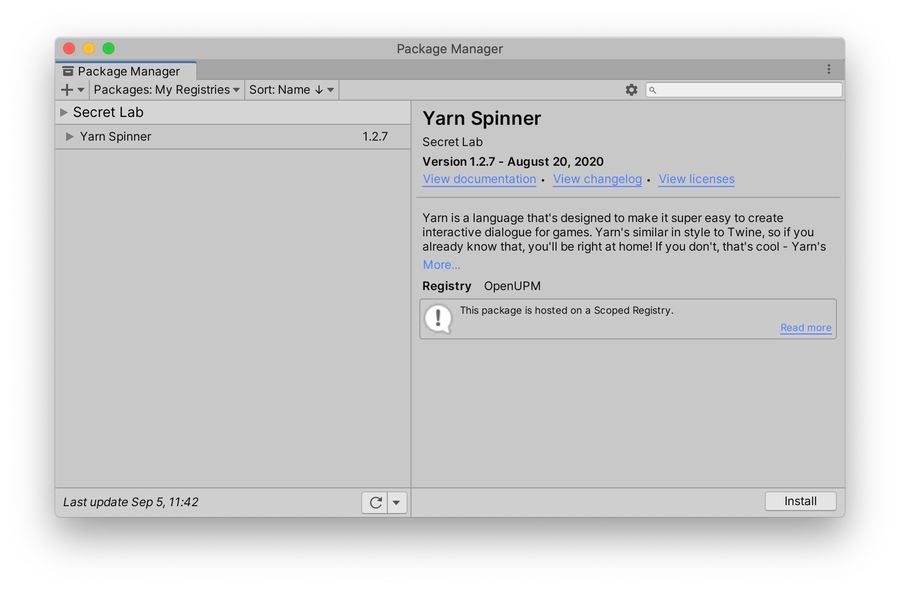
You can also install the Yarn Spinner package into your project using the Package Manager window in Unity. Specifically, Yarn Spinner is available via the OpenUPM registry.
In order to follow the instructions in this section, your project needs to be using Unity 2020.1 or higher. If your project is using an earlier version of Unity, we recommend installing Yarn Spinner from Git.
Before you can install Yarn Spinner from OpenUPM, you first need to configure your project so that it knows where to get the package from.
In Unity, open the Edit menu, and choose Project Settings.
In the list of sections at the left hand side of the window, select Package Manager.
This window is where you tell Unity about where to find packages that come from registries besides Unity's built-in one.
In the Name field, type OpenUPM.
In the URL field, type https://package.openupm.com.
In the Scopes field, type dev.yarnspinner.
Click Save.
When you're done, the settings window should look like this:
You can now install Yarn Spinner itself.
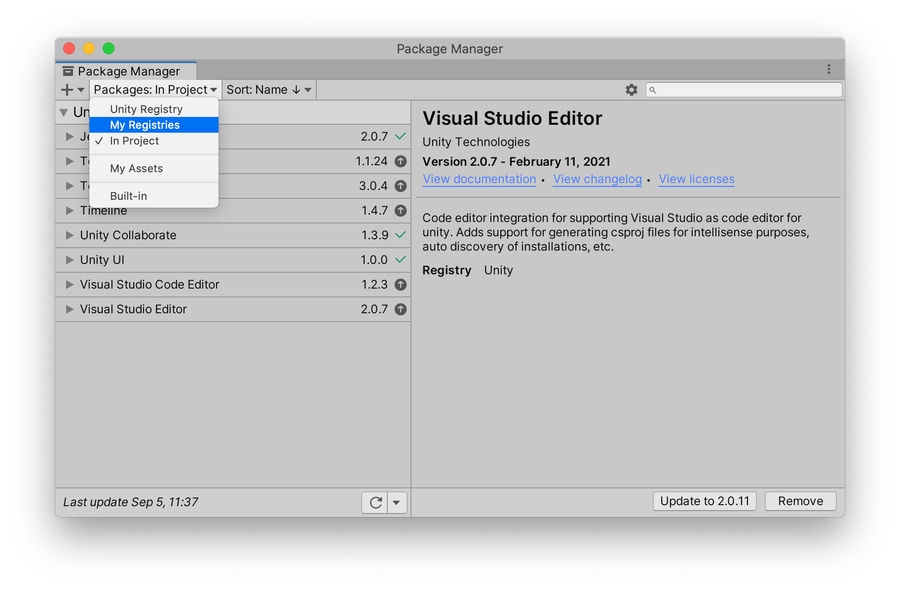
Open the Window menu, and choose Package Manager.
In the toolbar, click Packages: In Project, and choose My Registries.
Yarn Spinner will appear in the list. Select it, and click Install.
Yarn Spinner will download and install into your project.
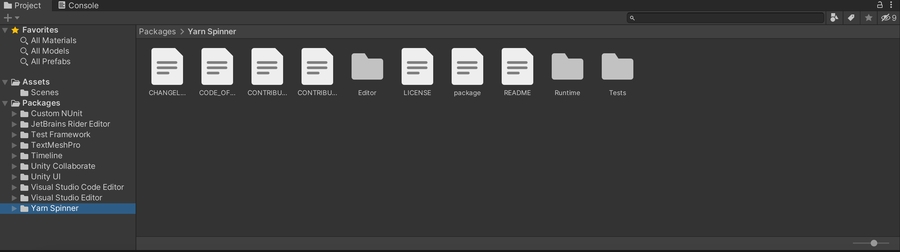
You can verify that everything is imported succesfully by looking for Yarn Spinner under Packages, in the Project pane.
As an alternative to downloading Yarn Spinner from OpenUPM, you can install Yarn Spinner by downloading the package directly from GitHub, where the project's source code is stored.
Where possible, we recommend installing Yarn Spinner via a purchased .unitypackage, or from OpenUPM rather than GitHub, because it's easier to update to new versions.
To install Yarn Spinner from GitHub, follow these instructions.
Make sure your system has Git (minimum version 2.14.0) installed.
In Unity, open the Window menu, and choose Package Manager.
Click the + button, and choose "Add package from git URL".
In the text field that appears, enter the following URL:
https://github.com/YarnSpinnerTool/YarnSpinner-Unity.git#current
Be sure to type the URL exactly as it appears in this document.
The project will download and install. This might take a moment.
If you don't have a game save system, you can use the component. This is a simple Variable Storage component that's built into Yarn Spinner.
Debug Text View
A Unity UI Text object that will display a summary of the variables that have been stored in this component. If this is not set, this property will not be used.
You can use this property to display a debug summary of your variables at run-time in your games.
Debug Variables
This area of the Inspector shows a summary of the variables. This works similarly to the Debug Text View property, but the summary is only ever shown in the Editor, and it doesn't require any setup.
Localization is the process of translating and adapting content to a specific language, region or culture.
Yarn scripts are written in human-readable language. This is generally a single language, and (most of the time) will be written in the language that your development team primarily speaks. The language that a Yarn project is written in is called the base language.
However, if you want your dialogue to be understood by people who don't speak this language, you will need to translate it. Yarn Spinner is designed to make it easy to extract the user-facing text of your dialogue into a strings file, which can then be translated into a different language, and then loaded at run-time. You can translate your project into as many languages as you'd like, and Yarn Spinner will handle it for you automatically.
Yarn Spinner is also designed around the idea that a line of dialogue may have assets associated with it. Most commonly, this means an audio file that contains an actor performing the line, so that it can be used in your game as a voice-over. These assets are also localisable.
I just want to add voiceover in a single language. Why do I need to localise, too?
The philosophy of Yarn Spinner's approach to localisation is: if you want your dialogue to be text-only, and in a single language, you don't need to do anything at all. If you want to do anything else, you will need to set up a localisation and manage it using Yarn Spinner's processes.
We've found that most users who want to start using Yarn Spinner want to quickly get dialogue on the screen, and don't want to do lots of work to get the basics going. That's why we make the simple use-case (text only, a single language) as easy to use as we can.
However, if you're building a game that's voice acted, it makes your life significantly easier if you build your systems with localisation in mind from the start. Additionally, if you have the resources to add voice-over to your project, you should also have the resources to translate your game to other languages (even if you only have voice-overs in a single language.)
To that end, we designed it so that voiceover is intimately tied to localisation, so that you have to at least start thinking about localisation at the start of the process.
Localisation: A set of information that describes where to find text and assets for a given language.
Base language: The language that your Yarn script files are written in.
Strings file: A text document that contains translated versions of Yarn lines.
Line ID: A unique code that identifies a line of dialogue or an option in the original source text.
Localised line: The text of a line of dialogue, in a particular locale.
Localised line asset: An asset (for example, an audio clip) that's associated for a particular line, in a particular locale. For example, an audio clip containing the voiceover for the line "Hello there", in German.
Line provider: A component that receives line IDs from the Dialogue Runner, and fetches the localised line and localised line assets (if present) for the player's preferred locale.
To localise your Yarn scripts, you specify the 'base language' that your scripts are written in. You then add unique line ID tags to each line that identify each line. Finally, the localisation system reads your tagged lines and fills the string table for your base language. You can then add additional translations for your lines to the string tables for other languages.
Every Yarn script is associated with a base language. By default, Yarn Spinner sets the base language to that of your current locale. For example, if your computer is set to use Australian English, then Yarn Spinner will use that as the base language.
The base language of a Yarn Script is controlled by the Yarn Project that it's a part of. You can change the language of your base localisation by changing the 'Base Language' setting on a Yarn Project.
In order to match different versions of a line, you need to add a line id to each line of dialogue. A line ID is a tag that appears at the end of a line that uniquely identifies a line of dialogue in your game.
Here's an example of a line of dialogue with a line tag:
In this example, the line of dialogue has a line ID of 1a64a5.
Yarn Spinner can add line IDs to your dialogue for you. To do this, select your Yarn Project, and click 'Add Line Tags to Scripts'. Yarn Spinner will re-write all of the script files, adding a line ID to any line that doesn't already have one.
You can't generate a strings file unless all of the lines in all of the scripts in the Yarn Project have a line ID.
Once you've added line IDs to your Yarn scripts, they're ready to be used in your game's localisation system. Yarn Spinner works with the Unity-provided Localization package, and can prepare your string tables and fetch content from those tables at run-time.
If you'd prefer to not use Unity's Localization package, Yarn Spinner also provides a built-in localisation system, which is described in Built Yarn Spinner localisation system
Line Providers are components that are responsible for taking the Line objects that the Dialogue Runner produces, and fetches the appropriate localised content for that line. Line Providers produce LocalizedLine objects, which are sent to the Dialogue Runner's Dialogue Views.
When a Yarn script runs, the Dialogue Runner produces Line objects. These objects contain information about the line, but not the text of the line itself. This is because it's the responsibility of the game to load the user-facing parts of the line, including the text of the line in the player's current language setting, as well as any other assets that may be needed to present the line (such as audio files for voiceover.)
Yarn Spinner comes with three built-in types of line providers:
Text Line Provider is a Line Provider that fetches the text of a line, given a language to use.
Audio Line Provider is a Line Provider that fetches the text of a line as well as an Audio Clip, given languages to use.
Unity Localised Line provider is a Line Provider that fetches the text and any localised assets from Unity's Localization system.
If you don't set up a Line Provider for a Dialogue Runner, it will automatically create a Text Line Provider, and configure it to use the user's current language.
Audio Line Provider is a Line Provider that fetches localized text for a line of dialogue, as well as a localized AudioClip.
Audio Line Provider will automatically use Addressable Assets, if the Addressables package is installed in your Unity project and the Yarn Project is configured to use Addressable Assets.
Use this Line Provider if you are using the Built-In Localisation system. If you are using the Unity Localisation system, use the Unity Localised Line Provider instead.
Text Language Code
The language that the Audio Line Provider should use to fetch localised text for.
Audio Language
The language that the Audio Line Provider should use to fetch localised audio clips for.
Learn about the Samples provided with Yarn Spinner for Unity.
To help learn the features, capabilities, and implementation techniques for Yarn Spinner, we provide a number of samples with Yarn Spinner for Unity:
Intro
Space
Sliced Views
Visual Novel
3D Speech Bubble
Phone Chat
Shot Reverse Shot
User Input and Yarn
Markup Palettes
Pausing the Typewriter
Minimal Dialogue Runner
The rest of this section looks at each of these.
You can define your own commands, which allow the scripts you write in Yarn Spinner to control parts of the game that you've built.
In Unity, there are two ways to add new commands to Yarn Spinner: automatically, via the YarnCommand attribute, or manually, using the DialogueRunner's AddCommandHandler method.
YarnCommand attributeThe YarnCommand attribute lets you expose methods on a MonoBehaviour to Yarn Spinner.
When you add the YarnCommand attribute to a method, you specify what name the command should have in Yarn scripts. You can then use that name as a command.
If the method is not static, you call it with the name of the game object you want the command to run on.
For example, if you have a script called CharacterMovement that has a method Leap, you can add a YarnCommand attribute to it to make it available to your Yarn scripts:
If you save this in a file called CharacterMovement.cs, create a new game object called MyCharacter, and attach the CharacterMovement script to that game object, you can run this code in your Yarn scripts like this:
If the method is static, you call it directly, without providing a game object name. For example:
If you save this in a file called FadeCamera.cs, you can run this code in your Yarn scripts like this:
You can also use methods that take parameters. Yarn Spinner will take the parameters that you provide, and convert them to the appropriate type.
Methods that are used with YarnCommand may take the following kinds of parameters:
string
Passed directly to the function.
int
float
bool
The strings "true" and "false" are converted to their respective boolean values, true and false. Additionally, the name of the parameter is interpreted as true.
GameObject
Yarn Spinner will search all active scenes for a game object with the given name. If one is found, that game object will be passed as the parameter; otherwise, null will be passed.
Component (or its subclasses)
Yarn Spinner will search all active scenes for a game object with the given name, and then attempt to find a component of the parameter's type on that game object or its children. If one is found, that component will be passed as the parameter; otherwise, null will be passed.
Method parameters may be optional.
For example, consider this method:
This command could be called like this:
If you're using Unity 2021.1 or earlier, you'll need to use the Window -> Yarn Spinner -> Update Yarn Commands menu item whenever you add, remove or change a YarnCommand-tagged method.
If you're using Unity 2021.2 or later, this is done for you automatically.
You can see a list of commands that you've registered with the YarnCommand attribute by opening the Window menu and choosing Yarn Spinner -> Commands.
This will show a list of every command that you can call in your Yarn script, what parameters they take, and which parameters are optional.
This feature is available in Unity 2021.2 and later.
You can also add new commands directly to a Dialogue Runner, using the AddCommandHandler method.
AddCommandHandler takes two parameters: the name of the command as it should be used in Yarn Spinner, and a method to call when the function is run.
If you want to add a command using AddCommandHandler that takes parameters, you must list the types of those parameters.
For example, to create a command that makes the main camera look at an object, create a new C# script in Unity with the following code:
Add this script to any game object, and it will register the camera_look in the Dialogue Runner you attach.
You can then call this method like this:
We provide two different means of handling commands in Yarn Spinner: the AddCommandHandler method and the YarnCommand attribute. Both of these provide effectively the same functionality, and under-the-hood the YarnCommand attribute is even a wrapper around the AddCommandHandler call. So if there are two different ways to achieve the same thing when should you use each one?
The YarnCommand attribute allows you to tag specific methods as being a command, Yarn Spinner will then automatically handle the binding and connection of the the command in text to the method call in C#.
AddCommandHandler method allows you to manually connect a method in C# to a command in Yarn, letting you set the name of the command and which method it connect to, giving you the control over the binding.
Most of the time, we feel that the YarnCommand attribute is the better option, because it is easier to use, and maps well to how we find most people use commands - that is, calling specific methods on specific GameObjects.
This convenience, however, does come at a cost of flexibility, because your YarnCommands either need to be on static methods, or follow specific calling conventions, which may not be what you need or want.
The YarnCommand attribute works best in our opinion when your commands are calling into specific GameObjects in your scene, which means that it works very well for moving, animating, or changing characters and items in a scene.
For larger gameplay changing moments, such as loading new scenes, moving between dialogue and the rest of your game, or for more global events like saving the game or unlocking an achievement, the AddCommandHandler method is better.
Coroutines can be commands. If you register a command, either using the YarnCommand attribute, or the AddCommandHandler method, and the method you're using it with is a coroutine (that is, it returns IEnumerator, and yields objects like WaitForSeconds), Yarn Spinner will pause execution of your dialogue when the command is called.
Additionally, if your method returns a Coroutine object, Yarn Spinner will wait for that coroutine to complete. You can create and return a Coroutine by using the StartCoroutine method.
For example, here's how you'd write your own custom implementation of <<wait>>. (You don't have to do this in your own games, because <<wait>> is already added for you, but this example shows you how you'd do it yourself.)
This new method can be called like this:
Functions are units of code that Yarn scripts can call to receive a value.
In addition to the built-in functions that come with Yarn Spinner, you can create your own.
To create a function, you use the YarnFunction attribute, or the AddFunction method on a Dialogue Runner. These work very similarly to commands, but with two important distinctions:
Functions must return a value.
Functions are required to be static.
For example, here's a custom function that adds two numbers together:
When this code has been added to your project, you can use it in any expression, like an if statement, or inside a line:
Yarn functions can return the following types of values:
string
int
float
bool
If you're using Unity 2021.1 or earlier, you'll need to use the Window -> Yarn Spinner -> Update Yarn Commands menu item whenever you add, remove or change a YarnFunction-tagged method.
If you're using Unity 2021.2 or later, this is done for you automatically.
Unity Localised Line Provider is a Line Provider that fetches localized text and assets for a line of dialogue from a String Table and optionally from an Asset Table, based on the project's current localization settings.
Use this Line Provider if you are using the Unity Localisation system. If you are using the Built-In Localisation system, use the Text Line Provider or the Audio Line Provider instead.
This page covers what you need to know to use the internal localisation system built into Yarn Spinner. This supports both the localisation of the text, so the lines themselves, and your assets needed for them.
The other option for localisation is to use the Unity Localization package. The Unity Localisation package has more features, but is more complex.
Watch a video where Yarn Spinner developer Jon Manning walks you through using the Built-In Localisation System:
When you want to prepare a Yarn Project for an additional language, you add a new Localisation in the Yarn Project.
Localisations are how you tell Yarn Spinner where to find the localised lines, and the localised line assets, for a given language.
To create a new Localisation, open the Localisations list in the Yarn Project's Inspector, and click the + button.
Localisations have the following properties:
Language ID
The language for this localisation.
Strings File
Assets Folder
A folder containing the localised assets for this localisation.
Your project always includes at least one localisation, which is for the base language.
After you've set up a localisation, you can translate your dialogue into that localisation's language. To do this, you generate a strings file.
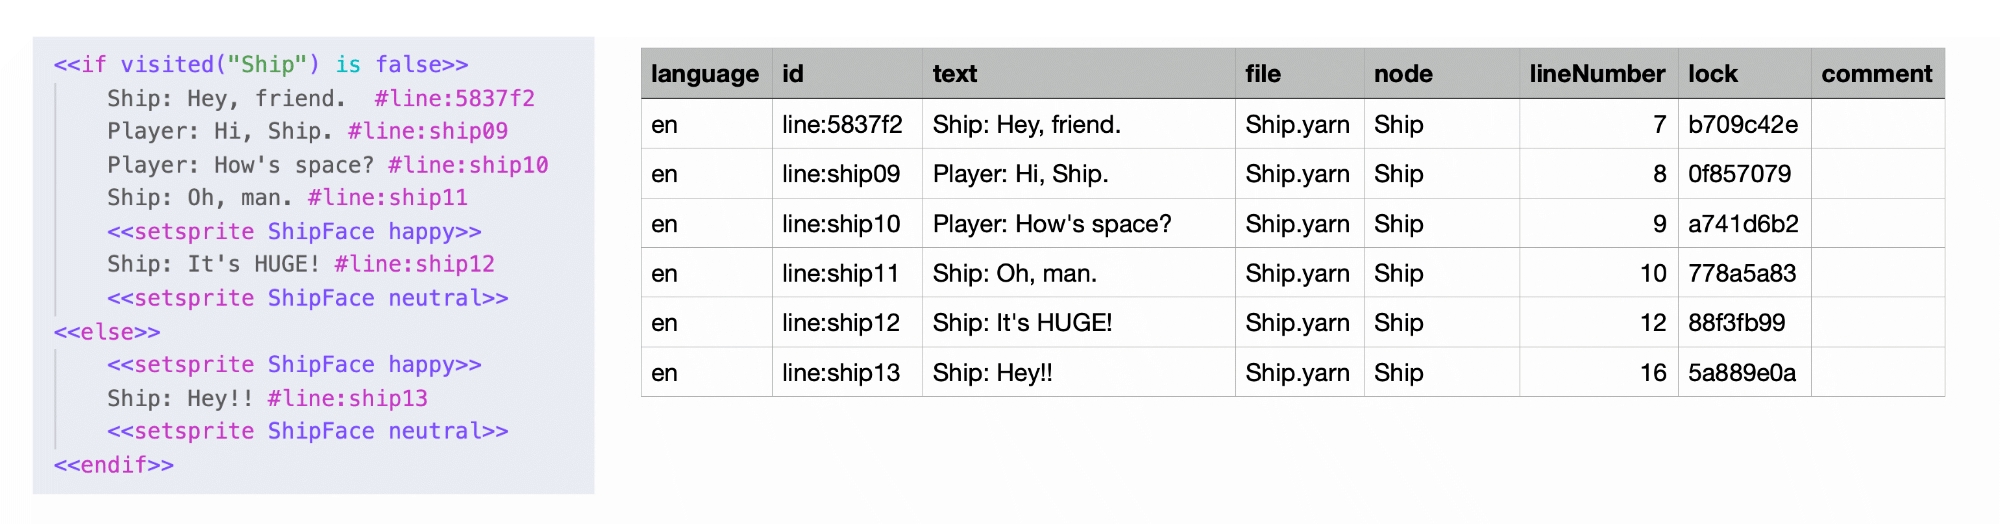
A strings file is a text-based spreadsheet, in comma-separated value form, that contains a translated version of your dialogue. Yarn Spinner can generate a strings file for you, based on the line IDs in the dialogue.
You don't need to create a strings file for your base localisation, because Yarn Spinner creates that for you by reading your source Yarn scripts. Any localisation whose language ID is the same as your base language will be marked as 'Automatically included'.
To create a strings file, select a Yarn Project, and click the "Export Strings and Metadata as CSV" button. Unity will ask where you want to save the strings file (the metadata file will have the same name as the strings file, but with a "-metadata" appended to it).
A strings file has the following structure:
language
The language code for this line.
When you export a strings file, this will be the Yarn project's base language.
id
The line ID for this line.
text
The text of the line, in the language indicated by the language column.
file
The file that the line was originally found in.
node
The node that the line was originally found in.
lineNumber
The line number of the file that the line was originally found in.
lock
A unique value that Yarn Spinner uses to detect if the line has been modified since the strings file was generated. Don't modify or delete this value.
comment
A note indicating the intent and tone of the line. This can be useful for translators who may not have the same background or context for how the line should be delivered.
Once you've exported a strings file, you can translate it into another language: for each row in the database, change the language column to the new language you're translating into, and the text column to the translated text of the line.
Only the language and text columns should be modified by the translator. Don't modify the others; in particular, if you modify the value in the id column, Yarn Spinner won't be able to link the translated line to the original version.
The metadata file contains the id, file, node, and lineNumber columns (which have the same values as in the strings file). Additionally, it contains a metadata column with all the metadata of a line. Only lines that contain metadata will be present in this file. For more information on metadata, see Tags and Metadata.
You can also provide the metadata file to the translator to give them more context and improve localisation accuracy.
Once you have a strings file that's been translated into your target language, you can add it to your Localisation. To do this, drag and drop the translated strings file into the Strings File property of your localisation, and click Apply.
It's possible to update a strings file after you've made changes to your source scripts. For example, you might have added or removed lines, or made changes to the text.
To update a strings file, click the Update Existing Strings Files button at the bottom of the Inspector.
Yarn Spinner will update every strings file that's been added to the Localisations list: new lines will be added, removed lines will be deleted, and lines whose original text has changed since the last time the file was updated will have the text "NEEDS UPDATE" added to the end. This allows you to more easily find which lines need an updated translation.
Localised line assets are assets that are associated with a particular line, in a particular localisation. The most common example of this is voice-over lines, which are audio assets that are associated with each line.
Line Providers are responsible for fetching the appropriate assets for a given line and language. For example, the Audio Line Provider fetches audio clips, and provides them to voice-over dialogue views.
The specific localised line, and localised line assets, that a line provider fetches depends on which language they have been configured to fetch.
The Text Line Provider has a single language option, which controls which language the line will appear in.
The Audio Line Provider has two language options: the language of the text, and the language of the audio files that are retrieved. This means that you can configure it to provide text in one language, and audio in another.
If a line provider is asked to retrieve content for a language that it doesn't have any assets for, it will retrieve the base language version instead.
Learn about Dialogue Advance Input, a component that can signal to a Dialogue View that the user wants to proceed to the next piece of content.
Dialogue Advance Input is a component that receives user input, and uses it to signal to a Dialogue View that the user wants to advance to the next piece of content. Dialogue Advance Input is generally used to implement a 'press spacebar to continue / skip' mechanic.
Dialogue Advance Input isn't a Line View itself, but it's designed to work with other line views, to interrupt and control the flow of dialogue.
To use a Dialogue Advance Input, create a new game object, and attach a Dialogue Advance Input component to it using the Add Component button.
You can control what specific input the component is looking for by changing the Continue Action Type setting:
If you set the Continue Action Type to Key Code, you can select a key on the keyboard that will continue to the next line on press.
If you set the Continue Action Type to Input Action, you can create an Action from an input device (such as from a keyboard, gamepad, or other method).
If you set the Continue action Type to Input Action from Asset, you can attach an Action from an Input Actions asset that you've set up elsewhere.
If you want to use Input Actions, your project will need to be set up to use the new Unity Input System.
Both the Unity Localization and Built-In Localisation approaches are very similar to one another, but there are some caveats and extra steps to make them play together.
The Built-In Localisation system is simpler, but has fewer features.
In this document, we'll refer to the 'Localization' package that Unity provides as 'Unity Localization', to reduce the chance of confusion.
Watch a video where Yarn Spinner developer Jon Manning walks you through using Yarn Spinner with Unity's Localisation package:
Once you have followed these instructions, your project should now:
Have the Unity Localization package installed
Created and configured one or more Locales for your project
Created a string table collection.
When localising your game's dialogue using Yarn Spinner, we recommend creating a separate string table collection for your dialogue, set apart from other localised content like button labels. It can make it a little easier to manage.
With these done you should now have your project set up correctly, and have a string table collection for your locales with no entries inside. Yarn Spinner will fill this string table with content that it extracts from your Yarn Scripts.
To fill a string table with content from a Yarn project, follow these steps:
Select the Yarn Project, and go to its Inspector.
Enable the Use Unity Localisation System setting.
Set the Base Language to your desired language. This must be ensure its one of the locales that you have configured for your project.
In the String Table Collection field, add the String Table Collection that you want to populate with line content.
Click Apply.
You can check that the string table has been filled with content by opening the Window menu, and choosing Asset Management -> Localization Tables. You can then view the contents of your string table. The Key of each string will be the #line ID from the Yarn files.
When the Yarn Project importer adds your lines into the string table, it uses the Base language field you set in the Inspector to determine which locale in your String Table Collection should have the lines added into.
If your project doesn't have a Locale which matches your Base Language, Yarn Spinner will attempt to find an appropriate Locale to use. To ensure that the importer uses the correct Locale, be sure to specify it in the Inspector.
The Dialogue Runner's Inspector will tell you when you need to use a Unity Localised Line Provider. You can click the button it provides to quickly add and configure one. You can also set one up manually, using the Add Component menu.
To configure it, all that needs to be done is hook your string table collection up to the Strings field of the Unity Localised Line Provider.
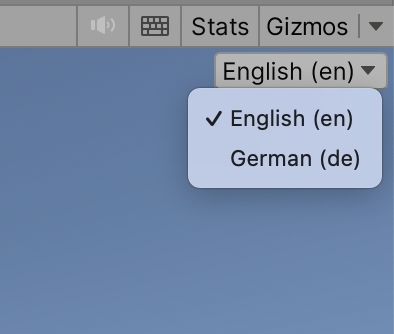
During gameplay, the Unity Localised Line Provider will fetch content from your string table depending on the game's current locale setting. You can control this at run-time by using the locale selector at the top-right corner of your Game View.
In addition to localising the strings that make up your lines, you can also localise assets that go with each line, such as voice-over audio, or custom objects that store other localised data.
To localise assets in Unity Localisation, you create and populate an Asset Table. Yarn Spinner doesn't automatically populate Asset Tables for you like it does String Tables, because Yarn Spinner doesn't manage your assets like it does with your lines.
Instead, you can create an Asset Table that contains assets with the same key as your lines. For example, if you have a line in your Yarn script that has the line ID "line:tom-1", then the string table will have an entry with the key line:tom-1. To create a voice-over asset to go with this line, you can create an asset table that also contains an entry with the key line:tom-1, and maps to an audio file.
The Unity Localised Line Provider will automatically match String Table entries and Asset Table entries if they have the same key, and then deliver them to your Dialogue Views for use. To do this, ensure that your Unity Localised Line Provider has an Asset Table configured in the Inspector.
As each node is entered the Unity Localisation Line Provider will begin loading all the required assets for every line and option in that node, and when you leave a node all assets are then released. We have found that as a default this works very well, but in some circumstances you will want more control over this. The most common reason for this is to preload multiple nodes worth of assets at once. This is supported but has a few steps and quirks to be wary of.
Now the downside to this is because we can't know which assets you are finished with you will need to manually tell the line provider when to release the assets. You do this by calling ClearLoadedAssets which will release all loaded assets. It's important to note that calling ClearLoadedAssets will clear every loaded asset, so doing this while nodes are still being read will result in unusual behaviour.
Because both Yarn Spinner and Unity use the same marker for their string interpolation and manipulation ({ and }), you can't use the Unity Localization smart strings in Yarn Spinner content.
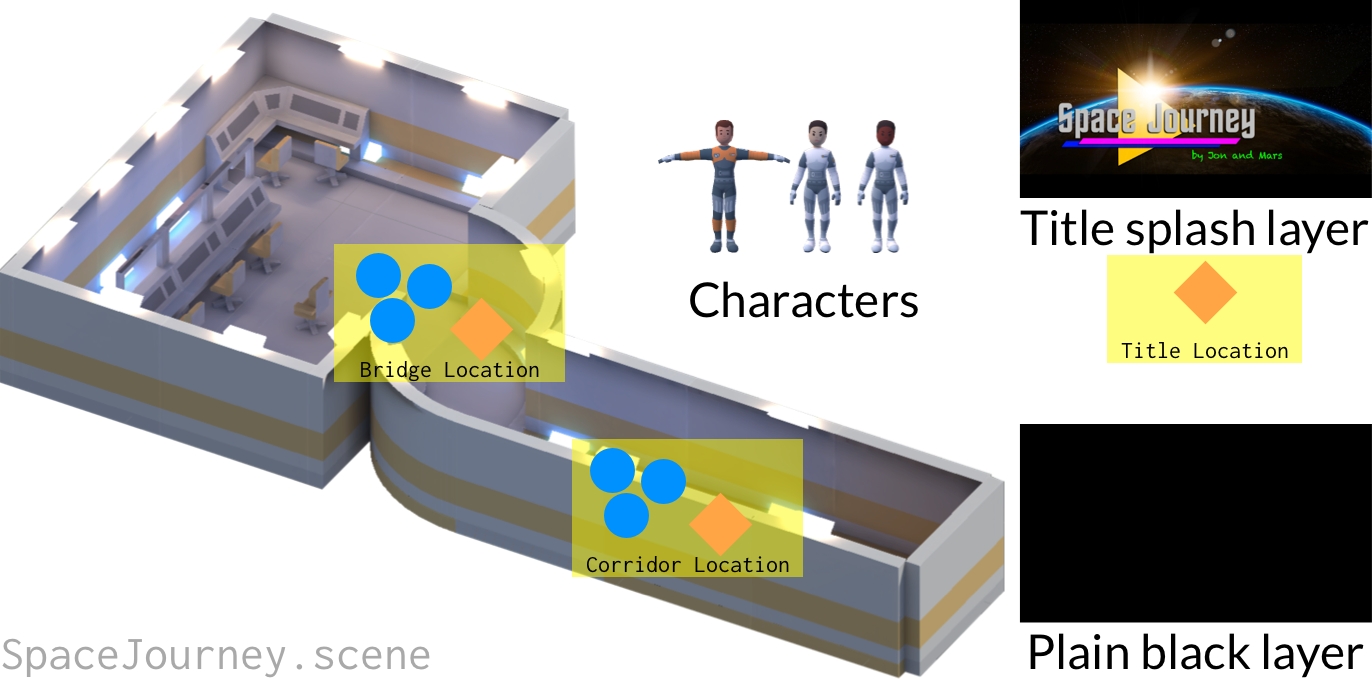
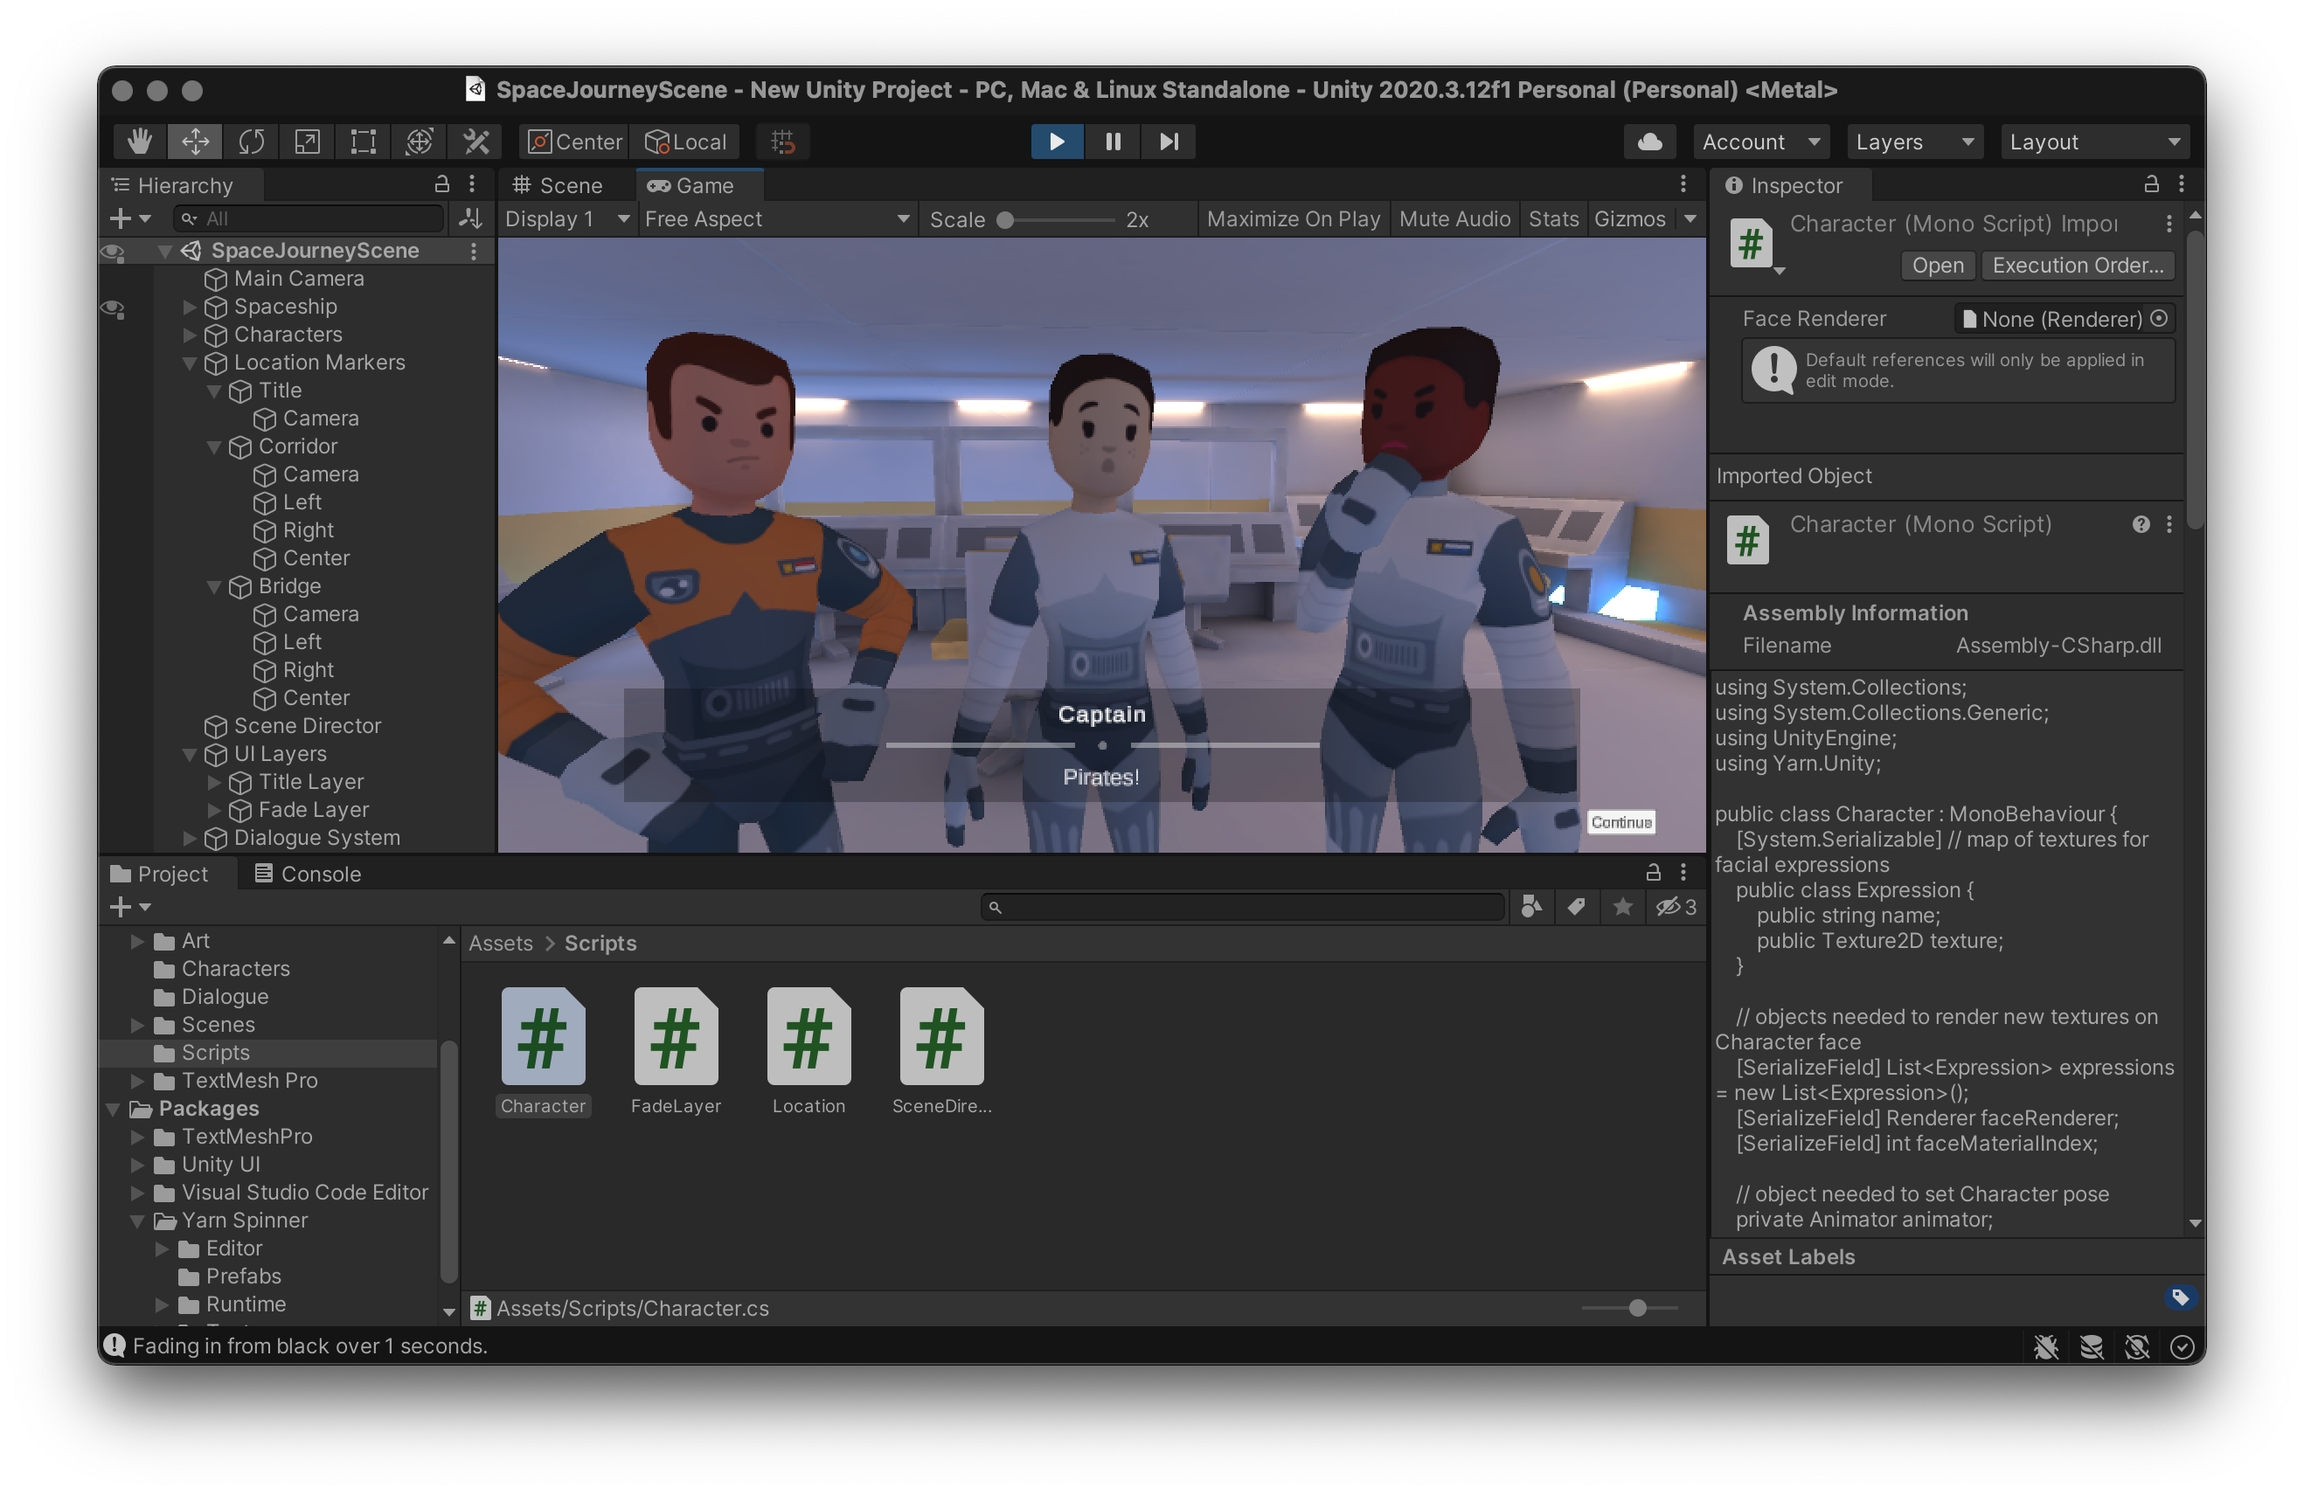
This example project demonstrates making a simple dialogue-based game when beginning with only an empty Unity scene.
Display Yarn dialogue in a Unity scene
Allow a player to select between options to respond
Add some static visuals
If the sample empty scene is not visible, you'll need to open it. In the Project Window where project files are displayed, navigate to Assets > Scenes and select SampleScene.unity.
Yarn Spinner for Unity comes with a pre-made UI layer and accompanying utility scripts to handle displaying lines and presenting options from Yarn files. Add one by opening the GameObject menu, and choosing Yarn Spinner > Dialogue System.
Depending on your version of Unity, a window might appear asking you to import TextMesh Pro assets. If this appears, click 'Import TMP Essentials'.
When the Dialogue System in the scene is selected, the Inspector will display the Yarn Project it is expecting line from. Here, a Yarn Project is a kind of linking file that groups Yarn script files together.
To make one, navigate to a sensible place for the file to live (such as a new folder Assets > Dialogue) and right-click the Project Window pane to select Create > Yarn Spinner > Yarn Project.
The existence of Yarn Projects allows larger games with multiple dialogue systems (e.g. main story dialogue, barks, storylets) to separate into multiple projects that pass lines to different UI or systems. This allows an extra level of organisation above separate Yarn files which are typically used to separate story scenes or parts.
However, most games will need only a single Yarn Project.
Select the scene's Dialogue System again and drag the new Yarn Project into the labelled slot in the Inspector.
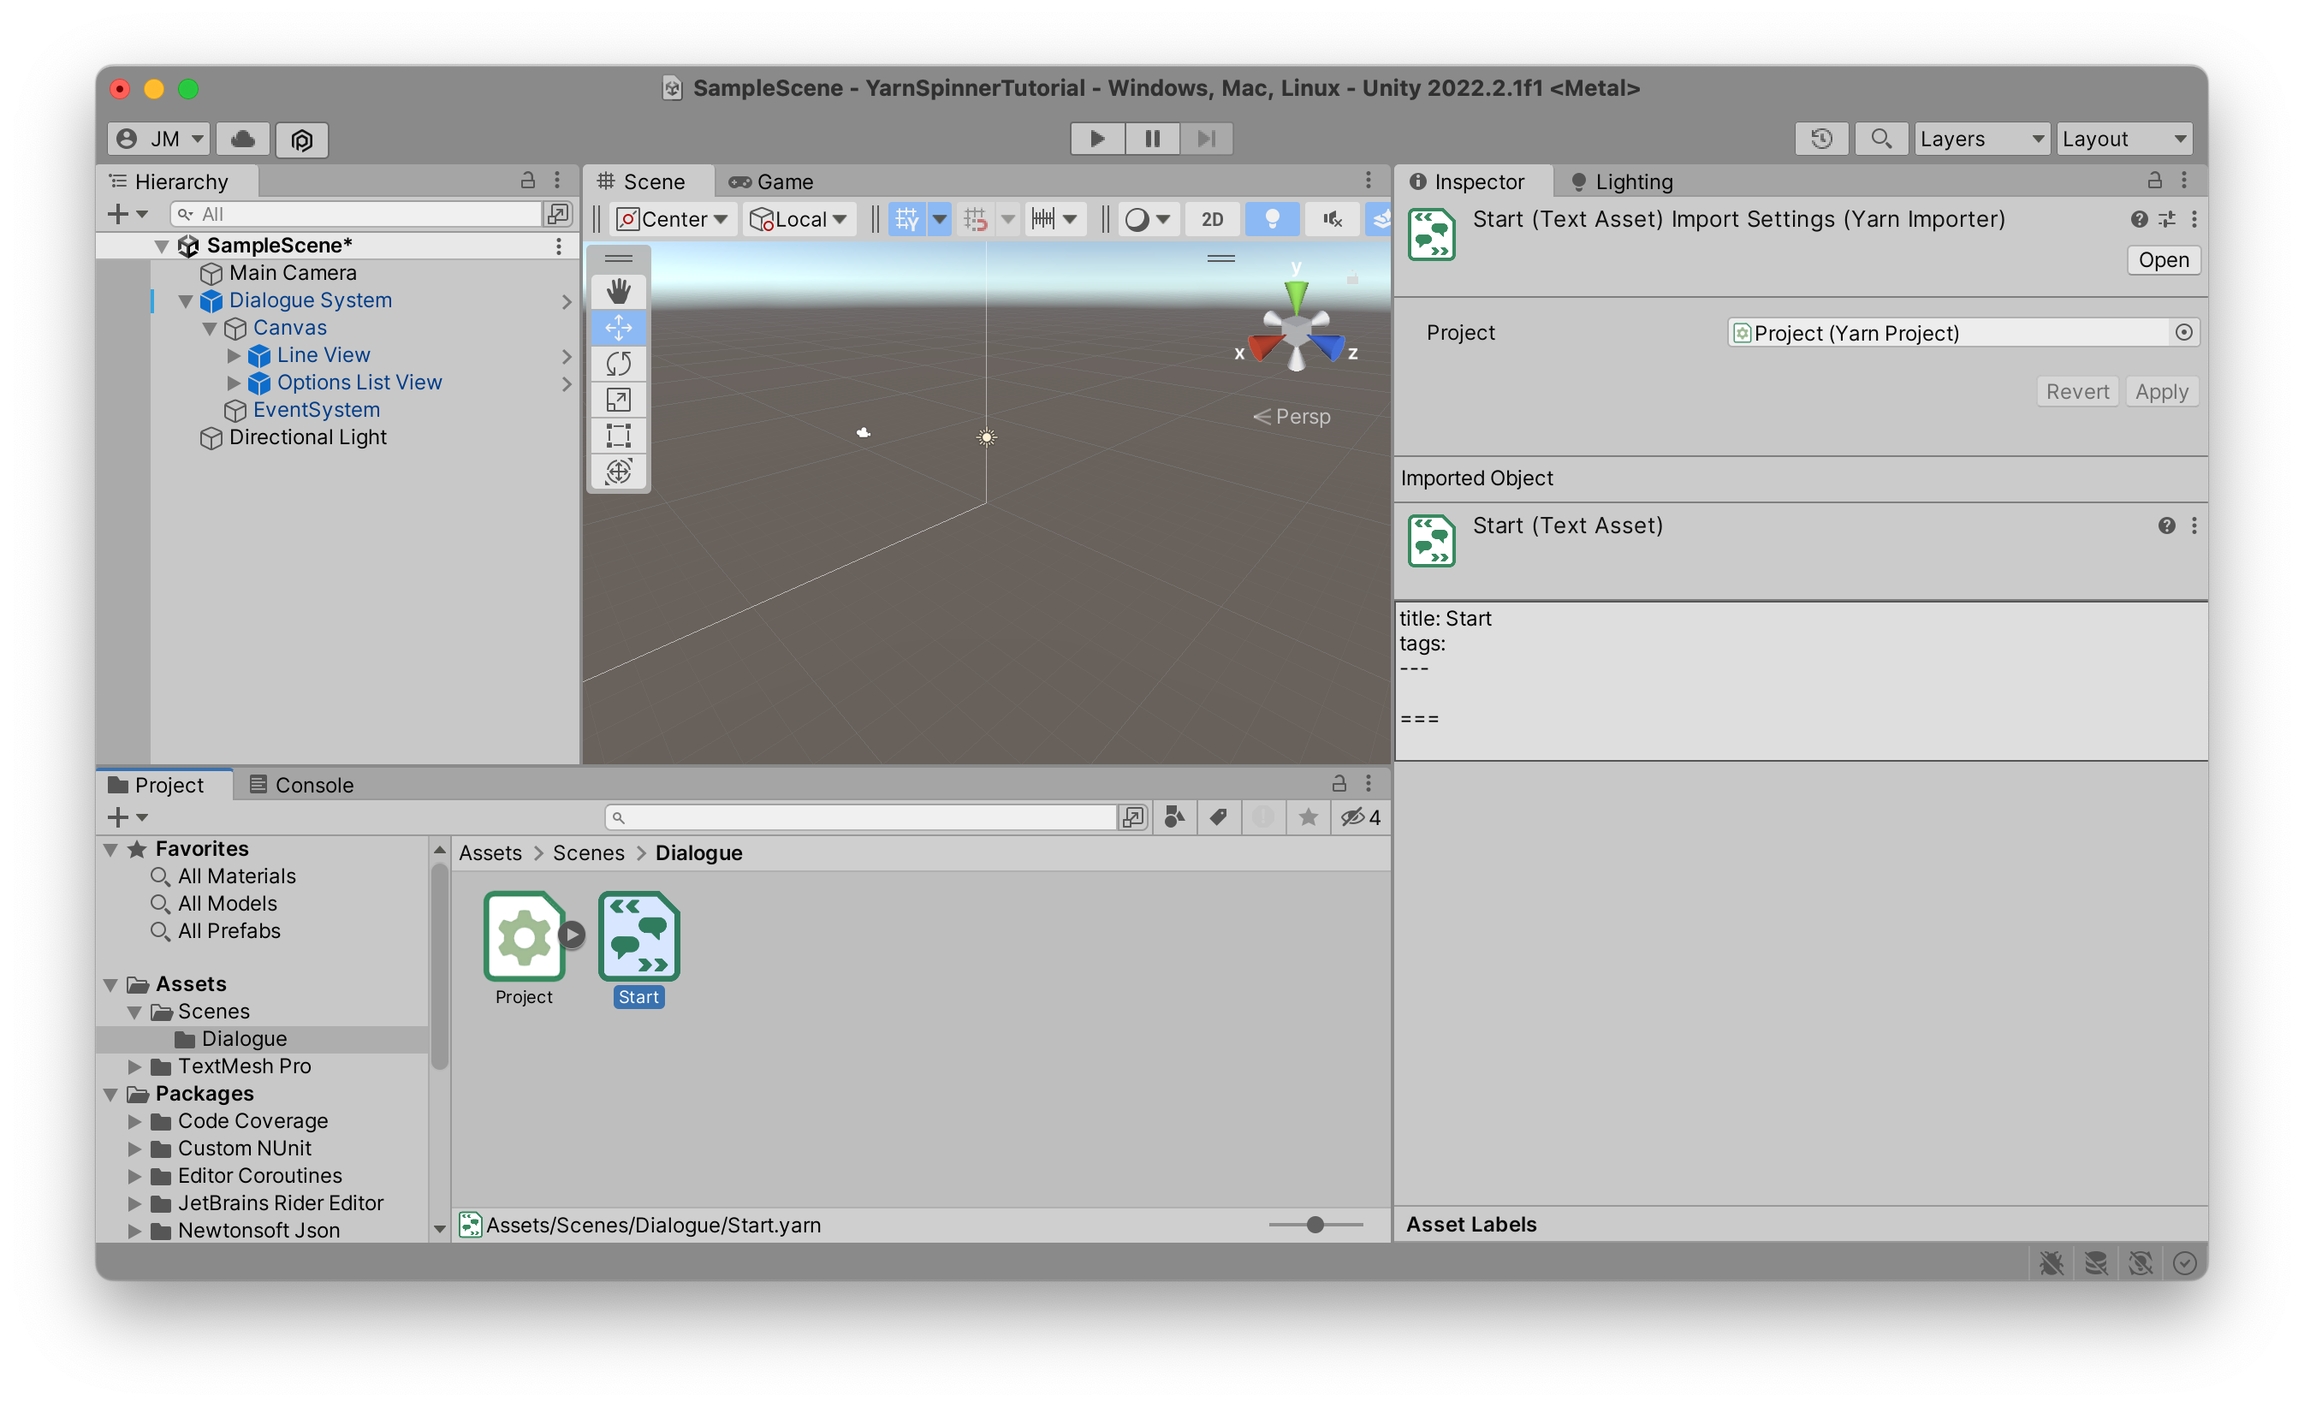
Now the Yarn Project needs one or more Yarn Scripts to get dialogue from. Just like with the Yarn Project, navigate to the desired file location and select Create > Yarn Spinner > Yarn Script. Name the new script Start, and place it in the same folder as the Yarn Project. This will make the Yarn Script be included in the Yarn Project.
By default, a new Yarn Script begins with a single empty node with the name of the file. Open the file, rename the node to Start and put a single line of test dialogue. You may remove the tags field.
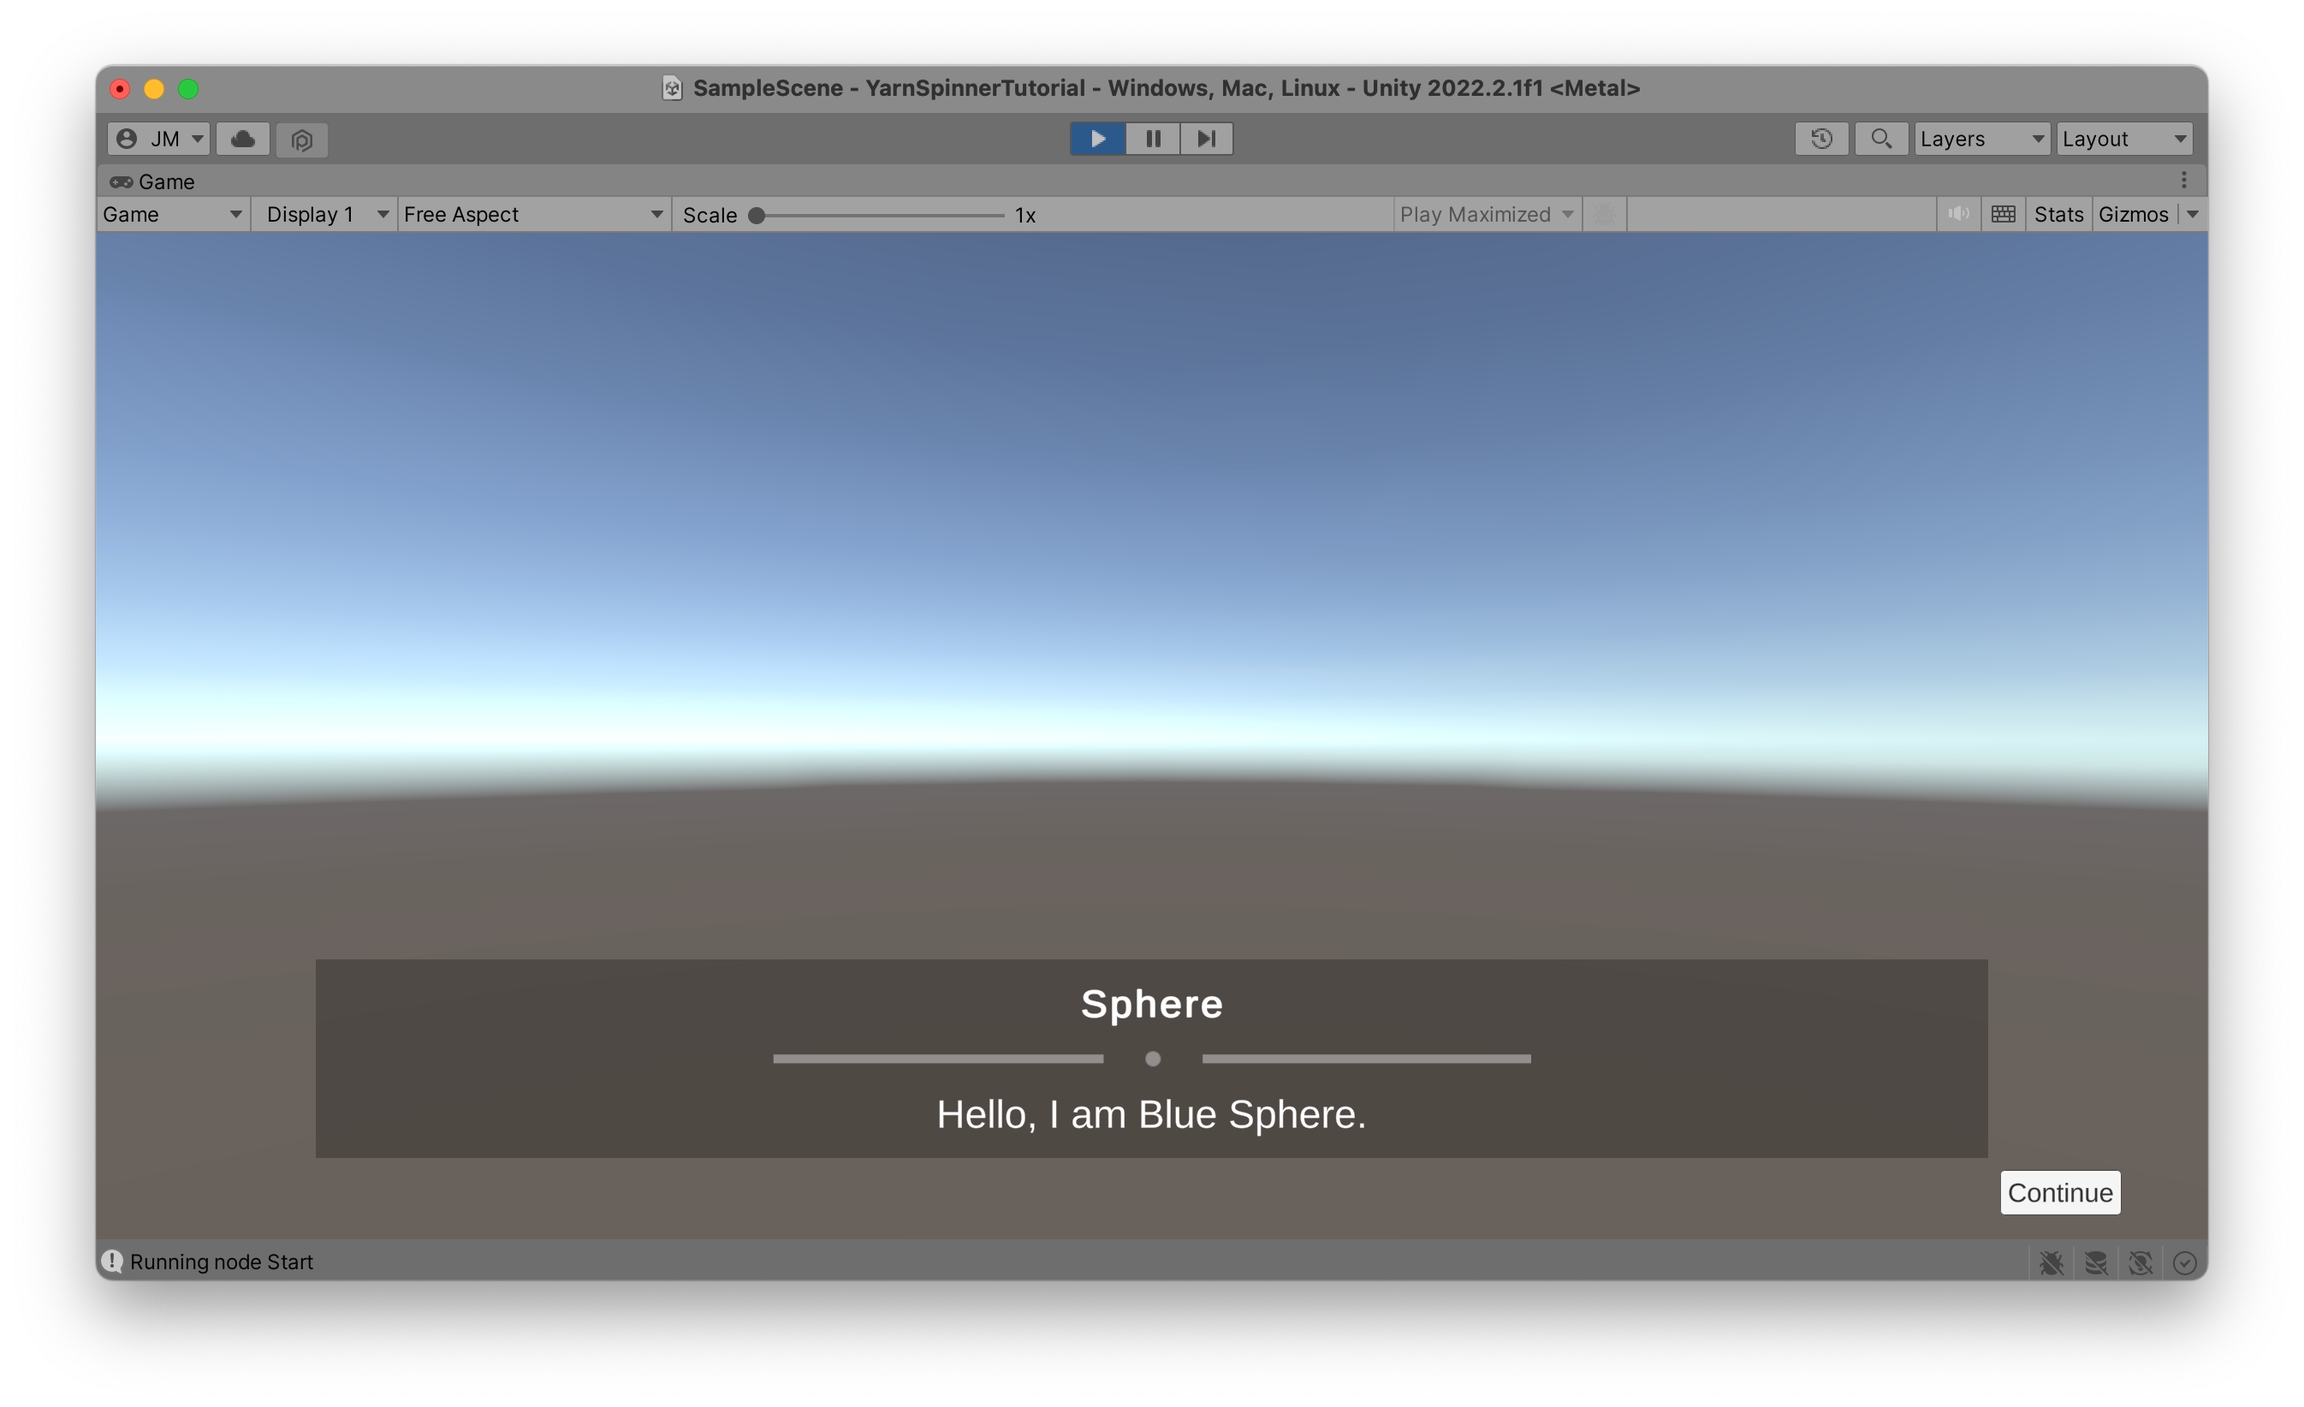
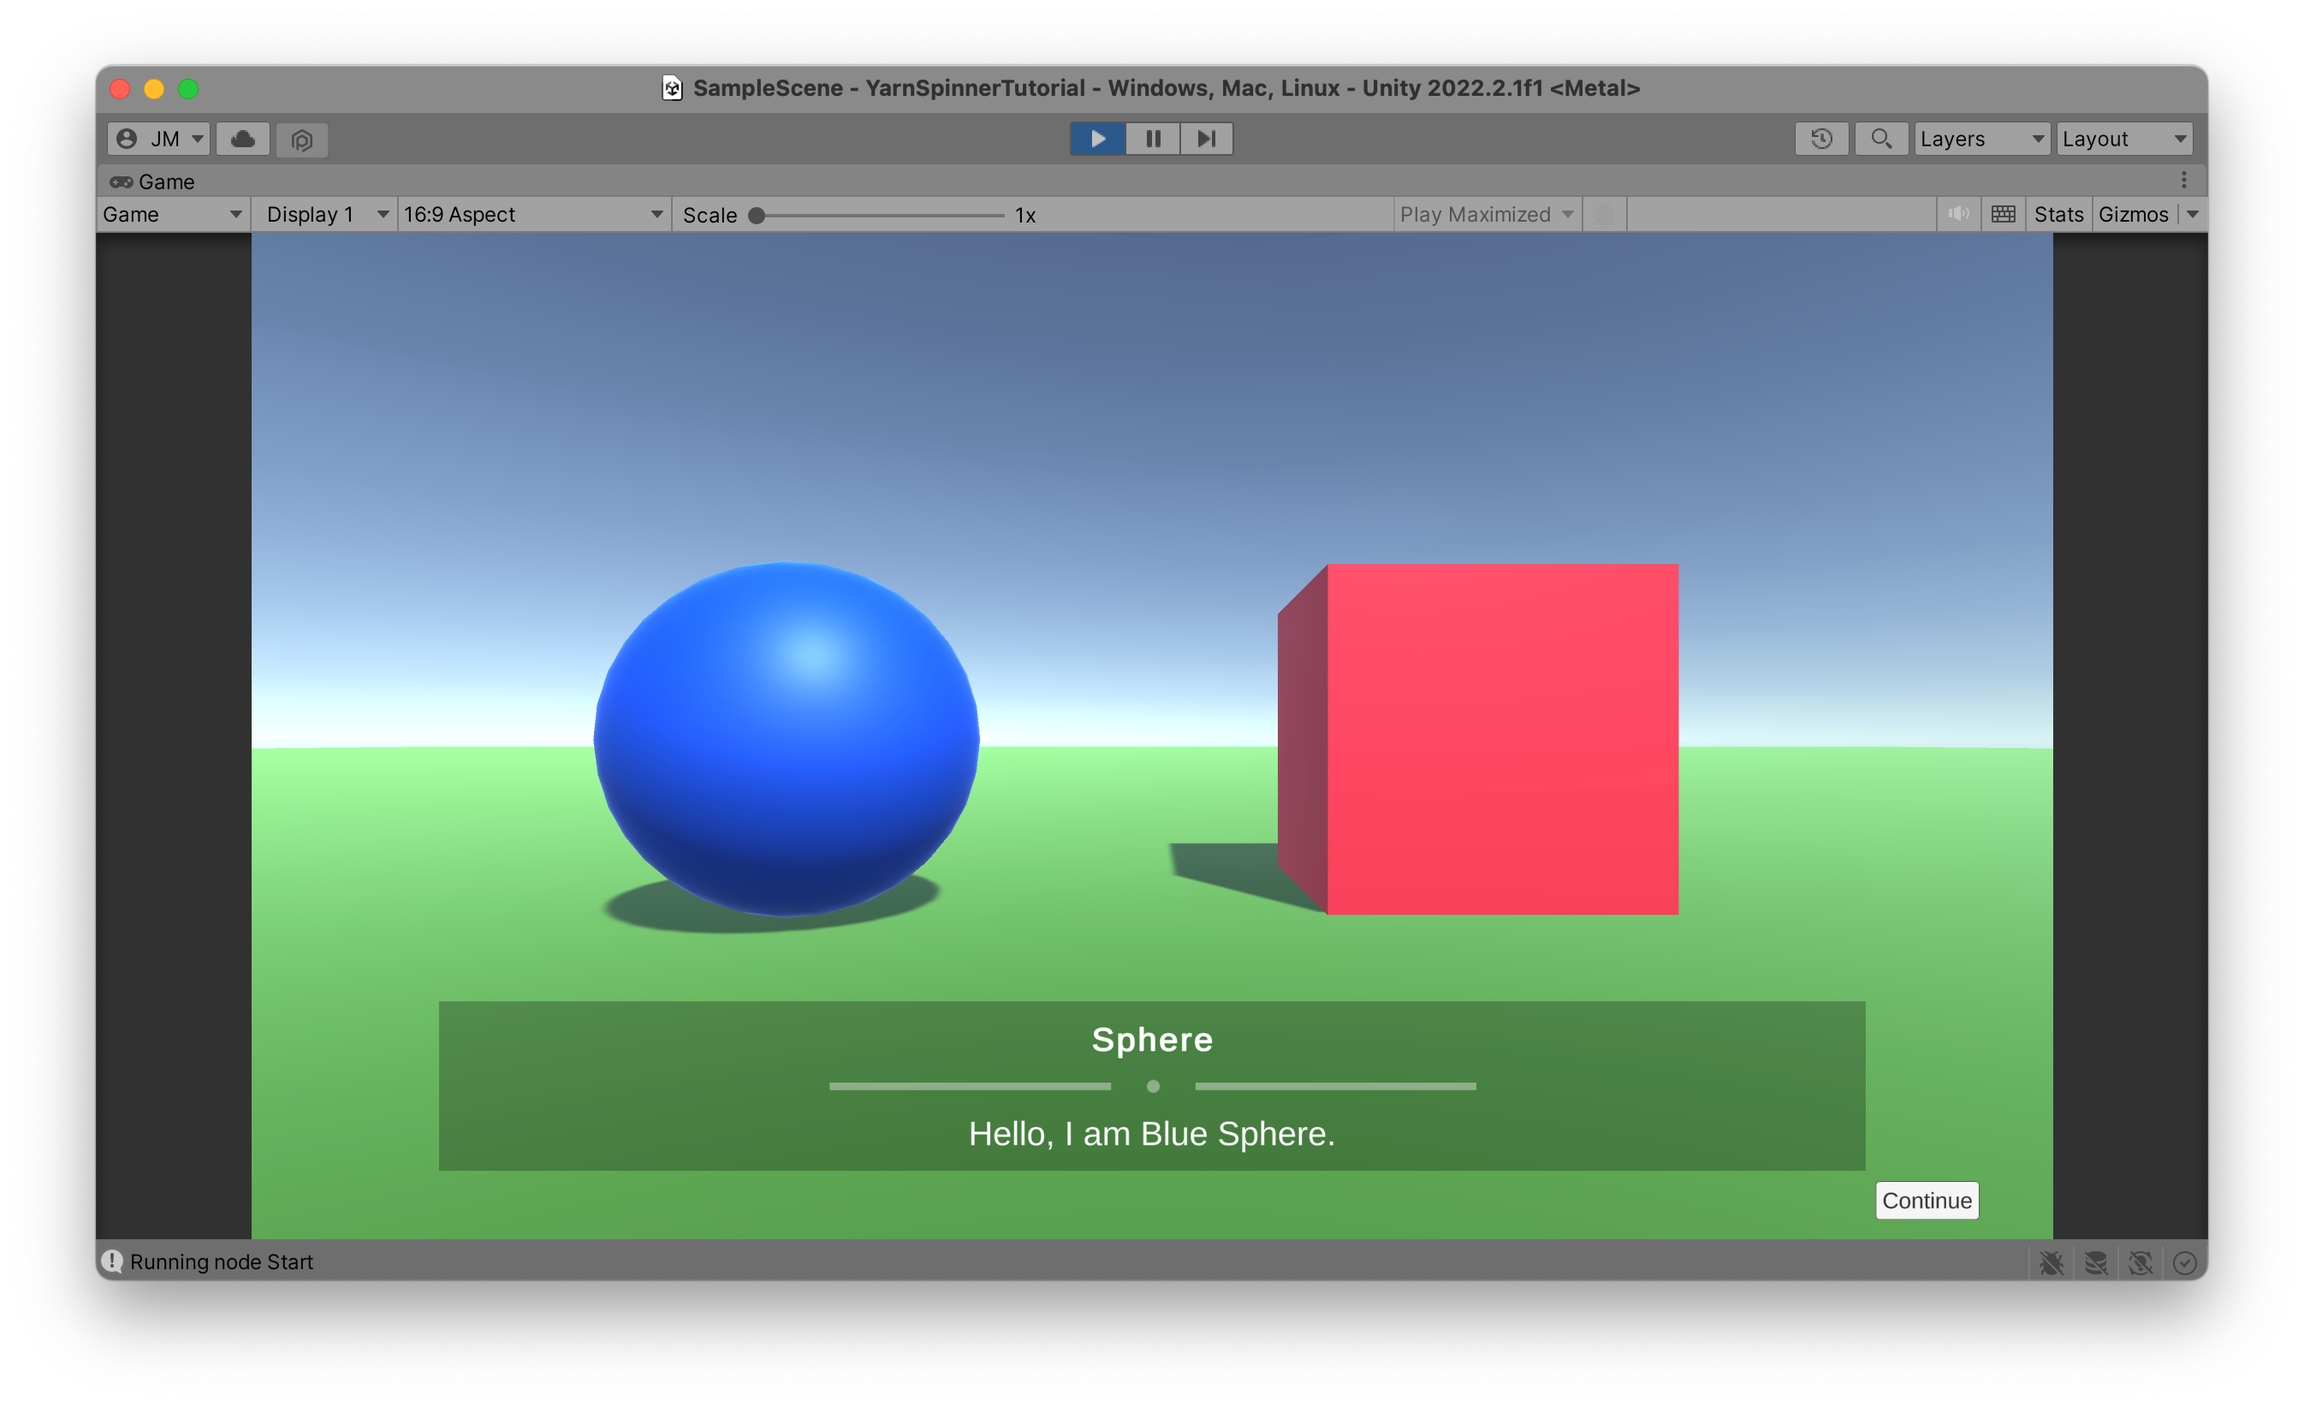
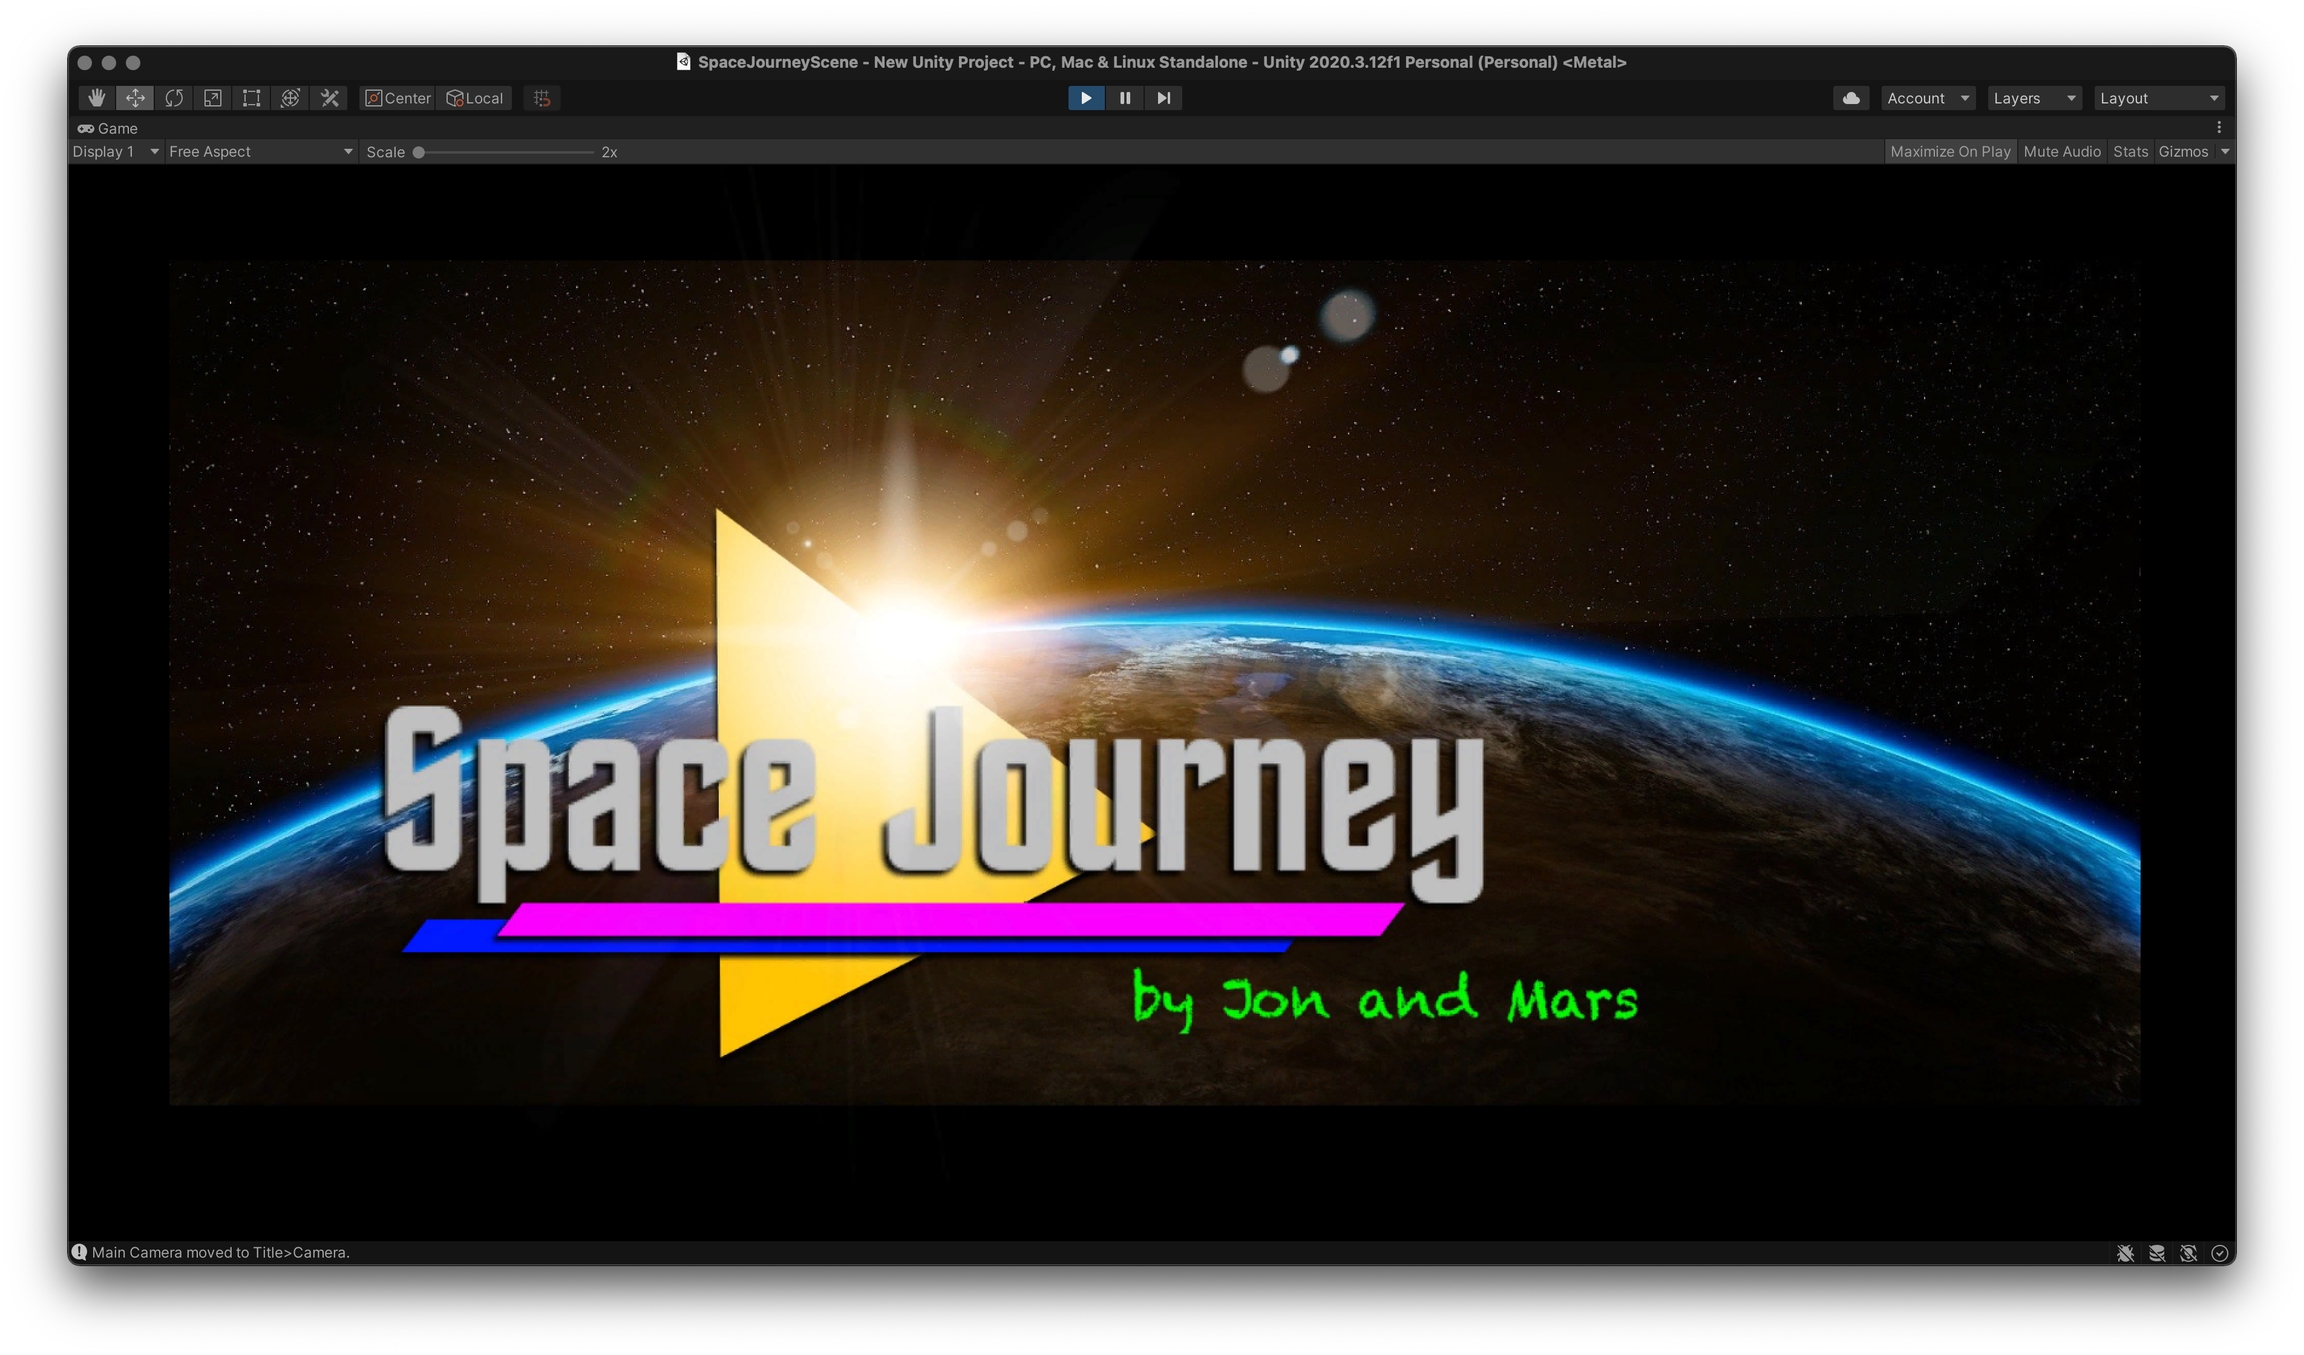
Returning to Unity, pressing the ▶️ button results in the test line being displayed in front of the empty scene world. Pressing Continue will make the UI disappear, as it has reached the end of the script.
Once you've got a basic story, pop back into Unity and check the basics:
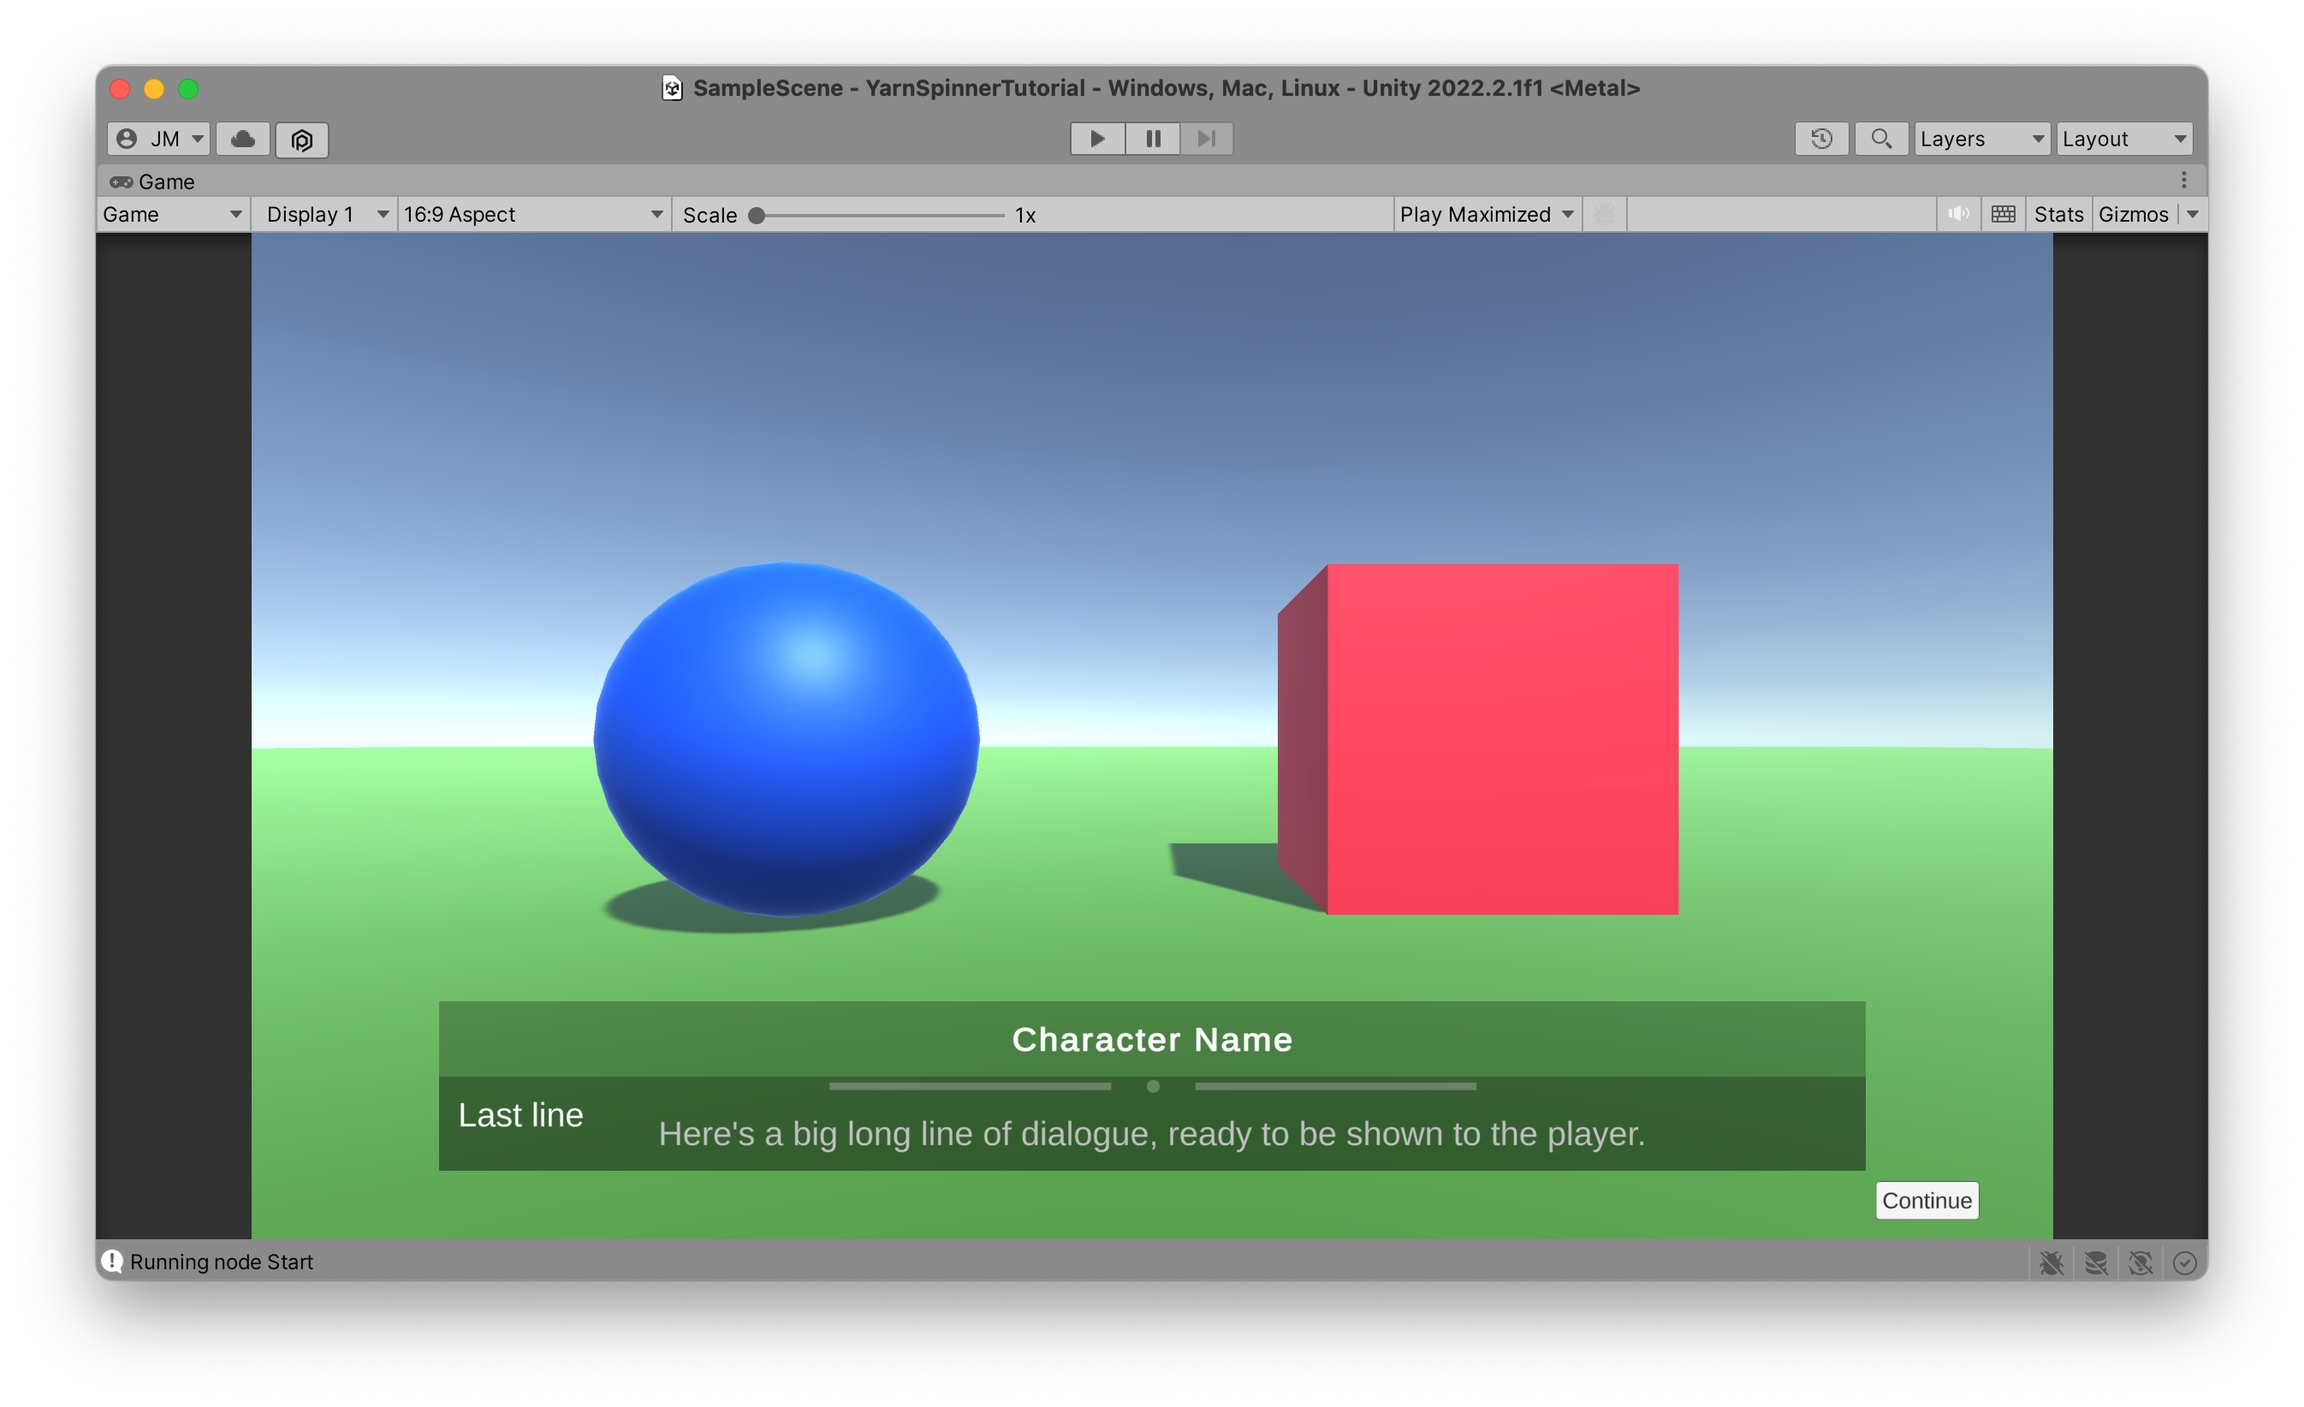
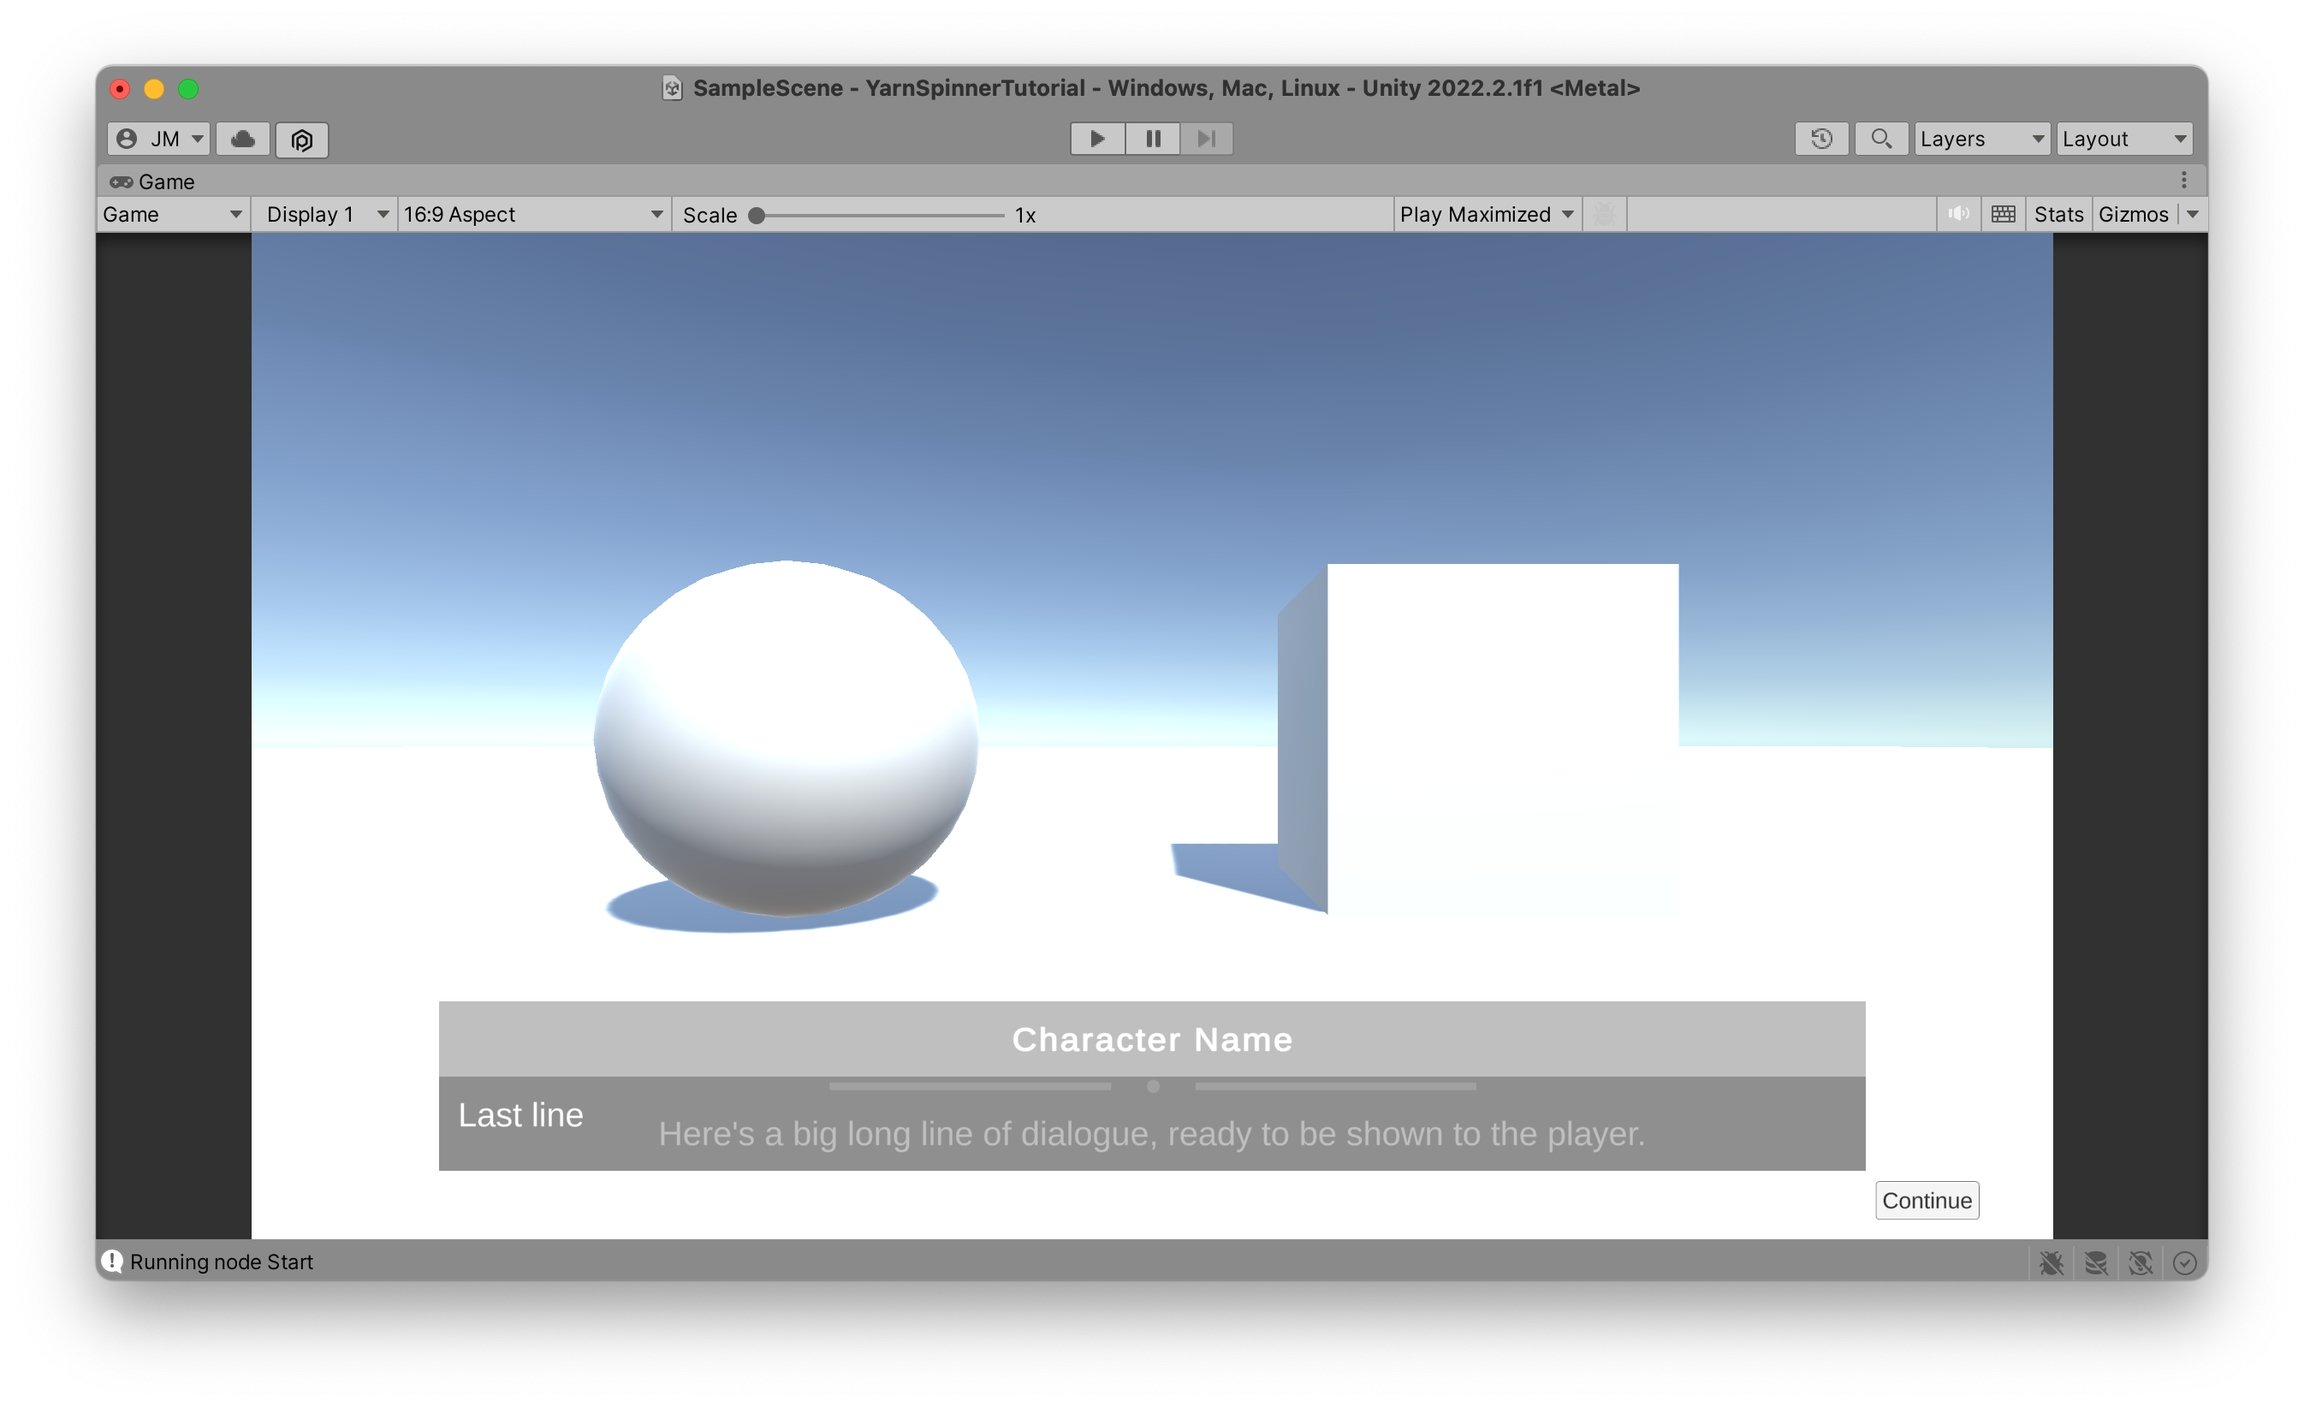
For the shape example, let's add some "characters" to the scene. Use Menu > GameObject > 3D Object to add a Sphere, a Cube and a Plane to the scene. Scale up the Plane by adjusting the values in the Inspector to Scale = 10, 10, 10. To put the Sphere and Cube in front of the camera and make the Plane appear as a floor, they'll need to be moved. The following coordinates are about right, using the default location for the Main Camera:
Looking to the Game view, this should appear as two shapes on a floor with the dialogue UI in front.
All this white makes them difficult to distinguish though, so let's colour each Object. Create basic Materials for each by right-clicking the Project Window in the desired file location and select Create > Material three times. Change the colour of each Material to three distinct colours by modifying the Albedo value in the Inspector.
Add a Material to each Object by selecting the desired object and dragging the Material into the Materials > Element 0 under Mesh Renderer in the Inspector.
A playable branching story game with simple static visuals.
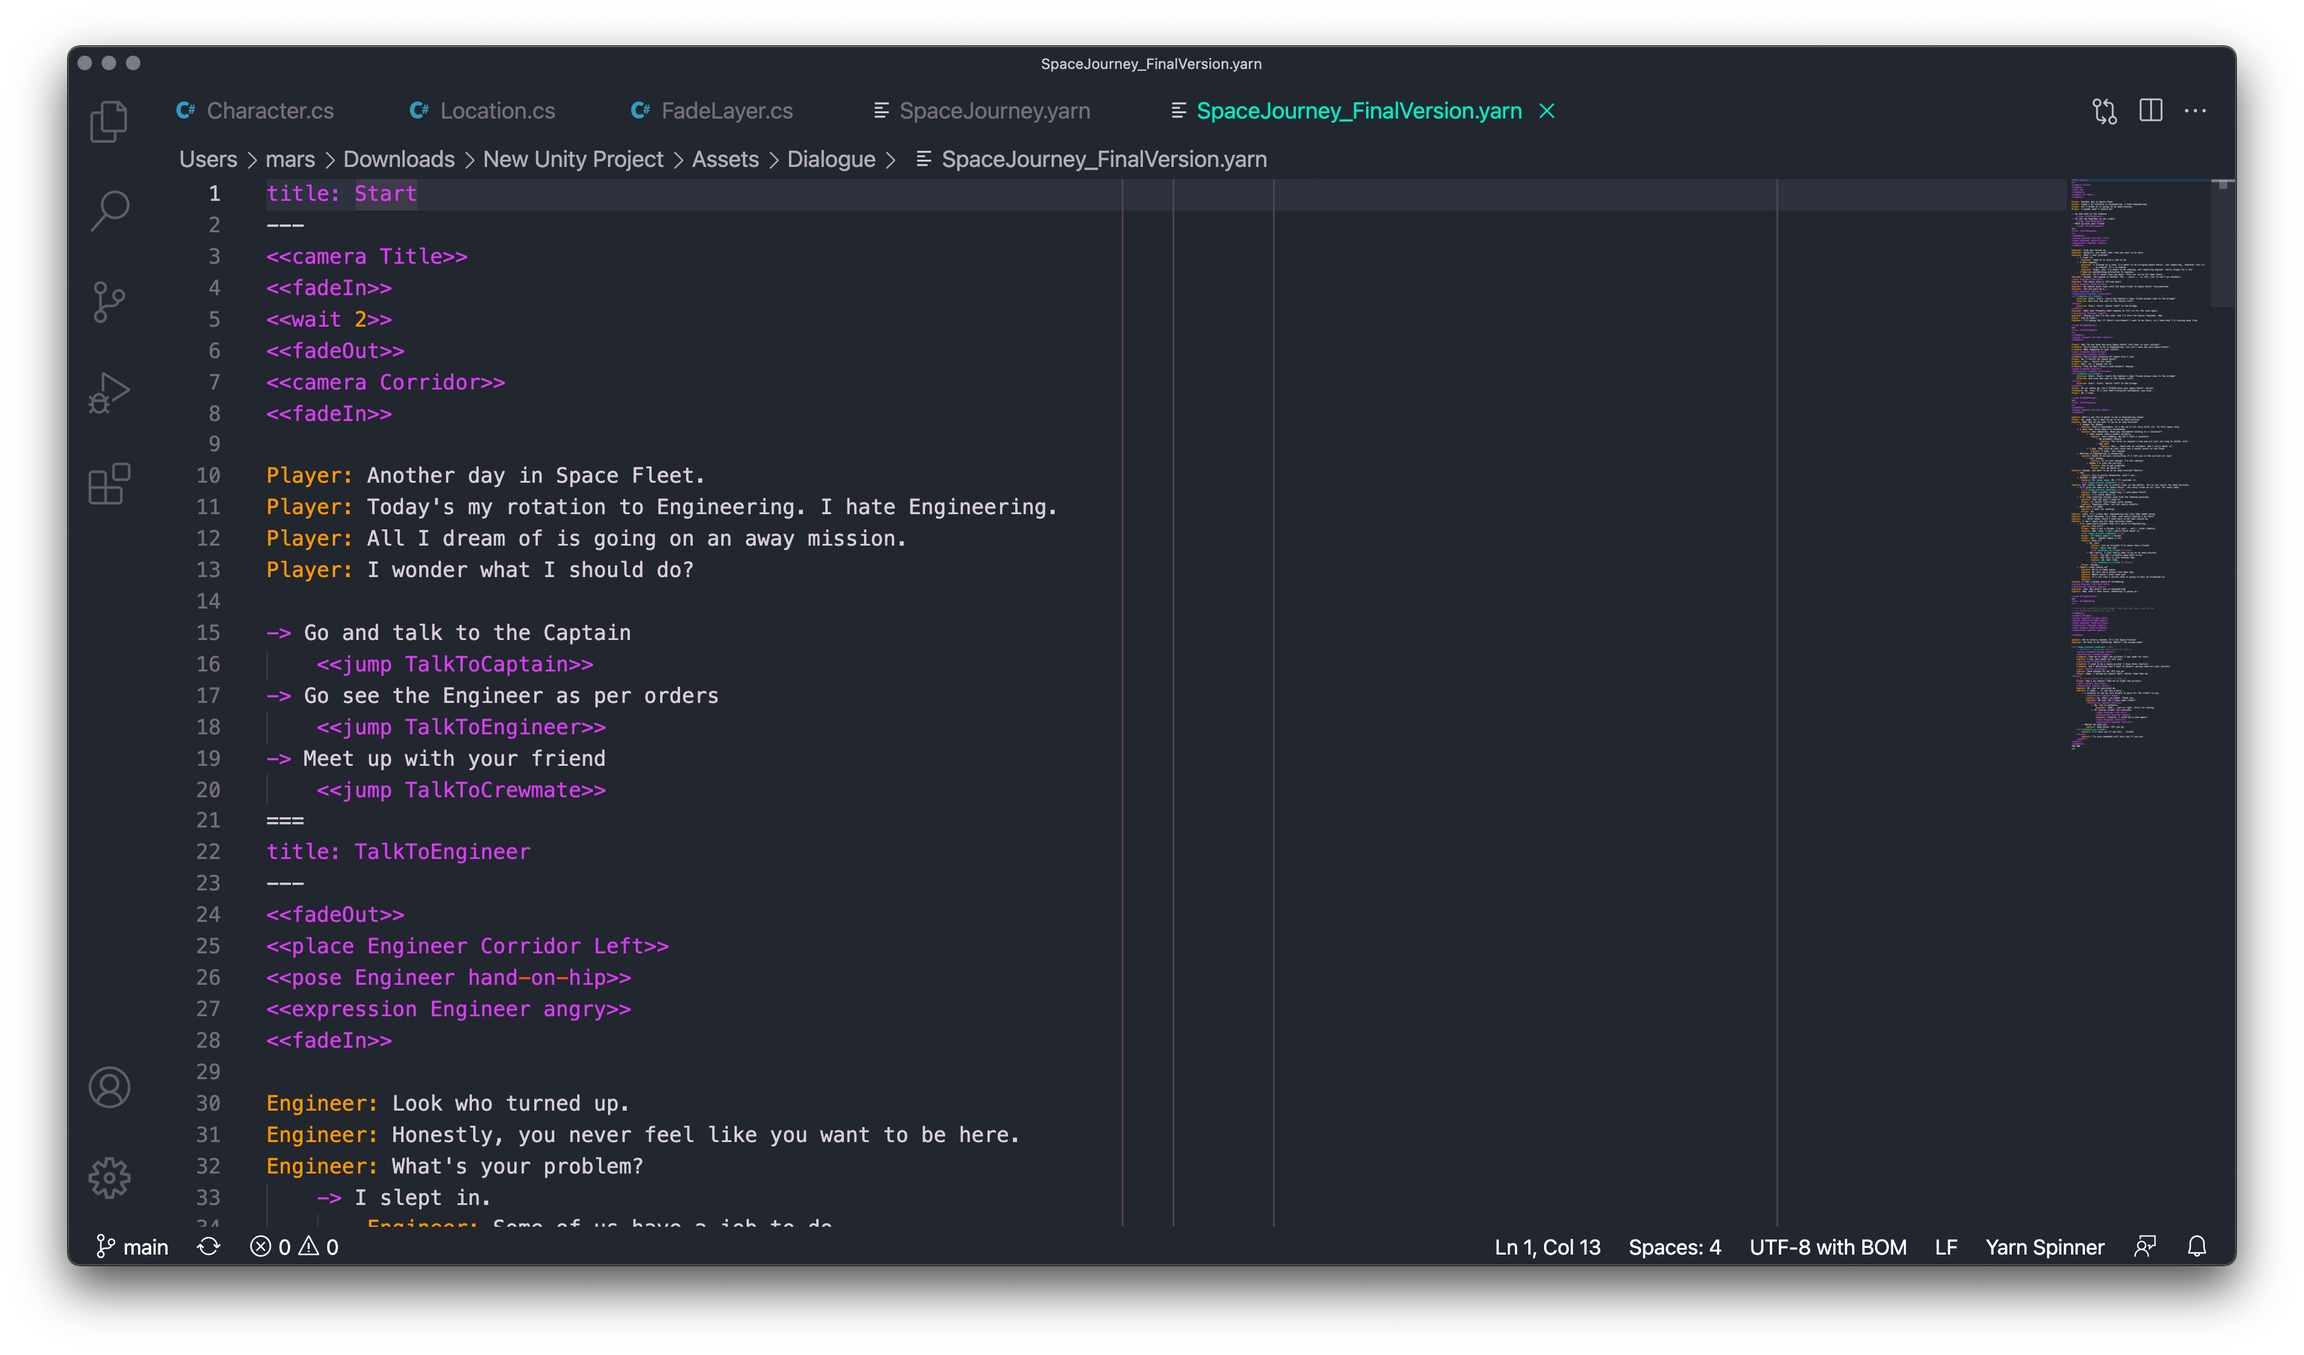
An easy way to spice this up is to just add more dialogue with the same characters. Here is an example script that shows how a simple starter script made for testing can grow to a fuller conversation. And it doesn't stop there! Yarn Spinner is perfect for allowing growing projects to remain functional throughout.
Now, let's move onto an example where Yarn Spinner leverages the power of Unity to change things in the scene as well as running dialogue...
Every game's data storage requirements are different. For this reason, Yarn Spinner is designed to make it straightforward to create your own custom component for managing how Yarn scripts store and load variables in ways that work with the other parts of your game.
Custom Variable Storage components are subclasses of the abstract class VariableStorageBehaviour. To implement your own, you need to implement the following methods:
Understand the Intro sample.
After you've worked through the Beginner's Guide, the Intro Sample is a great place to go next.
Intro is a simple conversation featuring branching, variables, localisation, a themed Line View and Option View, and voice-over.
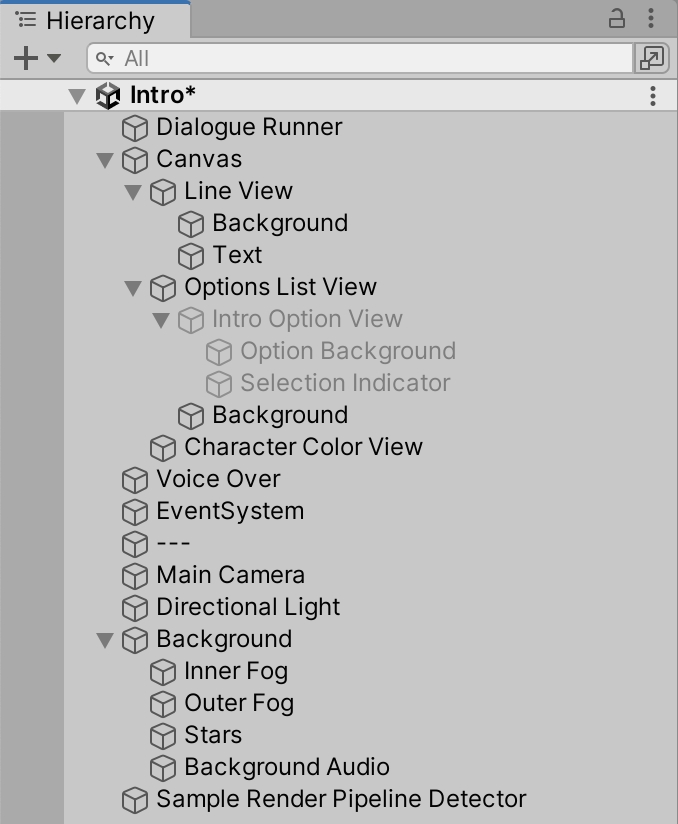
To understand the Intro Sample, open it and take a look at the Hierarchy:
You'll find the following:
Common questions and solutions for using Yarn Spinner in Unity.
Markup lets you mark a range of text (words, phrases) in a generic way, for whatever use. You could use it to style text, add sentence markers, make clickable words, etc.
Don't forget the $ when writing the variable's name!
Then call the functions and commands in Yarn:
If you're using Unity 2021.1 or earlier, you'll need to ask Yarn Spinner to update some code in your project that registers these C# methods as Yarn functions. To do this, open the Window menu, and choose Yarn Spinner -> Update Yarn Commands.
You don't need to do this if you're using Unity 2021.2 or later.
It is not currently possible to save or restore the specific line that the dialogue is running.
Write input code to detect clicking / tapping, then call DialogueRunner.StartDialogue().
This implementation will vary for every game, so we purposely do not attempt to design a one-size-fits-all generic NPC system. Here's some example pseudo-code to make your own:
The math / code is a little complicated. Calculate the NPC's on-screen position, then convert this screen position to UI canvas space, and reposition the dialogue bubble.
This is more about Unity UI rather than Yarn Spinner. For a working example, see the "Phone Chat" sample. (In Unity, go to Window > Package Manager, and select Yarn Spinner package. Expand the "Samples" dropdown and select "Phone Chat" and import it.)
This mainly involves Unity UI, and assumes that your project already has a system where a player can input text like a TMPro Input Field component. If the player input needs to happen in the middle of dialogue execution then you can trigger it with a Yarn Command, using a coroutine to wait for the player input if needed.
There is no real technical limit on the number of Yarn scripts or the size of Yarn Projects. You decide how to organize your data, and every project has different needs. Some factors to consider:
Simplicity. Putting everything into one big script file or one big project file is simpler sometimes.
Ease of writing. Writers may prefer to think in terms of one file per scene, one file per chapter.
A crash bug exists in versions of Yarn Spinner earlier than 2.3 for these platforms. If you're able to upgrade your version of Yarn Spinner, the best fix is to upgrade to the most recent version of Yarn Spinner.
If you can't upgrade your version of Yarn Spinner, a workaround for this issue is to open the Build Settings window in Unity, and set the "IL2CPP Code Generation" setting to "Faster (smaller) builds."
This example project demonstrates making a simple non-linear dialogue-based game when beginning with some pre-existing assets.
Display Yarn dialogue in a Unity scene
Allow a player to select between options to respond
Allow a player to select among available characters to speak to
Use Yarn Spinner to trigger a command that changes the interactability of characters
Yarn Spinner installed in Unity
Yarn Spinner set up in a text editor
Drag the provided Asset Package into the Project Window where project files are displayed in Unity to import them into the project.
This package includes the following assets and functionality:
A simple, static environment called Graveyard which also contains four character models.
A C# script that provides simple functions for the character objects.
A Timeline that stores the hovering animation for the Ghost character.
Some Lights that turn on and off to indicate when a Grave character is speaking.
Yarn Spinner for Unity comes with a pre-made UI layer and accompanying utility scripts to handle displaying lines and presenting options from Yarn files. Open the GameObject menu, and choose Yarn Spinner > Dialogue System.
When the Dialogue System in the scene is selected, the Inspector will display the Yarn Project it is expecting line from. Here, a Yarn Project is a kind of linking file that groups Yarn script files together. To make one, navigate to a sensible place for the file to live (such as Assets > Dialogue) and right-click the Project Window pane to select Create > Yarn Spinner > Yarn Project.
The existence of Yarn Projects allows larger games with multiple dialogue systems (e.g. main story dialogue, barks, storylets) to separate into multiple projects that pass lines to different UI or systems. This allows an extra level of organisation above separate Yarn files which are typically used to separate story scenes or parts.
However, most games will need only a single Yarn Project.
Select the scene's Dialogue System again and drag the new Yarn Project into the labelled slot in the Inspector.
Now the Yarn Project needs one or more Yarn Scripts to get dialogue from. Just like with the Yarn Project, navigate to the desired file location and select Create > Yarn Spinner > Yarn Script. Name it whatever you like - "GhostyLads" will do - and place it in the same folder as the Yarn Project.
By default, a new Yarn Script begins with a single empty node with the name of the file. Open the file, rename the node to Start and put a single line of test dialogue.
Returning to Unity, pressing the Play ▶️ button results in the test line being displayed in front of the graveyard scene. Pressing Continue will make the UI disappear, as it has reached the end of the script.
It's time to plan a story. In the scene there are four characters—Ghost, LeftGrave (Louise), CenterGrave (Carol), and RightGrave (Ruby)—and the intent of this game is for the player to be able to interact with them in virtually any order to complete the objectives of the game. This game format typically accompanies stories where the player must piece together information from smaller tidbits given to them when they speak to different characters.
For example: neither Witness A nor B knew who stole the cookie from the kitchen, however:
Witness A knew the cookie was taken in the morning.
Witness B knew that Suspects A and B entered the kitchen in the morning and afternoon, respectively.
Together, their clues show that Suspect A must have eaten the cookie.
So, when the game begins, Ghost will present some mystery. Once a brief context-establishing conversation ends, the player will be free to select which character to speak to next. Speaking to each of the Grave characters will present a clue, provided the required prerequisite clues are known. At any time, the player can present their collated clues to Ghost. If their clues are complete, Ghost will tell them they solved the mystery and the game will end.
This short story provides a looping circuit through four paths, and results in the player reaching the ending after an undetermined number of conversations (though there is a hypothetical minimum, there is no maximum). A railroad diagram representation of the story would look as follows:
In this script, selecting the correct conversation option when speaking to each character will yield a new clue. However, the correct option is only available if the player has the required prerequisite clues. So no matter the order the player speaks to the graves, they must acquire clues in the order A then B then C.
The most notable part about this script is that there are no jump statements in the file at all; each node is completely disconnected from the rest. Instead, we will be requesting and jumping to specific nodes manually from within Unity.
Once you've got a basic story, pop back into Unity and check the basics:
Note that at this point, there is no way to progress beyond the intro conversation with Ghost. All other nodes cannot be reached with the code we have written so far.
In this game, the player should be able to select an NPC in the scene and have it trigger their repsective conversation. This requires a few things:
Code to begin dialogue from a specific node when a character object is interacted with.
Code to disable scene interaction when any character is already speaking.
Code to disable character interaction when a specific character should not be interactable.
In Assets > Scripts there is a C# script that has code to do these things (see headers below), so we just need to connect it to the appropriate places. But first, let's step through what it does.
Add the YarnInteractable script to each character in the game: Ghost, LeftGrave, CenterGrave, and RightGrave. Make sure to set their respective conversationStartNode values in the Inspector to match what they are called in the Yarn script.
First up is the code for beginning a conversation. This requires running dialogue from a specific node when a character is interacted with. Running dialogue is a simple matter of telling the DialogueRunner to begin dialogue and passing the name of the node to begin from as a string.
To run this when a character is interacted with, simple override the OnMouseDown() function that exists for every GameObject (which this class inherits from). Checking the IsDialogueRunning property of the DialogueRunner is a simple way to ignore interaction whenever starting dialogue would interrupt an existing conversation.
This handles beginning a conversation, but what if other changes are needed while a character is speaking? Well, having a function that is triggered when a conversation ends would allow properties to be set in StartConversation that can then be reversed once dialogue has ended.
In a typical game, several changes would be triggered when beginning or ending dialogue, such as changing UI mode and starting and stopping a speaking animation on the relevant character or similar. So it's sensible to have bookend functions that hold all this code, even if we won't be doing anything useful with EndConversation()until later.
To trigger a function when a conversation ends, a listener can be added to the DialogueRunner that will fire a specified function when a certain event occurs. The onDialogueComplete event happens whenever the runner reaches the end of its current conversation path.
Next, let's define the function it will call. A key consideration here is that every object using this YarnInteractable script will be notified of dialogue completion every time it happens. Each one is registering a listener, and each will have its own EndConversation() function be called.
So to save some work, we can check whether this is the instance that should care about the event. This can be done just by setting a boolean when the conversation begins, that says this is the character that is currently speaking.
Returning to Unity, press the ▶️ button and see that this now allows a new conversation to be triggered by interacting with any character after another has finished speaking.
At this point, this may seem done, but there is a critical issue here. Looking back at the earlier goals:
Why that third thing? Well, because the current state of the game allows the player to:
Speak to the Ghost to begin the story.
Ask the Graves about the mystery.
Speak to the Ghost once they have collected the necessary clues.
Have Ghost tell them they ✨ solved the mystery ✨ and say goodbye.
Go back and still ask the Graves about the mystery that is already solved(?!)
So there needs to be a way to tell a specific character "no, you are done, don't speak to the player any more". This can be done with a simple Yarn Command.
In YarnInteractable.cs there is a simple function that sets a flag that the OnMouseDown() function checks when deciding whether to start a conversation. Turning this into a command simple requires adding the Yarn Command decorator above the function, with the string that will become the command keyword in any yarn scripts.
If you're using Unity 2021.1 or earlier, once you've made this change to your code, open the Window menu and choose Yarn Spinner -> Update Yarn Commands to update the code that makes this command available to your Yarn scripts.
Back in the Yarn script, call disable once for each character when the story ends, to save the player from going back and having a confusion conversation about an already-solved mystery.
And that's it for the dialogue behaviours! Back in Unity, characters should speak when interacted with—but not when it would interrupt another, or when the story has ended.
Now that all the behaviours are working and the skeleton story plays through correctly, it's time to replace the skeleton placeholder script with the full story and add some polish. Delete the Yarn Script that you created earlier, and find the GhostyLads_FinalVersion.yarn file in the Assets > Dialogue folder. Move it into the same folder as the Yarn Project.
Next, let's add an indicator so the player more easily knows which character is currently speaking.
Because I am not an animator, I have used only static objects as characters in this demo game. To indicate who is speaking, I will be using a simple spotlight that turns on and off above the speaker. I will not be taking questions at this time.—Mars, 2022.
In the scene, each grave object also contains a green spotlight which is currently assigned to a variable called lightIndicatorObject in YarnInteractable.cs, so a snippet of code in each of theStartConversation() and EndConversation() functions can quickly turn it on and off for the relevant character.
Now, a light should turn on above any grave who is currently speaking.
A playable whodunnit-like game with multiple characters that can be spoken to in any order to solve a mystery from partial clues available.
An easy way to spice this up is to just try replacing provided assets with ones of your own choosing. There are plenty of publically available asset packs with permissive licenses to play with, and re-theming a starter game and building from there can be easier than starting from scratch.
You could add more characters, or even design a more complex conversation structure that must be navigated to solve the mystery! Yarn Spinner is great at telling complex non-linear stories where player choices matter.
This example project demonstrates making a simple dialogue-based game when beginning with some pre-existing assets.
You can watch a video version of this tutorial presented by Yarn Spinner's Jon Manning and Mars Buttfield-Addison, from the Game Developers Conference in 2021.
Display Yarn dialogue in a Unity scene
Allow a player to select between options to respond
Use Yarn Spinner to trigger commands that change the scene, camera and characters
Yarn Spinner installed in Unity
Yarn Spinner set up in a text editor
Drag the provided Asset Package into the Project Window where project files are displayed in Unity to import them into the project.
To see the Scene containing the imported assets, you'll need to open it. In the Project Window, navigate to Assets > Scenes and select SpaceJourney.unity.
This package includes with the following assets and functionality:
A simple, static environment called Spaceship.
Three Character models that each come with 6 available poses and 5 facial expressions.
UI Layers that appear in front of the camera to present a black screen or title screen.
Location Markers which are named but invisible objects in the scene that can act as anchors to move other objects to predefined positions.
Four C# scripts that are attached to some of the above objects to provide simple functions.
So the Scene looks somewhat like this, except that Locations and the markers within them are invisible. Here, orange diamond 🔶 icons are markers intended for the camera to move to and blue circle 🔵 icons are intended for characters.
You can see these markers yourself in Unity by selecting each marker in Location Markers and allocating them an Icon using the dropdown at the top of the Inspector. The markers named Camera are the camera markers and the ones named like Left or Right are character markers.
Yarn Spinner for Unity comes with a pre-made UI layer and accompanying utility scripts to handle displaying lines and presenting options from Yarn files. Open the GameObject menu, and choose Yarn Spinner > Dialogue System.
When the Dialogue System in the scene is selected, the Inspector will display the Yarn Project it is expecting line from. Here, a Yarn Project is a kind of linking file that groups Yarn script files together. To make one, navigate to a sensible place for the file to live (such as Assets > Dialogue) and right-click the Project Window pane to select Create > Yarn Spinner > Yarn Project.
The existence of Yarn Projects allows larger games with multiple dialogue systems (e.g. main story dialogue, barks, storylets) to separate into multiple projects that pass lines to different UI or systems. This allows an extra level of organisation above separate Yarn files which are typically used to separate story scenes or parts.
However, most games will need only a single Yarn Project.
Select the scene's Dialogue System again and drag the new Yarn Project into the labelled slot in the Inspector.
Now the Yarn Project needs one or more Yarn Scripts to get dialogue from. Just like with the Yarn Project, navigate to the desired file location and select Create > Yarn Spinner > Yarn Script. Name it whatever you like - "Start" will do - and put it in the same folder as the Project.
By default, a new Yarn Script begins with a single empty node with the name of the file. Open the file, rename the node to Start and put a single line of test dialogue.
Returning to Unity, pressing the Play ▶️ button results in the test line being displayed in front of the empty scene world. Pressing Continue will make the UI disappear, as it has reached the end of the script. If you do not see this, read onward for a common fix.
If you only see a black screen, the included fade-to-black layer is turned on and blocking the camera from seeing the scene. Hide this by selecting UI Layers from the Scene Hierarchy and unchecking the box at the top of the Inspector.
It's time to plan a story. In this Asset Package there are three character models called Engineer, Crewmate and Captain.
These low-poly spacefarers live and work on a spaceship with the player. It's a new day on the job in Space Fleet, the player is in the corridor and they must decide which of their three shipmates they're going to speak to. The choices presented are:
The Engineer, who will complain to the player about his job.
The Crewmate, who the player will attempt to convince should give them extra rations.
The Captain, who will try to judge whether the player is ready for action.
After a short conversation with the chosen character, a shipwide alert requests all hands report to the bridge. When the player arrives, the Captain reveals that space pirates are attacking. Then one of two things happens:
If the player chose to speak to the Captain earlier, and succeeded in convincing her that they were ready for action, the player is sent to fight off the pirates and save the day.
If the player either didn't speak to the Captain, or failed to convince her that they were ready for action, the Crewmate is sent instead.
This short story provides an initial choice between three paths, and results in the player achieving one of two endings. A tree representation of the story would look as follows:
Once you've got a basic story, pop back into Unity and check the basics:
Speaking to an empty void is all well and good, but this particular game is going to be more compelling if it makes use of the provided assets to make dynamic visuals. So to empower our Yarn script to invoke changes in Unity, we'll make some Commands. For this project, we'll make commands to:
Move the Camera to preset locations, as if the player is moving.
Turn on and off UI elements, to create nice transitions during Scene changes.
Move Character models to preset locations, as if they are entering and exiting the Scene.
Change Character model animations and textures, as if they are showing different emotions.
The first two will need to exist throughout the Scene, while the next two should attach to specific Character objects so each can be controlled independently. In Assets > Scripts there are four C# scripts that have code to do each of these things (see headers below), so we just need to create commands that make the functionality available to Yarn scripts in the project.
Code for the scene-wide commands are included in Assets > Scripts > SceneDirector.cs. To make functions from the script available throughout the project, it is attached to an otherwise empty GameObject in the Scene called Scene Director.
With our first command we want to be able to be able to move the Scene's Main Camera to an invisible marker in the Scene with the given name. The function from SceneDirector.cs that we want to be able to invoke from Yarn is called MoveCamera() and it looks like this:
It takes a Location in the Scene, from the eligible options Title, Corridor and Bridge. **It then finds the location and facing of the marker named Camera in that Location** and sets the camera location and facing to that of the marker.
If the camera moves to the Title location, the Title Layer element will fill the screen and appear as if a splash screen was being shown. If moved to the Corridor or Bridge locations, it acts as the point of view of the player who is then seen to be currently in that location. The default camera location is Title.
Here, we want to make a Yarn command called camera that takes a location name and knows to pass it off to the MoveCamera() function in C# to make it happen. This will mean when the player has to move to the bridge, the Yarn script can just say <<camera Bridge>>.
Making a command that can then be used in Yarn is as simple as registering a Command Handler. A Command Handler tells the Dialogue System that a Yarn command exists with a given name, how many additional pieces of information it needs, and which C# function to pass this information to when it's called. Then, when the game runs, the Dialogue System will handle talking to C# for you.
Command Handlers have two important requirements:
They must be created before the command can ever be called. Usually, this means you want to make it as part of the initial creation of the scene or the object it's attached to.
They must be attached to the Dialogue System's Dialogue Runner object. It's the thing passing lines of dialogue to the scene that has to know to change behaviour if the next line it receives is a command instead of dialogue.
To satisfy the first point, we can register any Command Handlers in a function called Awake() that every Unity object has by default. This function is called when the object is created, and because our empty Scene Director object is always in the Scene this means it gets created as soon as the Scene does. Registering Command Handlers in the Awake() function of this object therefore means they will be registered before anything else happens when the game is run.
To satisfy the second, we need to find the Dialogue Runner in the scene and assign it to a variable in C# that we can then attach Command Handlers to. Because there is only one Dialogue Runner in the Scene, we can find it by asking Unity to give us all the objects in can find in the Scene of type DialogueRunner.
Altogether, this means two simple lines in the Awake() function of SceneDirector.cs:
The Dialogue Runner now supports a command called camerathat has a parameter of type Location and will defer to the function MoveCamera() to make it happen.
Return to the Yarn script and add commands of syntax <<camera (location name)>> to the appropriate places:
Add <<camera Corridor>> to the top of the Start node.
Add <<camera Bridge>> to the top of the node where characters should move to the bridge.
To show the title before the game begins, add <<camera Title>> at the top of Start and then a call to the inbuilt <<wait (number of seconds)>> command to hold for a second or two before moving to the Corridor.
If you hid the Title Layer object earlier, be sure to unhide it now by selecting it and re-ticking the box at the top of the Inspector. If necessary, unhide UI Layers and re-hide just the Fade Layer.
These minimal changes to the Yarn script...
...should now result in the camera moving around the empty environment in the appropriate points in the script. Returning to Unity, press the ▶️ button and playthrough to check this works correctly.
When Yarn script needs to pass an argument of a project-specific type (like Location is) it simply searches the scene for objects of that type with the given name, so make sure you spell and capitalise Location names exactly as they are in the Scene.
Onto the next command! Smash cuts are fine, but nice transitions are fancier. In the Scene there is a flat black layer called Fade Layer that sits in front of the camera. Changing its opacity can make the camera appear to fade to and from black. Back in SceneDirector.cs there is a line in the Awake() function that finds the objects of type Fade Layer in the Scene (there is only the one) and keeps it in a variable called fadeLayer, similar to how the Dialogue Runner was found earlier.
Remember to unhide the Fade Layer if you hid it earlier, otherwise this command won't be able to find it. Re-tick the box at the top of the Inspector.
Then further down the file there are short functions called FadeIn() and FadeOut() that do just that, by changing the opacity of this stored layer over the given number of seconds (or defaulting to 1 second if no argument is provided).
These functions are a little different in that instead of returning nothing like the MoveCamera() function did, these functions return a Coroutine. This gives Yarn Spinner a handle to the process it triggered so that for operations that take time (like fading in a screen over a second or so) it knows not to trigger the next line of dialogue until that process has completed.
Again, the functionality that performs the actual opacity change is contained in a C# script attached to the relevant GameObject. In this case it is a file called FadeLayer.cs attached to the Fade Layer.
Adding commands for fadeIn and fadeOut works just like before. In the Awake() function of SceneDirector.cs by adding Command Handlers to the previously found Dialogue Runner.
Back in the Yarn script, add a <<fadeOut>> and <<fadeIn>> to either side of each camera or node change to make nice fade-to-black transitions between story parts. Because no argument is provided, this will perform a 1 second fade.
Including transitions between conversation nodes even if they occur in the same Corridor location will hide the characters appearing that will be implemented next.
All this took is a few more additions to the Yarn script:
The next command will allow character models to be placed in the Scene whenever they are part of the current conversation. We could write these as before in SceneDirector.cs with a function that takes a Character to change and what to change about them, but instead we're going to try out another type of command.
This time, we're going to add commands to the script that's attached to each Character-typed object in the scene, found at Assets > Scripts > Character.cs. This script has three main functions we want to use: Move(), SetPose() and SetExpression().
In our example nobody ever leaves a location while the player is still there so there's no need to implement hide/show-like functionality; we can just cycle Characters between predefined Locations in the Scene.
First up in Character.cs, there is a function called Move() that accepts a Location object and the name of a marker in that Location. It looks very similar to the MoveCamera() function used earlier:
Much like before with MoveCamera(), Yarn Spinner is able to find the Game Object you are trying to command by searching the Scene for one with the right type and name. This is used to find the Location that should be passed as the first function argument, but also to specify the target Character this function should be called on.
So if we want a command like <<place (location) (marker name)>> we need to add an extra argument in between to specify the target Character object: <<place (character) (loc...>>.
But this can't be done like before with a Command Handler registered when the object is created. Because Character.cs is attached to every Character object in the Scene, the Awake() function would be called every time any Character was created. This would result in the Dialogue Runner receiving multiple registrations of command with the same name but that are requested to pass off to different objects. Yarn Spinner won't allow that, so we have to instead annotate the relevant functions using the Yarn Command decorator.
Declaring a Yarn Command is as simple as adding [YarnCommand("command name")] to the declaration of a function. Add the following decorator to just above the Move() function:
If you're using Unity 2021.1 or earlier, open the Window menu, and choose Yarn Spinner -> Update Yarn Commands. This updates the code that makes sure that the "place" command is available to your Yarn script.
If you're using a later version of Unity, you don't need to do this.
Now in the Yarn script, just add commands to move the relevant Character to the desired marker in the current Location by adding <<place (character name) (location) (marker name)>> wherever needed. Placing characters before calling <<fadeIn>> will ensure they are there before the shot appears, so the Character won't seem to pop into existence a fraction later.
Just a handful of additions to the Yarn script:
And now our Characters appear in the Scene whenever they're part of the current conversation.
Next, we're going to add some pose and facial expression changes to make Characters respond to the changing mood of the story. Primarily because it's a bit weird that everyone looks so cheerful during a crisis...
The SetPose() function in Character.cs accepts the name of a pose and tells the animator attached to the Character model to move the model to that pose. The available poses for each model are defined by their underlying type seen in Assets > Art > CharacterBaseModels and the Asset Package has come with the following for both male and female models:
neutral
hand-on-hip
arms-out
hand-at-mouth
pointing
hands-on-hips
Mostly these just move their arms into different basic positions. The function looks like this:
As with the place command, add a decorator to SetPose() to declare a command called pose.
If you're using Unity 2021.1 or earlier, open the Window menu and choose Yarn Spinner -> Update Yarn Commands to update the list of available commands.
Now characters can be moved using <<pose (character) (pose name)>> wherever called for in the script. In particular, adding appropriately unhappy-looking poses during the Bridge scene will make Characters seem to respond to the story.
Next, do the exact same thing for expressions. The options included for each character in the Asset Package are:
neutral
happy
angry
smirk
surprised
Facial expressions for the included characters are just a texture applied to the model's face, so changing expression just means asking the texture renderer to change face texture.
Decorate with [YarnCommand("expression")] and, back in the Yarn script, place calls to <<expression (character) (expression name)>> wherever appropriate.
If you're using Unity 2021.1 or earlier, update your Yarn commands now by choosing Window -> Yarn Spinner -> Update Yarn Commands.
And that's it for commands! We successfully implemented commads to:
Now that all the commands are hooked up and the skeleton story plays through correctly, it's time to replace the skeleton placeholder script with the full story. Delete the Yarn Script that you created earlier, and find the file SpaceJourney_FinalVersion.yarn in the Assets/Dialogue folder. Move this file into the folder with the Yarn Project.
A playable visual novel-type game with multiple characters and scenes and sensible transitions between them.
An easy way to spice this up is to just try replacing provided assets with ones of your own choosing. There are plenty of publically available asset packs with permissive licenses to play with, and re-theming a starter game and building from there can be easier than starting from scratch.
Or you could try your hand at C# and create more advanced commands that can be made available to Yarn. Add new Locations, or camera motion. The sky's the limit! Yarn Spinner is perfect for allowing iterative and creative development.
Now, let's move onto an example that uses Yarn Spinner to run different dialogue based on players interacting with different NPCs...
"Getting Additional Control Over The Dialogue or: How I Learned To Stop Worrying And Build My Own Custom Dialogue Runner Class"
If you really do need total control, read on!
While for the most part we think the best way to use Yarn Spinner is to use the components provided and replace and supplement them as needed there are going to be times when you need more control over the dialogue itself. In these cases you will need to directly interface with the dialogue and to build your own dialogue runner. This will give you full control over the dialogue and let you control the timing and triggering of important events.
Before we can really start building our own dialogue system we need to take a bit of a look at what Yarn Spinner does and how it works currently. The starting point for Yarn Spinner is the Yarn dialogue files themselves, once you have your Yarn files written and ready is where Yarn Spinner takes over. These files get associated together into a Yarn Project, this project reads through and compiles the Yarn files into three pieces:
strings tables
metadata table
binary program
This isn't a deep dive into how the specifics of Yarn Spinner works there is one part that does need to be covered, and that is how lines work. When you write some lines in your Yarn like the following:
You have two lines (identified by their ids ab12c and 34de5) that inside the strings table (simplified for this example) will be something like the following:
The compiled output of the yarn has no understanding or knowledge of the text itself, it just knows that it will at some point run a line with the id of ab12c and then after another line with the id of 34de5. So to get the actual text this is where the line providers come in, they read the strings table and then return the actual text so that other parts of the game can use it. Even then there are further stages, substitutions need to occur and markup needs to be parsed, but the core is a line of text as far as the Yarn Spinner compiler is concerned is an id and nothing more, other pieces make it actual text. We do it this way for two main reasons, localisation and code bloat. If the text of the line was stored in the compiled program either we'd need to also store every localised variant also or have some other system to let the dialogue runner know that "no actually I know you have the line with some text but ignore it and use this text instead, thanks". Both of these approaches just makes the compiled output much much bigger and complicates the flow of the program, hence why we split them out.
The first thing before we make any new code is to decide how our custom dialogue runner is going to be different from the built-in one, for if its just the same why bother making it? The question now comes "what will our runner do that is different?" The current runner works by sending Dialogue Views information when important events occur and then relying on completion callbacks to control the flow. Every view gets told about important events and once every view has run their completion callback the runner continues. This means all timing is the responsibility of the views and that might be less than ideal for your needs, so lets change that in our runner. Let's make it so that all timing is solely the responsibility of the runner, and it won't give two hoots about what any other part of the game is doing, if its told to advance it will advance. With our goal set lets lay the basis of our scene.
If you have not already done so import Yarn Spinner
Create a new scene in Unity, name it whatever you like
Create a new C# file, name it MinimalDialogueRunner.cs
Open it and add the following:
These are the basic bits we will need for our runner, in particular the Yarn.Dialogue is of most interest to us as it is how we will interface to the compiled version of the Yarn narrative.
Yarn can be thought of as an event driven story language, you start the story by going to a particular node in the story, then you advance through the story. Every time you reach a line of dialogue you show it (somehow), and then advance onto the next piece. When you hit a command you handle it (somehow), and then advance. When you hit a set of options you get the users input on which option to go with (somehow), and then advance. Eventually you finish that node and either end the story there or jump into a new node and start the process all over again. This gives us our main events we need to handle, lets stub them out now, add the following methods to our new runner:
Hopefully these are understandable enough from their names, but the public ones are intended to allow us as the game developer control the flow, and the private ones are for the runner itself to make use of before letting other parts of the game know what has happened. In general inside each of these methods we are going to be doing some setup and configuration so that when we let other parts of the game know everything is in a manner they can consume without too much work. Now there are two more events that aren't really events but should be handled, we need to let the line provider know to expect lines and we need to have a means of querying what nodes exist in the project, so we should add them now.
Each of these basically maps to a specific method we defined above and can be thought of as the public facing side of those methods. Ok now its time to draw the rest of the owl!
Here we will be making the implementation of the methods we defined above and dispatching the events from inside of them, let's get cracking.
Replace the StartDialogue and StopDialogue methods with the following:
These methods are very minimal in what they do, they set some flags for state and otherwise just let the dialogue object itself know things have changed.
Replace the HandleOptions method with the following:
In this method we do a few more steps, we go through each option in the option set and configure them so that other parts of our game can make use of them. We do this by first getting the line inside of the option from our line provider and then we do any necessary substitution of variables inside of the line, and then finally we parse any markup inside of the line. With that done the line is ready, we then make a new DialogueOption with that line and other relevant option info, in particular the availability and ID of the option, and then add that to an array. Once we have run this process on every option in the set of options we fire off the event with the array of our configured options for the rest of the game to use.
Replace the HandleCommand method with the following:
When it comes to commands there are two parts, if the command is wait we will handle it, otherwise we send it off for other parts of the game to deal with. In this method we split the command up into its constituent parts, we use an existing method to do this so that situations like <<unlock "room seven">> are split up into the elements of unlock and room seven, although we could do this ourselves if we want. Once that is done we check if the command is a wait command and if it is we run a coroutine to wait for the duration, otherwise we fire off our command event to let the rest of the game worry about the command.
Replace the HandleLine method with the following:
Much like with the options, here we are getting a line from our line provider, performing any substitution, parsing markup and then sending it off. Unlike the options however we only have to do this once as lines come in one at a time.
Finally now we do the three simple events, HandleNodeStarted, HandleNodeEnded, HandleDialogueComplete:
With these done we have now handled all the events that our runner needs to ensure are handled, all that remains is to implement the Continue and SetSelectedOption methods. These two will allow us advance the dialogue and choose options, so lets add them now:
Both of these are similar, they both advance the dialogue itself onto the next event and in the case of SetSelectedOption chooses an option first. With that done we are finished with the events and the flow, now we need to setup the runner and dialogue so that they can actually do something with all these events we just handled.
Everything done so far has been about the handling and dispatching of events and flow we now need to configure the runner and dialogue class so that it can actually do something. First lets configure the various pieces of the runner itself, add the following code:
One method CreateDialogueInstance we haven't written yet and will get to in a second, but the rest of this is setting up the pieces the runner will need. In particular we make sure we have a variable storage and line provider and that both are ready to be used, everything else happens in CreateDialogueInstance so lets make that now:
The dialogue class being configured here is structurally very similar to our own runner, we have hooks that are run when important events happen. Its realistically the Dialogue class that does most of the heavy lifting, we are acting as a dispatching and Unity friendly window into the Dialogue. With that finished our custom dialogue runner is done, time to hook it up to something to make it dance.
The existing views Yarn Spinner provides assume that you are using the callback model the runner has, ours no longer does that so they are incompatible. So we will make some new ones, based off the originals but to handle our custom runners approach instead of the original. Before going any further its worth saying we could modify the runner so that it mimics the callback model and we could reuse the existing views, we chose not to do that because it isn't really a great example of taking control over the dialogue if you end up just rebuilding the exact same (or very similar) thing.
We'll get started with the line view first, and to speed things up we are gonna be reusing most of the code from the existing LineView.
Back inside Unity create a new C# file
Name it MinimalLineView
Add the following code:
Most of the code here is unchanged from the original. The main differences is we are no longer derived from the DialogueViewBase class but are just normal gameobjects and all the method signatures for handling the dialogue events no longer have a callback method. Now when they have done their stuff they just call Continue on our runner.
Much like with our line view our options view will also be mostly copy-pasted from the existing OptionListView class and modified as in. We will still be using the OptionView class and default prefab just to save time, so this will require a little bit of emulating some callbacks so that works, but won't be too much.
Create a new C# file
Name it MinimalOptionsView
Add the following code:
Again this is almost identical to the original code, just with some tweaks here and there. Of interest is the RunLine method, when this is hooked up later it will let us get access to the line and we don't have to do anything to advance the dialogue because in the line view that is doing that side of it.
So our views are ready, but we still have a lot of other events we haven't handled and we also don't currently have a way to start the dialogue, let's fix that.
. Make a new C# file . Name it DialogueSupportComponent . Add the following code:
This class basically just logs every other event, in a more complete scenario you might have to do more but for us just logging is fine. We also have a very crude means of starting the dialogue now, by pressing the Spacebar.
Now for the last little bits and pieces, we need to hook everything up in the scene, to speed things up we are gonna be using the Dialogue System prefab and reworking it to use our components.
Add a Dialogue System Prefab into the scene
Select the prefab in the hierarchy
In the Inspector unpack the prefab
Remove the Dialogue Runner component from the prefab and add in our Minimal Dialogue Runner component in its place
Add a Dialogue Support Component to the prefab
Expand the Prefab, go into the Canvas -> Line View
Remove the Line View component
Add our Minimal Line View component in its place
Hook up the Line Text, Character Name Text, and Continue Button fields to their respective UI elements in the UI
Select the Options List View inside of Canvas -> Options List View
Remove the Options List View
Add our Minimal Options View in its place
Hook up the Last Line Text, and Options View Prefab
Now the UI and components are in their right place time to connect everything into our runner.
Select the Minimal Runner component in the hierarchy
Connect the Command Needs Handling event up to the Dialogue Support Component's HandleCommand method
Connect the Node Started event up to the Dialogue Support Component's LogNodeStarted method
Connect the Node Ended event up to the Dialogue Support Component's LogNodeEnded method
Connect the Dialogue Complete event up to the Dialogue Support Component's LogDialogueComplete method
Connect the Options Need Presentation event up to the Minimal Options View's RunOptions method
Connect the Line Needs Presentation event up to the Minimal Options View's and Minimal Line View's RunLine method
Our runner is now fully hooked up, lets give it a go.
Create a new Yarn file
Add some content
Create a Yarn Project
Hook your yarn file up to the project
Hook the project up to the Dialogue Runner
Start the scene
Press the Spacebar
Sit back and enjoy your story powered by your runner
We've done an awful lot in this guide, created new runners and UI to accompany them, and as part of it taken a deeper look into how Yarn Spinner itself works. There is still a lot more to do before you could ever use this runner in an actual production game, for a start it doesn't set up default variables, but this is the basis of a much larger world. Hopefully now if you find yourself wanting a different flow to your architecture or am needing more control over the process of handling your Yarn you will have the tools needed to do it yourself.
When writing Yarn scripts, variables come in handy for storing state and user preferences that can persist and impact story dialogue or choices later on. When using Yarn Spinner for Unity, variables from Yarn scripts can be accessed in C# code by using the provided InMemoryVariableStorage, which acts as a simple dictionary to store variable names with their current values.
This looks something like this:
This allows Yarn types String, Number and Boolean to be stored in memory, and then accessed by this wrapper class that converts them to the C# equivalents string, float and bool, ready for use in your code.
InMemoryVariableStorage is flexible and extensible, and has utilities for things such as initialising with default variables declared, or serialising to and from JSON. But what if you want to add very custom behaviour to how variables are stored? To keep values somewhere other than in memory, or add side effects to certain operations in a way that wouldn’t work by just extending this default variable storage? Well, you can define your own.
In Yarn Spinner for Unity, VariableStorageBehaviour is an abstract class that can be inherited from. It specifies the methods which Yarn Spinner may call at runtime, which are expected to be dealt with in your implementation:
Now, Yarn Spinner does not care how your custom VariableStorageBehaviour works beyond that. It simply assumes that you are doing something sensible, and that your subclass will provide the functionality it expects. Some of those expectations cannot be constrained in code, like the required method declarations can, so there is a level of trust here that you (as the implementer of this black box subclass which Yarn Spinner has never seen) will:
Actually store values somewhere. Your code will still compile if your SetValue() methods are empty or otherwise throw away the values they are given, but this will mean your TryGetValue() methods will never be able to work.
Actually get the right value for the given key. Your code will still compile if your TryGetValue() methods return random values from the aether, but this will make your use of these variables in your Yarn script effectively nonsensical. Likewise if you allow setting of multiple values with the same key.
Actually get rid of values when asked to. Your code will still compile if your Clear() method does nothing, but this means that Yarn script progress or state may never be reset correctly.
Actually check if a key already exists. Your code will still compile if your Contains() method always returns false, but this will lead to overwriting existing values the next time someone tries to SetValue() a seemingly unused key that already had a value.
So let’s assume you are not some chaos demon and you actually want to make a Variable Storage that works the way the Yarn Spinner runtime expects, so that you get variables that actually work. You need:
A way to store values of the given types, each associated with a unique key.
A way to get those values back, as the expected type.
A way to get rid of all the previously stored values.
If you were a masochist, you could write a class whose SetValue() method printed out the given key and value on a piece of paper, Contains() and TryGetValue() methods that took a snapshot with a camera placed above the printer and read the values back, and a Clear() method that pushed the paper from the printer tray into a shredder. Yarn Spinner would not care, because it would still do those three things (though probably unreliably, and with some storage limitations).
Some more typical examples of things that gamemakers have wanted their variable storage to do are:
Instead of storing variables in memory in a dictionary, store them on disk or in a database.
Instead of just setting values in the Variable Storage when asked, also update some corresponding variables on the C# side or call a UnityEvent to notify other components that a value has changed.
Instead of simply getting and setting values, run them via some sanitation or transformation, or even interface with an external API.
So let’s break down how you would go about implementing one of those more sensible ideas...
SQL is a domain-specific language and set of related frameworks that allow the creation and manipulation of relational databases. This will not be a guide to SQL, as there are many good ones already out there, but the TL;DR of SQL is: data is stored in tables, each column has a name and a type, each row is an entry, and some entries may reference entries in other tables that hold related information. SQL queries can be used to connect information from across tables, to get the fields of information you want.
To begin, we need to make a custom class for our new Variable Storage, which should inherit from the VariableStorageBehavour abstract class.
If you are following along, your IDE will probably complain at this point, because this empty class does not fulfil the requirements defined by the abstract superclass. To conform, we need at least the six methods listed earlier.
So let’s have a think about how each of these would need to work, given a backing of SQL. We need to be able to insert values into tables, check if a value exists in tables with the given key, return the corresponding value for a given key, and remove all entries from tables.
But first, before any values can be set, the database needs to already exist. Set up like this conventionally occurs in the Start() method:
Next, to create the tables we need to store values in, we need to declare a class that represents a single entry. Its class name will becomes the table name by default, and its field names and types will become the column names and types. Because each column can only hold one type, we’ll need one table for each type.
These classes would look something like this:
The column that will be used to reference or fetch values—and is thus required to be unique within that table—is specified by the [PrimaryKey] decorator.
Then, to create an empty table in the database, we can call the database connector’s CreateTable() method with the class we want to represent.
Those familiar with SQL may notice that these tables do not reference each other and thus this is not an ideal use case for SQL. But this is a minimal example for a method that would be more effectively used in larger games with more complex schemas for their data storage or persistence.
Now we can begin filling out our empty method declarations. Beginning with the easiest, Clear() is just a matter of telling each table in the database to remove all its entries. The query for this is DELETE * FROM TableName, where the * means all entries. Executing a query on the database is as simple as calling Execute() on the database connector with a string parameter of the desired query.
First we need to do some switching of which table we need to look for the value in:
Then, within each, we should look for that key within the corresponding table. To return only the value from any row that matches our variable name we specify Select ColumnName FROM TableName WHERE (conditions to match).
To make sure the compiler knows what T is at compile time, results must be cast to object and then back to T (thanks, C#!).
Next, before we can begin inserting values into tables, we first want to make sure a value doesn’t already exist for that key in another table. We can do this by creating a utility method that uses a lookup query to check if a value exists with that key in a specific table. This can take advantage of our TryGetValue() implementation:
...which can then also be used as the basis for our Contains() method, by checking them all:
This utility method then also comes in handy when defining the SetValue() methods, which would each look something like this:
In production, you should always validate and sanitise input before inserting it into SQL, in case our string value itself contains invalid syntax or partial SQL commands. Otherwise, you may leave yourself open to SQL injection attacks.
And lo! We should now have a fully functioning SQL-backed custom Variable Storage for Yarn Spinner. Simply replace the Variable Storage component on the DialogueRunner game object in your scene to put your custom implementation to work.
As far as Yarn Spinner is concerned, this should behave exactly as the provided InMemoryVariableStorage does at runtime, even though the entire storage model and behaviour has changed.
Using this simple method of overriding methods in the inbuilt VariableStorageBehaviour abstract class, you can make a custom Variable Storage backed by virtually anything to suit your needs!
Parsed as an integer using .
Parsed as an integer using .
Strings Table
The String Table Collection containing localised line text. See to learn how to populate it with your project's dialogue.
Assets Table
(Optional) The Asset Table Collection containing localised assets. If an Asset Table is provided, then the Unity Localised Line Provider will fetch localised assets for each line, based on the line's ID.
A Text Asset containing the translated lines for this Yarn Project's scripts. See for information on how to create these assets.
Dialogue View
The that will be signalled when the user performs the continue action.
Continue Action Type
A drop-down list that selects how user input will be used to continue to the next line.
When set to None, the dialogue will not continue based on user input.
When set to Key Code, the dialogue will continue when the user presses the keyboard key specified in Continue Action Key Code.
When set to Input System Action, the dialogue will continue when the user performs the Action set up in Continue Action.
When set to Input System Action from Asset, the dialogue will continue when the user performs the Action specified by the Continue Action Reference field.
Continue Action Key Code
The keyboard key that the user should press to continue to the next line.
Continue Action
An Input Action that the user should perform to continue to the next line.
Continue Action Reference
An Input Action, stored inside an Input Actions asset, that the user should perform to continue to the next line.
In addition to Yarn Spinner's own , your game can also use the Unity Localization package.
Before doing anything with Yarn Spinner, you will need to set up your Unity project to use the Unity Localization system. To install and set up Unity Localization, follow the instructions on the .
When a Yarn script is run, the receives line IDs from the Yarn Project, and must determine what localised content should be shown to the player, using a . In order for the Dialogue Runner to fetch localised data from the Unity string table, you use a .
First you will need to get a list of all the node names for which you want to preload the assets. Once you have this you can use the GetLineIDsForNodes method on the to get a list of the line IDs for every line and option in the nodes. Next you will need to disable the automatic asset clearing on the line provider, you do this by setting the AutomaticallyUnloadUnusedLineAssets boolean to be false. With this done you can now use the method to start the assets loading, and once that is finished your multiple nodes worth of assets have all been loaded.
Yarn Spinner installed in Unity:
Yarn Spinner set up in a text editor:
Open a new Unity 3D project. Ensure Yarn Spinner has been added to the project in the Package Manager as per the .
So it's time for the actual writing part. Here, I've opened my new Yarn Script in Visual Studio Code with the Yarn Spinner Extension installed as per the . I've written a simple script about a conversation between a blue sphere 🔵, a red cube 🟥 and the player who plays a shape of their choice. Depending on how the player responds to their greeting, the other shapes will either be pleased to meet them or decide they are rude.
You can find this example script below to copy. Or if you need a refresher on how to represent your own story in Yarn, refer to the .
Once any desired visual assets have been added to the scene and the story has received any necessary fleshing out, the game is complete. If you've used this example to add dialogue to your own scene, you may skip ahead to . Otherwise, let's proceed!
This tutorial isn't here to teach you all of Unity. If you need some guidance about aspects outside of Yarn Spinner, you can or there are lots of helpful guides around the web, on YouTube, or created by Unity themselves!
Use this Line Provider if you are using the system. If you are using the system, use the instead.
An Option View is an object that the uses when presenting options. When the delivers options to your game, Options List View will create an Option View for each option that could be selected.
For a complete tutorial on how to build an entirely custom variable storage system, see .
Dialogue Runner — a GameObject with a , an , and a script to allow the game to be quit attached to it.
The is a Component supplied by the Yarn Spinner for Unity Package.
The is a Component supplied by the Yarn Spinner for Unity Package.
Yarn Spinner doesn't do text rendering, you have to use existing Unity systems like TextMeshPro. Fortunately, TMP supports HTML-like rich text tags. See the .
However, this bespoke approach is impractical for longer scripts or bigger projects. We recommend using TextMeshPro's Style Sheets, which make it much easier to write consistently styled text. See the .
Yarn Spinner doesn't handle text rendering. You'll need a separate wavy text system, like .
Note that YS only processes the text data. You must still code the actual markup effect yourself. See .
Wrap the variable (or any expression) in curly braces ({, }) to evaluate and output it. For more info, see .
To read Yarn variables from C#, use . To write Yarn variables from C#, use .
To read and write C# variables from Yarn, you must first code in C#.
See the previous answers on working with variables. But we recommend avoiding any "sync" pattern, because then you'll have to track and maintain the same data in two different places. Programmers usually prefer a . Data should live in only one place. Variables should either live in Yarn or live in C#, and not in both.
To save the current node, save the value of somewhere, e.g. to Unity's . Then to restore it, call and pass in the saved node name.
To save variables, see . Then to load variables, call . These methods use Unity's built-in JSON utility to serialize a dictionary of variables to Unity's .
For custom save systems, create your own by subclassing VariableStorageBehaviour and implementing its methods. Study as an example. For more info, see .
To jump to a node from Yarn, use <<jump (nodeName)>>. See .
To jump to a node with C#, just call , even if there's already dialogue running.
Jumping to a specific line in a node is currently not supported. Instead, .
In most cases, use the .
For more control, call on a Dialogue View, or on a Line View. See .
Yarn Spinner automatically adds a #lastline tag to a line when the next step is a set of options. Create a that uses to check for "lastline" and perform the behavior you want.
To display anything in Yarn Spinner, use a component. for dialogue, for choices.
Most projects will need custom views. We recommend a modular architecture where each UI element has its own LineView component. For example, a nameplate bubble has a that displays , while the dialogue text window is another Line View that displays . See .
For a working example, see the "Visual Novel" sample. (In Unity, go to Window > Package Manager, and select Yarn Spinner package. Expand the "Samples" dropdown and select "Visual Novel" and import it.) Specifically, see which inherits from DialogueViewBase, and changes the character name window background color (among other effects) based on the character name.
Create a custom dialogue view with a custom effect based on Typewriter() (see ) to detect the next text character and pause accordingly.
The example tutorial can walk you through this step-by-step.
For a working example, see the "Space" sample. (In Unity, go to Window > Package Manager, and select Yarn Spinner package. Expand the "Samples" dropdown and select "Space" and import it.) Specifically, see for how to search for nearby NPCs from a list.
For a working example, see the "3D" sample. (In Unity, go to Window > Package Manager, and select Yarn Spinner package. Expand the "Samples" dropdown and select "3D" and import it.) Specfically, see which has a method WorldToAnchoredPosition() that does a lot of this UI positioning math.
To make a resizing dialogue bubble that automatically fits text, you will need a complex UI setup. Study the UI game objects and components in the sample scene. For more context about how it works, see .
Once you have the player input value, you can store it in a C# variable and access it through a Yarn function, or store that value in a Yarn story variable. .
The intended workflow is to generate and compile Yarn Projects at editor time, not runtime. See .
Compiling a Yarn script at run-time is more complex than it first appears, because it often interacts with the very specific needs of your game, and we can't provide a one-size-fits-all approach to it. If you want to implement run-time loading in your own game, the place to start looking is the API documentation for the namespace. Please note that this is not something that we encourage people who are new to Yarn Spinner to do!
Localization. 1 Yarn Project = 1 CSV spreadsheet per language. When translating, it is usually easier to work with fewer files, rather than fragmenting the translation across many files. As a workaround for games that need multiple Yarn Projects, you may prefer to create a single editor-only Yarn Project that's just for generating string files and translations. See .
Some devs use YS to manage all in-game localized text, like UI strings. This use isn't intended, but it's possible. Manually create a Yarn.Line struct, set the line ID (see ), and then pass the struct into .
Please visit the for more information. Thanks for thinking of us!
downloaded and unzipped
Open a new Unity 3D project. Ensure Yarn Spinner has been added to the project in the Package Manager as per the .
The next step is to import the Dialogue System and hook up a Yarn Project and Yarn Script. If you have completed or before, you may skip ahead to . Otherwise, let's proceed!
So it's time for the actual writing part. Here, I've opened my new Yarn Script in Visual Studio Code with the Yarn Spinner Extension installed as per the . I've written a minimal script that follows the planned story, as a skeleton that can be expanded on later.
You can find this example script below to copy. Or if you want to make you own version and need a refresher on how to represent it in Yarn, refer to the .
downloaded and unzipped
Open a new Unity 3D project. Ensure Yarn Spinner has been added to the project in the Package Manager as per the .
The next step is to import the Dialogue System and hook up a Yarn Project and Yarn Script. If you have completed before, you may skip ahead to . Otherwise, let's proceed!
So it's time for the actual writing part. Here, I've opened my new Yarn Script in Visual Studio Code with the Yarn Spinner Extension installed as per the . I've written a minimal script that follows the planned story, as a skeleton that can be expanded on later.
You can find this example script below to copy. Or if you want to make you own version and need a refresher on how to represent it in Yarn, refer to the .
This page describes advanced usage of Yarn Spinner. Unless you really need total control over how Yarn Spinner works in your Unity project, we recommend using the built-in class rather than creating your own.
By the end of this guide we are going to have recreated the same scene and code as can be found in the .
This guide is not for beginners: You should be very comfortable with Yarn Spinner and Unity before using this!
The strings table is a that holds all the text of the Yarn, the actual written dialogue. This isn't strictly necessary and could be stored in other parts of the output of the compilation but by having it separate it allows for easier localisation and proofing. The metadata table is similar, it is also a that holds all the metadata or hashtags each line of dialogue has. This metadata is used for a variety of reasons and changes on a game-by-game basis, as with the strings table this could be embedded in other elements but by having it standalone just simplifies certain elements. The binary program is a compiled representation of the Yarn as a series of as simulated on a stack machine. The binary program is the actual thing that Yarn Spinner will use to move through your dialogue, jump between nodes, create flow control, everything. Once the program has been compiled Yarn Spinner doesn't even look at the Yarn files.
These three pieces each have their own parts in what gets delivered to your game. The strings and metadata tables are used by the to create the your views use, and the compiled program is used by the Dialogue class and the Dialogue Runner, in conjunction with the variable storage, to determine the story flow.
What this means is if we are making our own runner we can still use some of the existing pieces, especially the line providers, the variable storage, and the compiler itself. Now while you could make your own interface into this compiled output from scratch, unless you are porting Yarn Spinner over to an entirely different technology stack you'd be better off using the interface into it that the existing runner uses, the . So that is what we will be doing in this guide.
Next step is to work out how to let the rest of the game know when important events have happened. While there are lots of ways we could do this, we will do this through the system. We are going with Unity Events because they are super easy to create, you hook them up via the editor (which is nice), and their limitations won't bother us for this sample. We'll need six different events with various parameters so let's make them now:
; if you see this, you saw us doing stuff behind the scenes!
Like other parts of the Unity API for Yarn Spinner, Variable Storage is made possible with the use of abstract classes. work a little bit like interfaces or protocols in other languages, in that they define a class that cannot be instantiated but can be used to make others. In this way, an abstract class is like a set of constraints for some hypothetical subclass you will define later: it can declare certain methods which your subclass must implement for it to work, and it can contain implementations or values of its own which act as defaults that you may or may not choose to override.
In this example, let’s replace the default Variable Storage implementation with one that stores values in a SQL database. The example code shown makes use of the library—an open source .Net API for SQL—for the creation of a database and tables, but uses vanilla SQL query strings in place of the convenience bindings which are specific to that library.
Now to the fiddliest method, TryGetValue() is the method that needs to figure out whether a value exists for the given key and, if so, return it as the correct type. This requires a little bit of .
Check out the or ask the community in the !
You can download the full implementation of the script made in this guide . Or you may also like to read through the default implementation of InMemoryVariableStorage .
Main Camera
0
1
-10
Sphere
-1
1
-7.5
Cube
1
1
-7
Plane
0
0.5
0
Text Language Code
The language that the Text Line Provider should use to fetch localised text for.
Text
A TextMeshPro text object that will display the text of the line.
Show Character Name
If this is turned on, the Text component will show any character name present in the option. If this is turned off, the character name will not be included.
ab12c
Oh hi there
34de5
Hey
TryGetValue(string variableName, out T result)
Look to see if variableName exists and can be cast to the given type and, if so, return its value.
SetValue(string variableName, string stringValue)
Store the value stringValue and somehow attribute it with the key variableName.
SetValue(string variableName, float floatValue)
Store the value floatValue and somehow attribute it with the key variableName.
SetValue(string variableName, bool boolValue)
Store the value boolValue and somehow attribute it with the key variableName.
Clear()
Remove, release or otherwise un-attribute all previously set variable names, such that calling TryGetValue() without first calling SetValue() with the same key would now fail.
Contains(string variableName)
Return whether a particular variableName exists as a key in the storage at this moment.
VariableStorageBehaviour.TryGetValue<T>()VariableStorageBehaviour.SetValue()DialogueRunner.CurrentNodeNameDialogueRunner.StartDialogue()DialogueRunner.SaveStateToPersistentStorage()DialogueRunner.LoadStateFromPersistentStorage()DialogueRunner.StartDialogue()UserRequestedViewAdvancement()OnContinuedClicked()YarnProject.lineMetadata.GetMetadata()LocalizedLine.CharacterNameLocalizedLine.TextWithoutCharacterName